Velocity tells you how fast a part moves; acceleration tells you how hard its motion is changing, and that is what creates force. A piston at 6000 rpm reverses direction a hundred times a second, and the force to turn its motion around comes straight from the engine structure, which is why a poorly balanced engine shakes itself apart. Acceleration analysis is one more differentiation of the loop you already have, and then Newton’s second law turns those accelerations into the inertia forces that size bearings and the shaking forces that engineers spend so much effort balancing. In this lesson you build acceleration polygons and convert them into dynamic forces. #AccelerationAnalysis #InertiaForces #EngineBalancing
Learning Objectives
By the end of this lesson, you will be able to:
Differentiate the velocity loop to find accelerations, splitting each into normal and tangential parts
Construct acceleration polygons for the slider-crank and four-bar
Convert accelerations into inertia and shaking forces with d’Alembert’s principle
Predict the primary and secondary shaking forces that drive engine balancing, and verify each result in a simulator
Real-World System Problem: The Forces That Shake an Engine
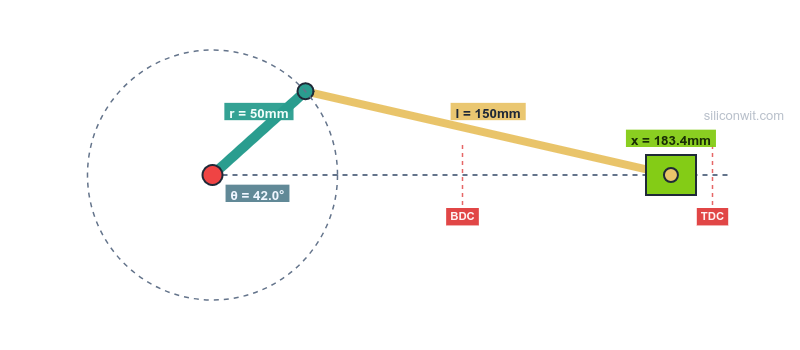
An engine, compressor, or pump runs steadily, yet its piston never moves at a steady speed. It accelerates hardest at the top of the stroke, where it reverses, and the force to reverse it is large: at high speed the inertia force on a piston can exceed the gas pressure force. That force is reacted through the connecting rod, the crank, the bearings, and finally the engine mounts, where it appears as vibration. Designers must predict these accelerations to size the bearings, choose the connecting-rod ratio, and add the counterweights and balance shafts that keep the machine smooth.
The Acceleration Problem
Engineering Question: Given the input speed, what is the acceleration of every part, and what inertia forces do those accelerations create?
For the slider-crank the headline result is the piston acceleration and the shaking force it produces. For the four-bar it is the angular accelerations of the coupler and follower, which set the inertia torques. For the scissor lift it is the platform acceleration that the actuator must overcome.
Why Acceleration Analysis Matters
Inertia forces
Every acceleration demands a force, . At speed these inertia forces dominate the loads on pins and bearings.
Vibration and balancing
Unbalanced inertia forces shake the machine. Predicting them is the first step to counterweights and balance shafts.
Smoothness and jerk
The rate of change of acceleration (jerk) governs how harsh a motion feels and how much a structure rings.
Actuator sizing
An actuator must supply both the static load and the inertia load. The acceleration sets the dynamic part.
Fundamental Theory: Acceleration by Differentiating the Loop
One More Derivative
Acceleration analysis differentiates the velocity loop exactly as velocity analysis differentiated the position loop. Each link’s acceleration splits into two parts:
Normal and Tangential Components
A point on a link rotating at angular velocity and angular acceleration , a distance from the pivot, has acceleration with two parts:
The normal (centripetal) part exists whenever the link rotates, even at constant speed. The tangential part exists only when the link speeds up or slows down. Their vector sum is the link’s acceleration.
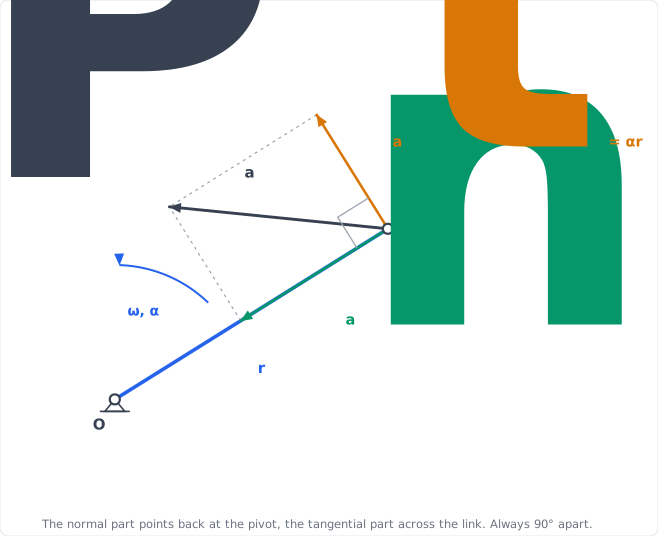
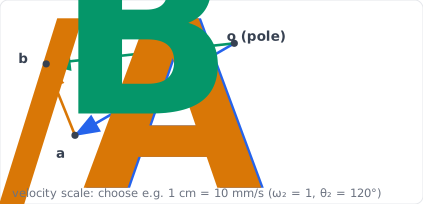
The two parts are easiest to keep straight by where they point rather than by their formulas. The normal part always aims back down the link at the pivot; the tangential part always lies across it. Whatever the mechanism, those two directions are at right angles, so the resultant is the diagonal of a rectangle:
The figure shows both parts because the link drawn is both turning and speeding up. That is the general case, not a rule: the two conditions are independent, so a part of a mechanism may carry both, one, or neither.
One misreading is worth heading off before the applications. When a problem says constant crank speed, that sets for the crank and for nothing else. The coupler and follower are dragged through a changing geometry, so their own angular speeds rise and fall through the cycle and their tangential parts are very much alive. In the slider-crank at , with the crank held at a rigidly constant speed, the rod’s tangential part is nearly ten times its normal part.
Part of the mechanism
Turning?
Its own constant?
Crank, driven at constant speed
yes
yes, by assumption
yes
no
Coupler, rod or follower
yes
no, it is dragged
yes
yes
Piston or slider
no, it translates
not applicable
no
no
The piston row is the one people forget: a part that only slides has no and no , so it has neither component. Its acceleration is a single vector along the slide, which is why the polygon closes on a plain horizontal line.
Nor is either part permanent for a link that does turn. The rod’s normal part vanishes at and , where passes through zero and the rod is momentarily translating rather than turning; its tangential part vanishes at top and bottom dead centre, where is at a maximum and so is instantaneously not changing. The two never vanish at the same instant, which is why the polygon never collapses.
The Relative-Acceleration Equation
For two points on the same rigid link,
where points from to , and is perpendicular to . This is the equation the acceleration polygon draws.
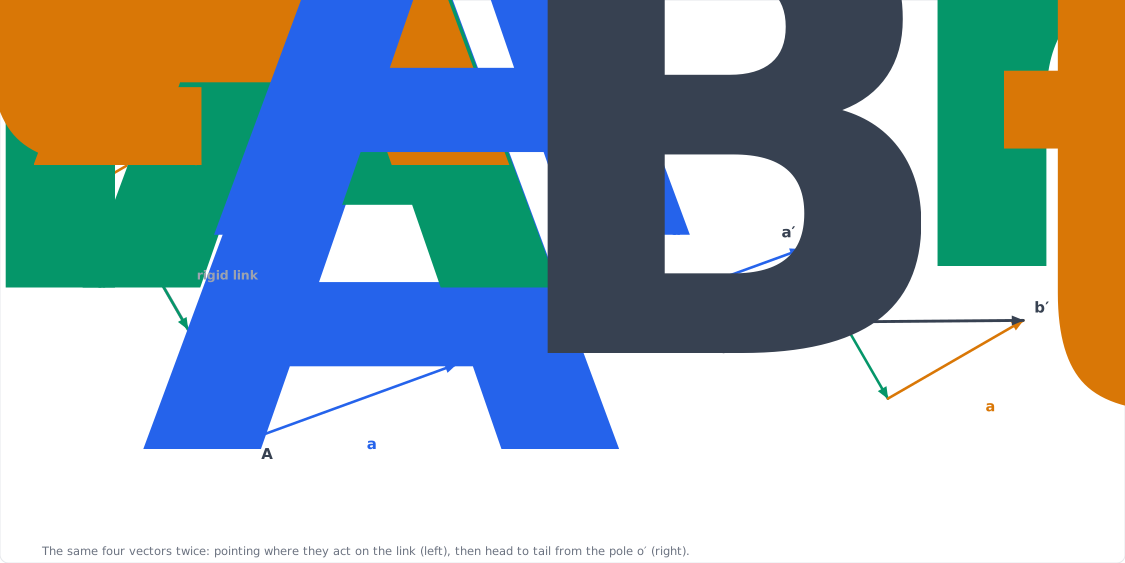
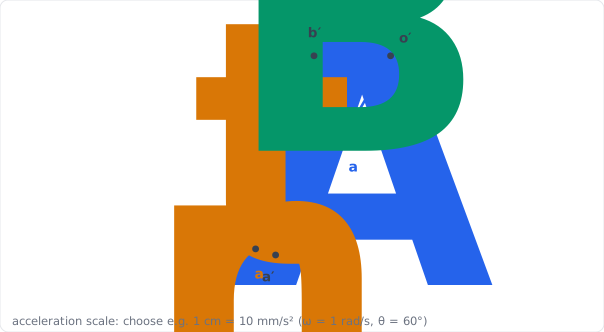
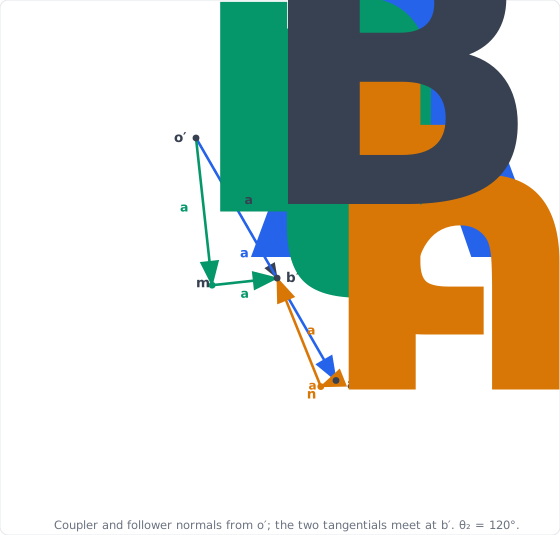
That last sentence is the one worth dwelling on, because the equation and the drawing look like separate objects and are not. Each term on the right is one vector; laying those same vectors head to tail from a pole is the polygon, and the side that closes it back to the pole is . The figure below draws both from one set of numbers, so you can read across:
Read the right-hand panel term by term against the equation: from the pole , then head to tail from there, then , arriving at . The line you have not drawn is , and it is the answer. Every acceleration polygon in this lesson is that same figure with one or two magnitudes unknown.
The Acceleration Polygon
Acceleration uses the same methods in the same draw, solve, simulate rhythm as position and velocity: the graphical acceleration polygon and the analytical acceleration loop are the two core routes, and the simulator confirms them. (There is no instantaneous-center shortcut for acceleration; that helper is velocity-only.)
The acceleration polygon is built with the drawing set exactly like the velocity polygon, on the same page and to a chosen acceleration scale (e.g. 1 cm = 10 mm/s²), but each relative-acceleration vector now has up to two parts laid down in sequence: first the normal part (known from the velocity analysis, since , directed along the link toward the centre it turns about), then the tangential part (unknown magnitude, but known direction, perpendicular to the link). Which of the two are present follows the table above, so a constant-speed crank contributes only a normal part while the links it drives contribute both. Where the tangential construction lines cross closes the polygon, and you measure the unknown tangential accelerations and the output acceleration off it.
Where the Factor of 2 Comes From
Almost everyone memorises the and then cannot decide, in an unfamiliar mechanism, whether the term applies at all. It is worth six lines to see it appear, because once you have watched it arise you can always reconstruct it.
Let a point sit at distance along a link that is turning at . Put along the link and perpendicular to it. Because these directions rotate with the link:
The position is . Differentiate once, using the product rule:
Differentiate again, applying the product rule to both of those terms:
Collecting gives the four-term acceleration of a point that both slides and turns:
Situation
Coriolis present?
Piston sliding on a fixed cylinder (slider-crank)
No: the frame does not rotate
Pin joint between two rotating links (four-bar)
No: nothing slides
Scissor lift, toggle clamp
No
Block sliding in a rotating slot (quick-return shaper)
Yes
Pin sliding in a moving slot (Geneva mechanism)
Yes
From Acceleration to Force: d’Alembert
Inertia Force and d'Alembert's Principle
Newton’s second law says . d’Alembert rewrites this as a statics problem by adding an inertia force (and an inertia torque ) to each link, so that the link is treated as if in equilibrium:
The inertia force acts opposite to the acceleration, through the centre of mass. Once the accelerations are known, the dynamic bearing loads follow from a static force balance with these inertia forces included (the force analysis carries this through to the joint reactions).
Application 1: Piston Acceleration of the Slider-Crank
This is the central worked example. We build the acceleration polygon on top of the velocity polygon, then confirm with the closed-form acceleration and the simulator.
Step 1: Redraw the Space Diagram and the Velocity Polygon
An acceleration polygon cannot be started from a blank page. Its normal components are , so every one of them needs an angular velocity that only the velocity polygon can give, and the velocity polygon in turn needs the link directions that only the space diagram can give. The three drawings are one chain, and this is the instant where it pays to have all three side by side on the same sheet.
Click to reveal the two drawings the acceleration polygon is built on
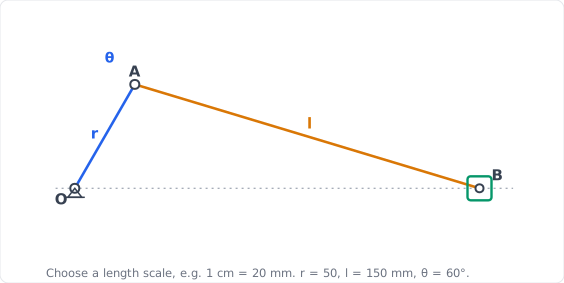
Space diagram. Choose and mark a length scale, say 1 cm = 20 mm. Draw the crank mm at , then strike an arc of mm from to cut the centre-line at the piston . Measure the rod angle: below the centre-line. ✅
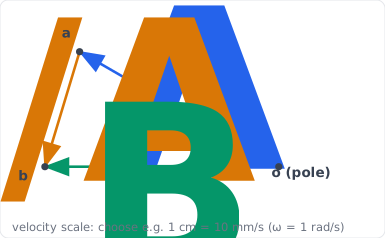
Velocity polygon. On a chosen velocity scale, say 1 cm = 10 mm/s, draw mm/s perpendicular to the crank. From draw the direction perpendicular to the rod, and through the horizontal the piston must move along. They meet at . ✅
Take the one number the next drawing needs. Measuring the polygon gives mm/s and mm/s. That last one is the whole reason for this step, because it fixes the rod’s angular velocity: ✅
The rod turns slowly compared with the crank, which is why its normal acceleration will come out small in Step 2. ✅
Step 2: Build the Acceleration Polygon
Construct it beside the velocity polygon from Step 1, at the same instant , on a chosen acceleration scale (say 1 cm = 10 mm/s²).
Click to reveal the acceleration-polygon construction
Crank-pin acceleration. With the crank at constant speed, the crank pin has only a normal (centripetal) acceleration mm/s², directed from toward the centre . From the pole draw . ✅
Normal part of the rod. This is where Step 1 is spent. The rod’s relative-acceleration normal part is , directed from toward , and came off the velocity polygon: ✅
Add it from . At about a tenth of it is nearly invisible on the drawing, because the rod turns slowly. Small is not the same as ignorable: it is what tips the polygon off the crank line. ✅
Tangential part and closure. From the end of the normal part, draw the tangential direction (perpendicular to the rod). Its magnitude is unknown, so this is a construction line, not a measured length. The piston acceleration is horizontal (the piston slides), so draw the horizontal through . Their intersection is , and it fixes both unknowns at once. ✅
Measure. is the piston acceleration, reading about mm/s² toward the crank, or in magnitude. Step 3 gets the same number from the formula. ✅
Step 3: Confirm by Differentiation
Click to reveal the closed-form piston acceleration
Start from the exact piston position. Project the loop onto the centre-line. The crank contributes and the rod contributes the remaining horizontal reach: ✅
Make the square root differentiable by hand. Since is small, , keeping the first two terms of the binomial expansion. Then use , which is what makes the second harmonic appear: ✅
Differentiate twice with respect to , then multiply by . Because is constant, , so no extra terms appear: ✅
✅
The first term is the primary acceleration (once per revolution); the second is the secondary (twice per revolution), and it exists only because the rod has finite length. Let and it vanishes.
Tabulate for : ✅
Crank
0° (TDC)
-1.333 (peak)
30°
-1.033
60°
-0.333
90°
+0.333
120°
+0.667
180° (BDC)
+0.667
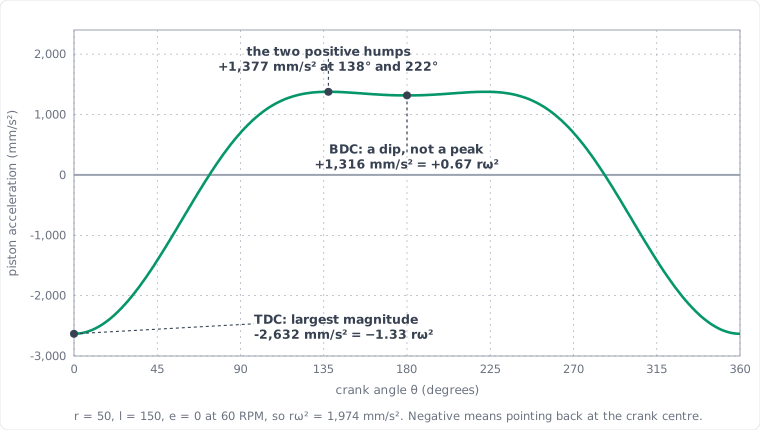
Read the peaks. The largest acceleration is at top-dead-centre, , and at bottom-dead-centre it is . The two ends differ because the secondary term adds at TDC and subtracts at BDC. At , , matching the polygon. ✅
Step 4: Verify in the Simulator
Everything above is in units of , because that keeps the result true for any speed. The simulator plots raw mm/s². Converting between the two is one multiplication, and doing it once makes the whole chart readable.
Click to reveal the simulator check
Set it up and fix a speed. Open the simulator (siwit.co/CSM) and set , , and RPM. A speed must be chosen before any absolute number exists: ✅
That single number converts every result in this Application into what the chart shows. ✅
Predict before you look. Multiply the values already found by : ✅
Where
This lesson
The chart should read
TDC ()
mm/s²
BDC ()
mm/s²
mm/s²
Mind what the readouts are called. This is where most people go wrong. The panel reports Maximum Acceleration and Minimum Acceleration, and because the top-dead-centre value is negative, the biggest acceleration in the machine appears under Minimum: ✅
Peak-to-Peak then reads about mm/s², the distance between them. ✅
Read the sign as a direction. Negative means the acceleration points back toward the crank centre. At top-dead-centre the piston is being hauled to a stop and reversed, which is why the number is both negative and the largest. ✅
Find the twin humps. The positive side has two peaks with a shallow dip between them at bottom-dead-centre, not a single peak. Differentiating the two-harmonic result gives , so besides the dead centres there are turning points at , that is and . This is the feature students most often mistake for an error in the simulator. ✅
The chart you should be looking at, with the same three landmarks named:
Lengthen the rod. Increasing shrinks the secondary term, bringing the two peaks closer together and smoothing the motion. Watch Peak-to-Peak fall as you do it. ✅
Application 2: Angular Accelerations of the Four-Bar
For the four-bar we differentiate the velocity loop once more and build the acceleration polygon to find the coupler and follower angular accelerations.
Step 1: Redraw the Space Diagram and the Velocity Polygon
The four-bar needs this step more than the slider-crank did, because here two angular velocities feed the acceleration polygon rather than one, and they enter squared.
Click to reveal the two drawings the acceleration polygon is built on
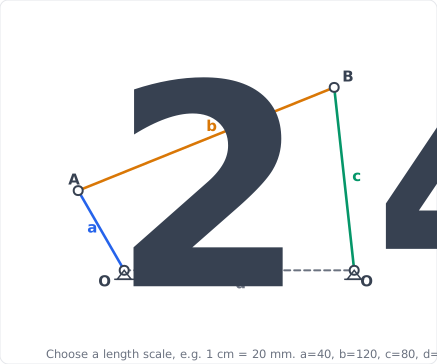
Space diagram. Choose and mark a length scale, say 1 cm = 20 mm. Draw the ground mm, the crank mm at , then intersect an arc of mm from with an arc of mm from . The upper intersection is . Measure and . ✅
Velocity polygon. Draw mm/s perpendicular to the crank. From draw perpendicular to the coupler, from draw perpendicular to the follower, and mark where they cross. ✅
Take the two numbers the next drawing needs. Measuring gives mm/s and mm/s, so ✅
Note how different these are. Squared, they make the follower’s normal component nearly ten times the coupler’s, which is what gives the acceleration polygon its lopsided shape. ✅
Step 2: Build the Acceleration Polygon
Click to reveal the acceleration-polygon construction
Crank pin. At constant crank speed, mm/s² directed from to . Draw . ✅
Coupler normal. Add mm/s² from , directed to . ✅
Follower normal. From the pole, the follower contributes mm/s², directed to . ✅
Tangentials close it. Two unknown magnitudes remain, and two construction lines supply them: the direction perpendicular to the coupler drawn from the end of the coupler normal, and the direction perpendicular to the follower drawn from the end of the follower normal. They intersect at . ✅
Measure and convert. The two tangential lengths read and mm/s². Divide each by its link length to get an angular acceleration: ✅
The drawing gives magnitudes; the sense comes from which way each tangential vector points on it. Here the follower’s points opposite to , so is negative, which Step 3 confirms and the callout there explains. ✅
Step 3: Confirm by the Acceleration Loop
Click to reveal the closed-form angular accelerations
Start from the loop you already closed. In complex form the four-bar loop is one line, and every equation below is a derivative of it: ✅
Differentiate once for velocity. Each depends on time, so the chain rule brings down : ✅
Differentiate again for acceleration, applying the product rule to each term. Every term produces two: one from differentiating (giving ) and one from differentiating again (giving , since ). With the crank keeps only its term: ✅
Those six terms are exactly the six vectors in the polygon of Step 2. The terms are the normals you could draw straight away; the terms are the tangentials you had to close the figure to find.
Split into real and imaginary parts using , and collect the two unknowns on the left. Note that multiplying by swaps sine and cosine, which is why the terms carry the opposite trig function to the terms: ✅
Everything on the right is already known, so this is just two linear equations in two unknowns: the same solve as the velocity analysis, with a different right-hand side. ✅
Solve at ( rad/s), substituting , , , :
✅
These match the and mm/s² measured off the polygon, divided by and . Drawing and algebra agree, which is the point of doing both. ✅
So the follower is decelerating at this instant even though it is still driving the output forward, which the simulator’s angular-acceleration trace confirms.
Step 4: Verify in the Simulator
Click to reveal the simulator check
Set it up and fix a speed. Open the simulator (siwit.co/FBL), set , , , , the assembly to open, and RPM, so rad/s and . Everything solved above was per unit crank speed, and these two factors convert it to what the simulator reports. The assembly setting matters as much as the link lengths: the crossed circuit is a different linkage with different angles and a different , so check it before comparing anything. ✅
Check the velocities on screen first. The and charts are tabs in the simulator. At they should read about ✅
Divide each by and you recover the and of Step 1. ✅
Open the angular-acceleration tabs. Alongside , , and the simulator plots and against crank angle. Select the tab, then . (The same values are in the downloadable CSV as Alpha3 (rad/s2) and Alpha4 (rad/s2) if you would rather read exact numbers than measure off a curve.) ✅
Read the value at 120 degrees. Expect ✅
Divide by to get and rad/s², matching the loop solution exactly. The signs survive the conversion, so the follower is still decelerating while turning forward. ✅
Angular acceleration scales with the square of crank speed, so doubling the RPM quadruples every one of these numbers while leaving the per-unit values untouched. That is why the working above is done per unit crank speed. ✅
Application 3: Platform Acceleration of the Scissor Lift
The scissor lift shows that a constant actuator rate does not give a constant platform motion: a centripetal-type term appears from the geometry.
Read the two terms. The first, , is the tangential part, present only when the scissor angle is speeding up. The second, , is a centripetal-type term present even at a constant angular rate (), and it always acts downward. So a lift raised at a steady angular rate still decelerates as it nears full height. ✅
Actuator consequence. The actuator must supply the platform weight plus the inertia force . Near the flat position, where the mechanical advantage is poor (force analysis), this dynamic term adds appreciably to the actuator load. ✅
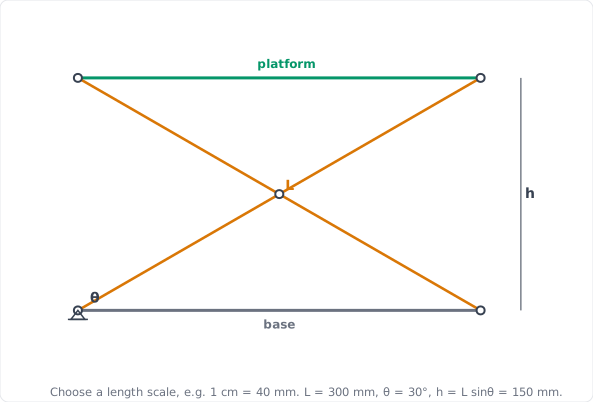
The scissor closes on the single scalar relation , so its acceleration is that one line differentiated twice rather than a polygon: the scaled space diagram below is the geometric reference the two derivatives rest on.
Step 2: Verify in the Simulator
Click to reveal the simulator check
Open the simulator (siwit.co/SLM) and run it at a fixed actuator speed. ✅
Confirm that the platform acceleration is non-zero even where the angular rate is steady, and that the power trace rises where acceleration and velocity are both large. ✅
Application 4: Inertia and Shaking Forces
Acceleration becomes force through . For the slider-crank this produces the shaking force that engine balancing is designed to cancel.
Hands-on lab: Continue in the Crank-Slider Experiments lab (siwit.co/CSM). Experiment 6 (force analysis and motor sizing) builds on the inertia forces below.
Step 1: From Acceleration to Shaking Force
Click to reveal the shaking-force harmonics
Apply d’Alembert to the reciprocating mass, using the piston acceleration from Application 1. The force the rod must apply to the piston to accelerate it is ; the shaking force is the equal and opposite reaction the piston applies back to the engine, which is the inertia force : ✅
The minus sign is not bookkeeping. At top-dead-centre is at its most negative, so is at its positive peak: the piston is being hauled downward hardest exactly when it yanks the engine upward hardest. That is the force felt at the mounts. ✅
Split into harmonics:
✅
Balancing. The primary force can be largely cancelled by a counterweight on the crank. The secondary force runs at twice engine speed and cannot be cancelled by a simple counterweight; it is why inline-four engines use balance shafts spinning at twice crank speed. The secondary is smaller by the factor , so a longer rod also reduces it. ✅
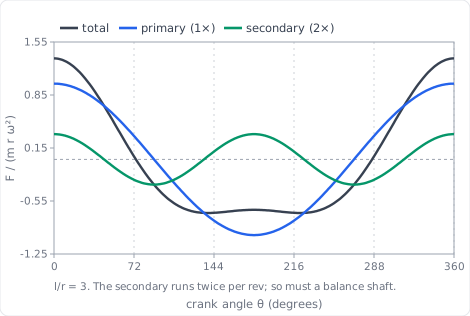
Plotted over one revolution, the balancing argument becomes obvious. The blue primary curve rises and falls once, so anything turning with the crank can be arranged to oppose it. The green secondary curve completes two full cycles in the same revolution, so no counterweight on the crank can follow it, and only a shaft geared to twice crank speed can:
The asymmetry of the black total curve is the same one Application 1 found in the acceleration: it reaches at top-dead-centre ( and ) but only at bottom-dead-centre (), because the secondary adds at one end and subtracts at the other.
Step 2: Verify in the Simulator
Click to reveal the simulator check
Open the simulator (siwit.co/CSM) and read the force and crank-torque charts. ✅
Confirm that the force trace peaks at top-dead-centre (where acceleration peaks) and that its shape is the primary cosine plus a smaller twice-frequency ripple. ✅
Application 5: Coriolis Acceleration of the Quick-Return Shaper
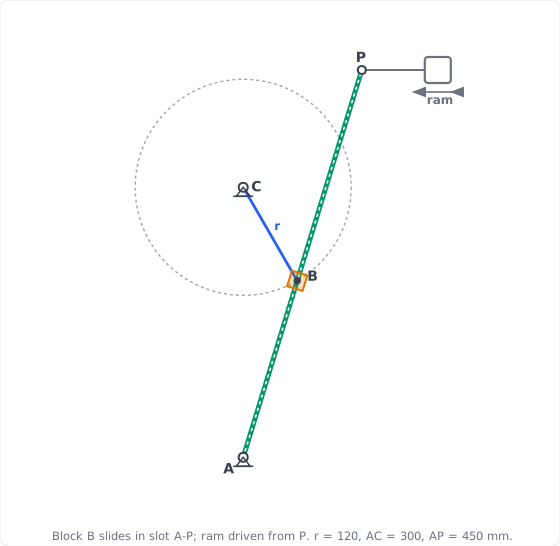
The shaper of the velocity analysis is the one mechanism in this course whose acceleration is wrong if you use only normal and tangential parts. Its crank pin is a block sliding inside a turning slot, and that joint adds the Coriolis component defined in the theory above. This application is where that term earns its place.
Hands-on lab: This inversion has no simulator of its own; the drawing and the calculation confirm each other. The related pin-in-slot Coriolis effect also drives the Geneva indexing motion noted below.
Step 1: Redraw the Space Diagram and the Velocity Polygon
Here the earlier drawings are not merely convenient, they are indispensable: the Coriolis term is , and both of those numbers come off the velocity polygon. There is no way to write down this acceleration without having drawn the velocity first.
Click to reveal the two drawings the acceleration polygon is built on
Space diagram. Choose and mark a length scale, say 1 cm = 40 mm. Set out the fixed centres and with mm, draw the crank mm to the given angle, and run the lever from through the block out to the driving point at mm. Measure mm. ✅
Velocity polygon. Draw mm/s perpendicular to the crank. Through draw the direction perpendicular to the lever (where , the coincident point on the lever, must lie); through draw the direction parallel to the slot (where the block slides). They cross at . ✅
Take the two numbers the Coriolis term needs. Measuring gives mm/s and mm/s, so rad/s. ✅
A useful check before going on: those two are perpendicular (one across the lever, one along it), so they must satisfy mm/s, the crank-pin speed. They do, to the last digit. If your polygon fails this, the error is in the drawing, not in what follows. ✅
Step 2: Build the Acceleration Polygon with the Coriolis Term
The block’s acceleration on the crank splits, on the lever side, into four parts laid head to tail from the pole : the lever point’s normal and tangential parts, the Coriolis part, and the slip part. Together they must close on the crank-pin acceleration.
Click to reveal the acceleration-polygon construction
Crank-pin acceleration (the target). With constant crank speed the block on the crank has only a normal acceleration mm/s², directed from toward . The construction must reproduce this vector. ✅
Normal part of the lever point. mm/s², directed from toward the fulcrum . Lay it from . ✅
Coriolis part. mm/s², directed perpendicular to the slot (the slip velocity turned in the sense of ). This is the part a plain slider-crank never has. ✅
Close with the two unknown directions. The lever’s tangential part is perpendicular to the lever (unknown magnitude); the slip acceleration is parallel to the slot (unknown magnitude). Drawing those two directions to close the polygon onto fixes both. Measuring gives the tangential part mm/s² and the slip acceleration mm/s². ✅
Lever angular acceleration. rad/s². ✅
Step 3: Ram Acceleration and Analytical Check
Click to reveal the ram acceleration and confirmation
Ram-drive acceleration. The driving point on the lever has a normal part (toward ) and a tangential part (perpendicular to the lever):
✅
The Coriolis term is not optional. At mm/s² it is a large share of the closing polygon; drop it and the tangential part, and hence and the ram acceleration, come out wrong. Any mechanism with a block sliding in a moving slot (this shaper, a Whitworth drive, a Geneva index) must carry it. ✅
Analytical confirmation. Writing the loop and differentiating twice, with the block distance as a changing length, produces the same four terms: the second derivative of is the slip acceleration, and the cross term is exactly the Coriolis part. The numbers match the polygon. ✅
A Note on Intermittent-Motion Mechanisms
Design Guidelines for Acceleration and Dynamic Forces
Differentiate, don't restart
The acceleration loop is the differentiated velocity loop. Reuse the positions and velocities; only the tangential accelerations are new unknowns.
Size for the peak
Inertia loads peak where acceleration peaks (top-dead-centre for the slider-crank). Size pins, rods, and bearings for that worst case.
Mind the second harmonic
The secondary term scales with and runs at twice speed. A longer connecting rod or a balance shaft tames it.
Constant rate is not constant motion
Centripetal and normal terms create acceleration even at steady input speed. Never assume a smoothly driven machine is inertia-free.
Summary and Next Steps
Key Concepts Mastered
Acceleration loop: one more derivative of the velocity loop, with normal () and tangential () components.
Acceleration polygon: the normal parts are known from the velocity analysis; the tangential parts close the polygon.
Piston acceleration:, peaking at top-dead-centre at .
Inertia and shaking forces: turns accelerations into the loads that vibrate machines, split into a primary and a balance-shaft-requiring secondary harmonic.
Every acceleration here was drawn as a polygon, confirmed by hand calculation, and reproduced with a few lines of Python (NumPy). The simulators confirm the same profiles. No specialised dynamics software is needed; the method is one derivative beyond velocity.
Next, Cam-Follower Systems and Motion Programming inverts the problem: instead of analysing a given linkage, you specify the motion you want (its displacement, velocity, acceleration, and jerk) and design the cam surface that produces it.





Comments