A slider-crank mechanism converts rotation to reciprocating motion, but the output is only approximately sinusoidal, and the approximation worsens at higher crank-to-rod ratios. When you need pure harmonic motion for vibration testing, shaker tables, or precision pumps, even small deviations introduce unwanted harmonics that corrupt measurements or reduce efficiency. The Scotch yoke produces mathematically perfect sinusoidal output because the slider tracks a pin moving in a circular path through a straight slot. In this lesson you will design a Scotch yoke in FreeCAD with slot-driven kinematics and clearance management. #FreeCAD #ScotchYoke #SinusoidalMotion #HarmonicMotion
Learning Objectives
By the end of this lesson, you will be able to:
Design slot-driven mechanisms with sliding contacts
Implement clearance-aware parametric geometry
Create pure sinusoidal motion systems
Model both rotational and linear sliding motion
Analyze simple harmonic motion through CAD verification
Engineering Context: Why This Mechanism Matters
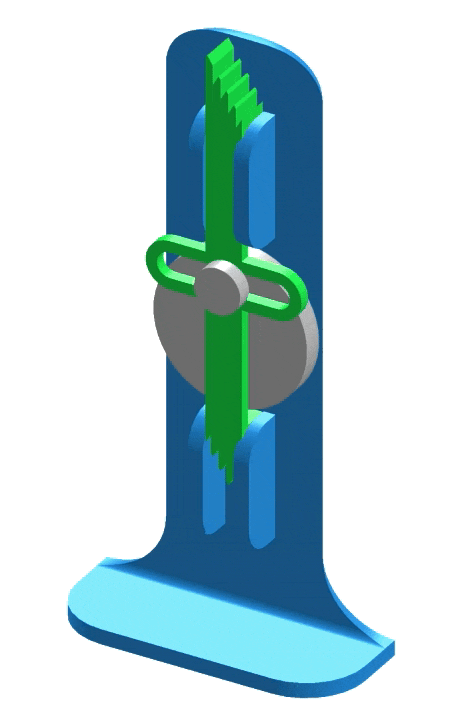
The Scotch yoke mechanism converts rotary motion to linear motion with perfect sinusoidal characteristics. Unlike the slider-crank mechanism, which produces approximate sinusoidal motion, the Scotch yoke creates mathematically pure sinusoidal displacement, velocity, and acceleration through its elegant slot-driven design.
Real-World Applications
The Scotch yoke delivers pure sinusoidal motion where precision matters:
The Engineering Problem
Design Challenge: Given constant rotational input, create linear reciprocating output with mathematically perfect sinusoidal characteristics in a compact package.
Slot-driven mechanisms require careful attention to clearances and dimensional relationships. Our parametric approach will automatically calculate slot dimensions from crank radius and clearance specifications, ensuring smooth operation at any stroke length.
Our Design Approach
🎯 Intelligent Parameter Control
We’ll control the Scotch yoke with:
Primary Parameters:
CrankRadius = 40 mm (determines stroke)
PinDiameter = 12 mm
Calculated Parameters:
Stroke = CrankRadius × 2 (automatic)
SlotWidth = PinDiameter + 2 mm clearance (automatic)
This plane is perpendicular to the yoke’s direction of travel
Draw rail profile
Rectangle tool
Width: 15mm (rail width)
Height: 25mm (rail height)
Position to left side, appropriate to yoke edge
Position the rail
You want it positioned so the yoke will slide against it.
Typical approach:
Distance from center: About YokeWidth/2 + small gap
Or position against yoke side surface
Close sketch
Pad along Y-axis
Click Pad
Type: Dimension
Length: Click ƒx → Spreadsheet.GuideLength
Direction: Ensure it extrudes along Y (yoke travel direction)
Click OK
Left guide rail created spanning 200mm!
You can either:
Option A: Mirror the left rail (if FreeCAD supports it in your workflow)
Option B: Create manually (recommended for learning):
Create Body
Create Body → Rename to GuideRail_Right
Create Sketch on XZ_Plane
Draw rail profile
Rectangle: 15mm × 25mm
Position to right side (mirror position of left rail)
Close sketch
Pad
Length: Click ƒx → Spreadsheet.GuideLength
Click OK
Both guide rails complete!
Alternative approach: Sketch rails on the same plane as simple rectangles at appropriate X-positions, then pad both in same body. This ensures perfect parallelism.
Part 7: Creating the Base Frame
Design Intent
📐 Frame Requirements
Fixed mounting base with:
Crank shaft bearing mount at center
Guide rail mounting surfaces
Stable platform for entire mechanism
Step-by-Step: Frame
Create Body
Create Body → Rename to Frame
Create Sketch on XY_Plane
Draw base plate
Rectangle tool
Width: 250mm
Height: 150mm
Centered at origin (use Symmetric constraints)
Add crank shaft hole
Circle tool
Center at origin (or appropriate position for crank shaft)
Or manually: 11mm radius for 20mm shaft + clearance
Position consideration
The shaft hole should align with where the crank will be mounted. Typically at origin or offset appropriately based on your mechanism layout.
Optional: Add guide mounting features
Flat surfaces for guide bolts
Raised platforms for rail mounting
Keep it simple for this lesson
Close sketch
Pad the frame
Click Pad
Length: 20 mm (frame thickness)
Click OK
Frame complete!
All four parts are now ready for assembly!
Part 8: Assembly
Assembly is where individual parts become a functioning mechanism. For the Scotch yoke, we’ll fix the frame, allow the crank to rotate, and constrain the yoke to pure linear motion along the guides.
Assembly Strategy
🎯 Assembly Constraints Plan
Frame: Fixed (ground reference)
Crank: Rotates about shaft axis on frame
Yoke: Constrained to horizontal linear motion by guide rails
Pin-in-slot: Conceptual connection (pin travels within slot)
Use TechDraw dimension tools: Horizontal, Vertical, Radius
Create a diagram showing sinusoidal displacement:
In a separate area of the drawing:
Draw crank at 4 positions: 0°, 90°, 180°, 270°
Show corresponding yoke positions
Plot curve: x = r × sin(θ)
Table of values:
θ (degrees)
x (mm)
0
0
90
40
180
0
270
-40
360
0
Add text annotations:
Title block:
Part: Scotch Yoke Assembly
Scale: 1:2 (or appropriate)
Material: Steel (or as designed)
Designer: Your name
Date: 2025-12-17
Review drawing
Verify all dimensions and views are clear
Export as PDF
Right-click page → Export as PDF
Save as ScotchYoke_Assembly.pdf
Optional: Export as DXF
For CAM or further processing
Professional engineering documentation complete!
Part 10: Testing Parametric Control
The true test of parametric design: changing a single parameter should intelligently update the entire mechanism while maintaining all design relationships and clearances.
Standard parts available - Bearings, pins widely available
Approximate sinusoidal motion acceptable - Most applications don’t need perfect sine wave
Proven design needed - Centuries of engineering refinement
Typical applications:
Internal combustion engines
Compressors (high-speed)
Industrial machinery
Automotive systems
Aspect
Scotch Yoke
Slider-Crank
Motion profile
Perfect sinusoidal
Approximate (harmonic distortion)
Number of moving parts
2 (crank, yoke)
3 (crank, rod, slider)
Overall length
Compact
Longer (rod length)
Primary wear mode
Sliding friction
Bearing wear
Side forces
Minimal
Significant
Speed capability
Low to moderate
High
Friction
Higher (sliding)
Lower (pivoting)
Mathematical simplicity
Simple (pure sine)
Complex (involved equations)
What You’ve Achieved in This Lesson
Slot-Driven Mechanisms
Designed sliding contact geometry with proper clearances
Formula-Based Parameters
Used spreadsheet formulas for intelligent design automation
Simple Harmonic Motion
Created mechanism generating perfect sinusoidal motion
Advanced Parametric Control
Automated clearance calculation and relationship management
Complete Mechanism Library
🎉 Congratulations! You’ve now designed eight fundamental mechanisms:
✅ Slider Crank - Rotary to linear conversion
✅ Four-Bar Linkage - Controlled motion paths
✅ Scissor Lift - Motion amplification
✅ Toggle Clamp - Over-center locking
✅ Pantograph - Motion scaling
✅ Cam and Follower - Programmed motion
✅ Geneva Mechanism - Intermittent indexing
✅ Scotch Yoke - Pure sinusoidal motion
Skills Mastered
✅ Parametric design thinking and strategy
✅ Constraint-based sketching with full definition
✅ Master sketch methodology for complex assemblies
✅ Assembly with motion constraints and testing
✅ Technical drawing generation and documentation
✅ Formula-based parameter relationships
✅ Design verification and testing protocols
✅ Clearance management and tolerance design
Next Steps
Apply Your Skills:
Thank you for completing this course! You now have the foundation to design sophisticated mechanical systems with professional parametric CAD methodology.
Comments