Not every application can tolerate the latency, bandwidth cost, or privacy exposure of cloud round-trips for every inference. Edge AI puts intelligence directly on the microcontroller. A sensor node that classifies vibration patterns locally, detects a wake word in milliseconds, or spots an anomaly before uploading anything is a fundamentally different kind of embedded device. In practice, the best production systems combine edge inference with cloud intelligence: fast local decisions, cloud escalation for uncertain cases, and over-the-air model updates. This course teaches you to build both the edge and the hybrid. #TinyML #EdgeAI #EmbeddedML
Why Edge AI on Microcontrollers?
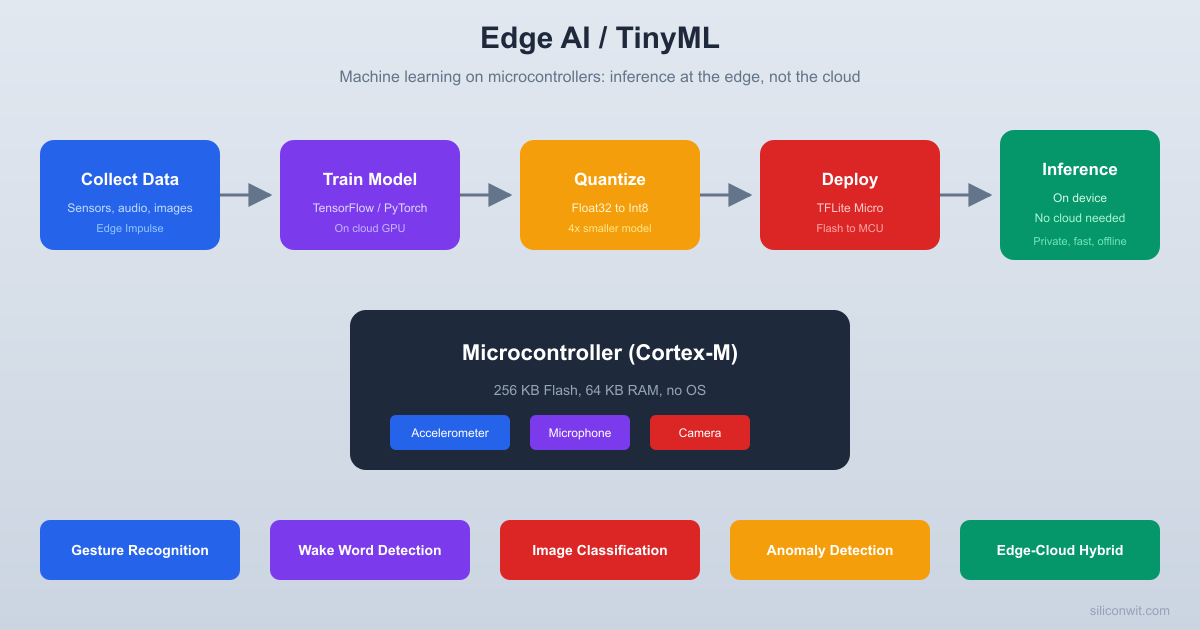
Cloud ML is powerful, but it requires connectivity, introduces latency, consumes bandwidth, and raises privacy concerns. TinyML addresses these problems by running inference directly on the MCU, while hybrid architectures (Lesson 9) combine the best of both.
Real-Time Response
Inference on-device takes milliseconds, not the hundreds of milliseconds (or seconds) required for a cloud round-trip. Wake word detection, gesture recognition, and anomaly alerts happen instantly. Lesson 5 builds a keyword spotter that responds in under 200 ms on an ESP32.
Works With Limited Connectivity
An MCU running a TinyML model can make decisions locally in basements, remote fields, aircraft, and anywhere else with unreliable internet. The model is baked into the firmware, so core inference works offline. For production systems, periodic connectivity enables model updates, cloud escalation of uncertain cases, and fleet-wide analytics (covered in Lesson 9).
Privacy by Design
Audio, images, and motion data never leave the device. The raw signal is processed on-chip and only the classification result (a label, a score, a flag) is transmitted. This is a hard requirement in medical, industrial, and consumer applications.
Microwatt Power Budgets
A Cortex-M4 running inference at 1 Hz draws single-digit milliamps. Compare that to a Wi-Fi radio transmitting raw sensor data continuously. TinyML enables battery-powered deployments lasting months or years.
Course Structure
Each lesson follows a consistent cycle:
The ML Problem
A concrete classification, detection, or anomaly task that benefits from on-device inference rather than cloud processing.
Data Collection and Labeling
How to gather training data from real sensors, label it correctly, and split it into train/validation/test sets.
Model Training
Train a neural network using TensorFlow, Edge Impulse, or scikit-learn. Understand the architecture choices that make a model small enough for an MCU.
Optimization and Deployment
Quantize the model, convert it to TensorFlow Lite Micro format, embed it in firmware, and run inference on the target MCU.
Evaluation and Integration
Measure accuracy, latency, and memory usage on real hardware. Integrate the inference result into application logic (alerts, actuators, display, MQTT publish).
Lessons
Lesson 1: TinyML and Machine Learning on Microcontrollers
TinyML and Machine Learning on Microcontrollers. Understand the TinyML landscape, toolchains, and hardware constraints. Deploy a pre-trained sine wave model on an ESP32 to see the full workflow from TensorFlow to on-device inference.
Build: Sine wave predictor on ESP32. Parts: ESP32 (reuse).
Lesson 2: Edge Impulse Data Collection and Training
Edge Impulse Data Collection and Training. Collect accelerometer data from an MPU6050, upload it to Edge Impulse, train a motion classifier, and deploy the quantized model back to the ESP32 for real-time inference.
Build: Motion classifier via Edge Impulse. Parts: ESP32, MPU6050 (reuse or new).
Lesson 3: TensorFlow Lite Micro Model Deployment
TensorFlow Lite Micro Model Deployment. Train a gesture classifier in TensorFlow on your PC, convert it to TFLite Micro, and deploy it on ESP32 and STM32. Compare the TFLM interpreter API across platforms and measure inference time.
Build: Cross-platform gesture classifier. Parts: ESP32, STM32 (reuse).
Lesson 4: Model Quantization and Optimization for MCUs
Model Quantization and Optimization for MCUs. Take a float32 model and quantize it to int8. Compare accuracy, inference speed, and flash/RAM usage before and after quantization. Learn post-training quantization and quantization-aware training.
Build: Quantization comparison bench. Parts: ESP32 (reuse).
Lesson 5: Keyword Spotting and Voice Wake Word
Keyword Spotting and Voice Wake Word. Build a “Hey Device” wake word detector using an I2S MEMS microphone and an ESP32. Train on the Speech Commands dataset, deploy the model, and trigger actions on keyword detection.
Build: Wake word detector with I2S mic. Parts: ESP32, INMP441 I2S mic.
Lesson 6: Accelerometer Gesture Recognition
Accelerometer Gesture Recognition. Collect labeled gesture data (shake, tilt, tap, circle) from an accelerometer, train a classifier, and deploy it on RPi Pico and STM32. Integrate gesture output with LED feedback and MQTT publishing.
Build: Gesture classifier on Pico/STM32. Parts: RPi Pico W, STM32, MPU6050 (reuse).
Lesson 7: Anomaly Detection for Predictive Maintenance
Anomaly Detection for Predictive Maintenance. Train an autoencoder on normal vibration data, deploy it on an ESP32, and detect mechanical anomalies in real time. Compare edge-only detection with cloud-based anomaly scoring.
Build: Vibration anomaly detector. Parts: ESP32, MPU6050 (reuse).
Lesson 8: Camera Image Classification on ESP32
Camera Image Classification on ESP32. Deploy a MobileNet-based image classifier on an ESP32-CAM. Capture images, run inference, and classify objects or detect people. Optimize the model to fit within ESP32’s memory constraints.
Build: Person/object detector on ESP32-CAM. Parts: ESP32-CAM module.
Lesson 9: Edge-Cloud Hybrid Architectures
Edge-Cloud Hybrid Architectures. Combine on-device inference with cloud intelligence. Build a system where the ESP32 handles clear cases locally, escalates uncertain classifications to a cloud server, and receives retrained models via OTA. Covers tiered inference, cloud retraining pipelines, and federated learning concepts.
Build: Hybrid inference system with OTA model updates. Parts: ESP32 (reuse), cloud server.
Parts Kit
Most components are reused from the embedded courses. A few new parts are needed.
C programming and at least one MCU platform (ESP32, STM32, or RPi Pico)
Basic Python (for TensorFlow and data processing scripts)
I2C sensor interfacing (covered in the embedded courses)
Linux command line
Helpful but not required:
Machine learning concepts (we start from the basics)
The IoT Systems course (for cloud integration context)
TensorFlow or PyTorch experience
Getting Started
Install Python 3.9+ and TensorFlow. TensorFlow is used for model training on your PC. The TFLite Micro runtime is compiled into the MCU firmware separately.
Create a free Edge Impulse account. Go to edgeimpulse.com and register. Edge Impulse provides a web-based pipeline for data collection, training, and deployment. The free tier supports everything in this course.
Ensure you have an ESP32 dev board. Lesson 1 starts with the ESP32. If you completed the ESP32 course, you already have one.
Get an MPU6050 accelerometer module. Lessons 2, 6, and 7 use this sensor for motion and vibration data. Available for under 3 USD from most electronics suppliers.
Start with Lesson 1. The sine wave model walkthrough gives you the complete mental model of the TinyML deployment pipeline.