On a single-core MCU, a smooth animation stutters every time you stop to check for user input, and blocking on serial input freezes the display. The ESP32 sidesteps this entirely with two Xtensa LX6 cores running FreeRTOS SMP, so one core can animate while the other listens for commands without either task stalling the other. In this first lesson you will install ESP-IDF, learn how menuconfig and partition tables shape your firmware, and build an RGB mood lamp that splits color animations and serial command handling across both cores. #ESP32 #ESPIDF #DualCore
Detail Level: Explained
×
Overview
Explained
Advanced
Set Detail Level
Overview
Explained
Advanced
What You Will Learn
The ESP32 is a small, inexpensive computer chip with two processor cores, Wi-Fi, and Bluetooth built in. Unlike simpler microcontrollers that can only do one thing at a time, the ESP32 can run two tasks simultaneously, one on each core.
In this lesson you will set up the programming tools (called ESP-IDF) and build an RGB mood lamp. One core runs a smooth color animation on an LED while the other core listens for your typed commands (“red”, “rainbow”, “pulse”). Neither core has to wait for the other, so the animation never stutters and your commands are always heard instantly.
 How the mood lamp works:
 ┌──────────────┐         ┌──────────────┐ │   Core 0     │         │   Core 1     │ │              │  queue   │              │ │ Listens for  ├────────>│ Runs color   │ │ your typed   │ "rainbow"│ animation    │ │ commands     │         │ on RGB LED   │ └──────────────┘         └──────────────┘
The wiring diagram and parts list are below. Switch to Explained to see the full implementation with code, or Advanced for the engineering details behind the design choices.
What We Are Building
RGB Mood Lamp
A color-cycling mood lamp controlled over serial. Core 0 handles the FreeRTOS system tasks and serial command parsing, while Core 1 runs continuous HSV color animations on an RGB LED using LEDC PWM. Send commands like “red”, “rainbow”, or “pulse” over the serial monitor to switch modes instantly.
2. Run the installer. It installs Git, Python, CMake, Ninja,
and the Xtensa toolchain automatically.
3. Choose ESP-IDF v5.4 when prompted.
4. After installation, open "ESP-IDF Command Prompt" from
the Start Menu. This shell has all paths set up.
5. Verify:
idf.py --version
The installer creates a desktop shortcut for the ESP-IDF PowerShell and Command Prompt. Always use one of these when building ESP-IDF projects.
USB Serial Driver
Most ESP32 DevKitC boards use a CP2102 or CH340 USB-to-serial chip. On Linux, add your user to the dialout group so you can access serial ports without root:
Terminal window
sudousermod-aGdialout$USER
# Log out and back in for the group change to take effect
On macOS and Windows, install the appropriate driver from the chip manufacturer if the board does not appear as a serial port.
ESP-IDF Project Structure
Every ESP-IDF project follows a component-based structure. The build system (CMake + Ninja) finds components by scanning directories and linking them automatically.
Directoryrgb-mood-lamp/
CMakeLists.txt
Directorymain/
CMakeLists.txt
main.c
sdkconfig
sdkconfig.defaults
Directorybuild/
…
The top-level CMakeLists.txt is minimal. It points to the ESP-IDF framework and declares the project name:
# Top-level CMakeLists.txt
cmake_minimum_required(VERSION 3.16)
include($ENV{IDF_PATH}/tools/cmake/project.cmake)
project(rgb-mood-lamp)
The main/CMakeLists.txt registers source files for the main component:
main/CMakeLists.txt
idf_component_register(SRCS "main.c"
INCLUDE_DIRS ".")
ESP-IDF treats every directory with a CMakeLists.txt calling idf_component_register() as a component. The main component is special: it is always included and serves as the application entry point. You can add more components by creating subdirectories under a components/ folder at the project root.
Menuconfig
ESP-IDF uses Kconfig (borrowed from the Linux kernel) to manage build-time configuration. Every driver, protocol stack, and system setting exposes options through this system, and all choices are saved into a single sdkconfig file.
Terminal window
idf.pymenuconfig
This opens a terminal-based menu. Key settings to know:
Menu Path
Setting
Typical Value
Serial flasher config
Flash size
4 MB
Component config > ESP System Settings
CPU frequency
240 MHz
Partition Table
Partition Table
Single factory app (no OTA)
Component config > FreeRTOS
Tick rate (Hz)
1000
Component config > ESP System Settings
Main task stack size
3584
When you change a setting, menuconfig writes the result into sdkconfig. This file is auto-generated and should generally not be edited by hand. If you want to set defaults for version control, put your overrides into sdkconfig.defaults instead. The build system reads sdkconfig.defaults first, then applies any existing sdkconfig on top.
The distinction between sdkconfig and sdkconfig.defaults matters for teams. sdkconfig is machine-specific and should go in .gitignore. sdkconfig.defaults goes into version control and holds only your intentional overrides. When a teammate clones the repo, ESP-IDF generates a fresh sdkconfig from the defaults. The HTTP Server lesson shows how to define custom Kconfig menu entries for your own application settings, not just system configuration.
Partition Table
The ESP32’s flash is divided into partitions. The partition table itself lives at offset 0x8000 and tells the bootloader where to find the application firmware, NVS storage, and any other data regions.
ESP32 Flash Memory Layout (4 MB)
┌──────────────────────────────┐ 0x000000
│ Bootloader (2nd stage) │
├──────────────────────────────┤ 0x008000
│ Partition Table │
├──────────────────────────────┤ 0x009000
│ NVS (Non-Volatile Storage) │ 24 KB
├──────────────────────────────┤ 0x00F000
│ PHY Init Data │ 4 KB
├──────────────────────────────┤ 0x010000
│ │
│ Factory App │ 1 MB
│ │
├──────────────────────────────┤
│ (Free / custom partitions) │
└──────────────────────────────┘ 0x400000
The default “Single factory app, no OTA” partition table looks like this:
Name
Type
SubType
Offset
Size
nvs
data
nvs
0x9000
24 KB
phy_init
data
phy
0xf000
4 KB
factory
app
factory
0x10000
1 MB
For projects that need OTA updates or filesystem storage, you create a custom partitions.csv:
# Name, Type, SubType, Offset, Size, Flags
nvs, data, nvs, 0x9000, 0x6000,
phy_init, data, phy, 0xf000, 0x1000,
factory, app, factory, 0x10000, 1M,
storage, data, spiffs, , 512K,
Then select “Custom partition table CSV” in menuconfig and point it to your file. View the compiled partition table at any time:
Terminal window
idf.pypartition-table
This prints the parsed table with offsets and sizes, which is useful for verifying that partitions do not overlap. You will use custom partition tables in Lesson 8: OTA Updates, where the flash needs two application slots for safe firmware updates.
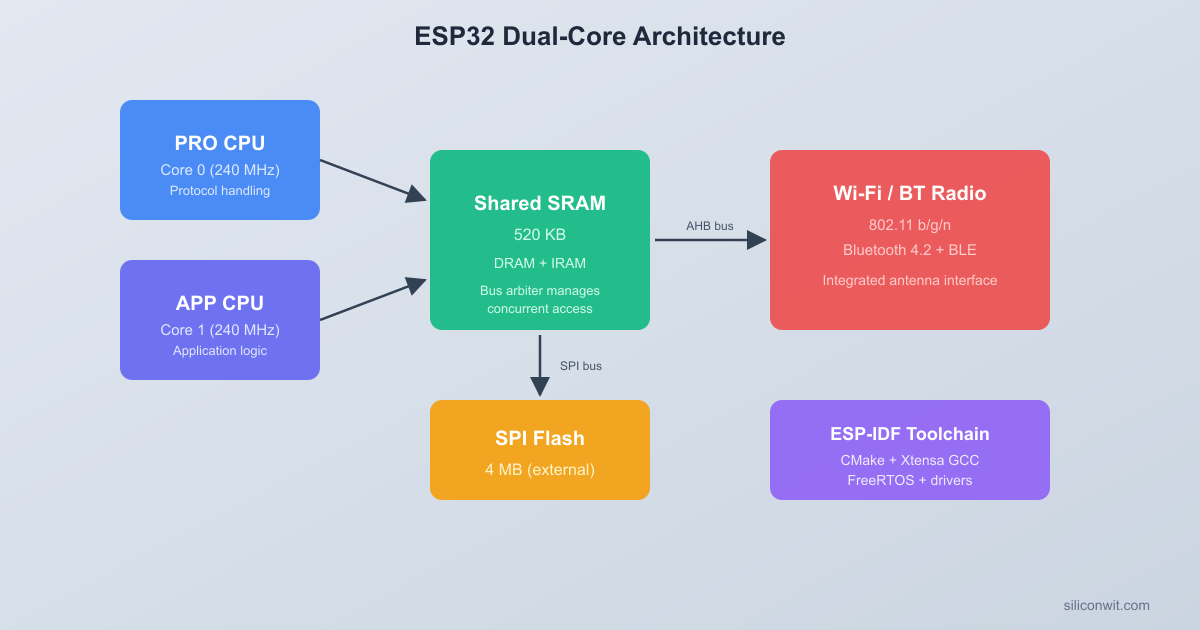
Dual-Core Architecture
The ESP32 contains two Xtensa LX6 cores running at up to 240 MHz. Espressif names them PRO_CPU (core 0) and APP_CPU (core 1). ESP-IDF runs a symmetric multiprocessing (SMP) variant of FreeRTOS across both cores, meaning any task can run on either core unless you explicitly pin it.
ESP32 Dual-Core Architecture
┌─────────────────────────────────────────┐
│ Shared Bus │
│ ┌───────────┐ ┌───────────┐ │
│ │ PRO_CPU │ │ APP_CPU │ │
│ │ (Core 0) │ │ (Core 1) │ │
│ │ Xtensa LX6│ │ Xtensa LX6│ │
│ │ 240 MHz │ │ 240 MHz │ │
│ └─────┬─────┘ └─────┬─────┘ │
│ │ ┌─────────┐ │ │
│ └────┤ FreeRTOS├────┘ │
│ │ SMP │ │
│ └────┬────┘ │
│ ┌───────┐ ┌────┴────┐ ┌───────────┐ │
│ │ SRAM │ │ ROM │ │ Peripherals│ │
│ │ 520KB │ │ 448KB │ │ GPIO,SPI..│ │
│ └───────┘ └─────────┘ └───────────┘ │
└─────────────────────────────────────────┘
How Boot and System Tasks Are Distributed
At startup, the bootloader runs on PRO_CPU. After initialization, ESP-IDF creates several system tasks:
Task
Core
Purpose
main (app_main)
PRO_CPU (0)
Your application entry point
IDLE0
PRO_CPU (0)
Idle task for core 0
IDLE1
APP_CPU (1)
Idle task for core 1
esp_timer
PRO_CPU (0)
Software timer callbacks
Wi-Fi task
PRO_CPU (0)
Wi-Fi protocol stack
ipc0, ipc1
0, 1
Inter-processor call tasks
The app_main() function runs as a FreeRTOS task on core 0 with a default stack of 3584 bytes. You can create additional tasks and pin them to specific cores or leave them floating.
Task Creation and Core Pinning
The standard FreeRTOS xTaskCreate() function lets the scheduler place the task on any available core. To pin a task to a specific core, use the ESP-IDF extension:
#include"freertos/FreeRTOS.h"
#include"freertos/task.h"
voidmy_task(void*pvParameters) {
while (1) {
/* This task runs only on core 1 */
vTaskDelay(pdMS_TO_TICKS(100));
}
}
voidapp_main(void) {
xTaskCreatePinnedToCore(
my_task, /* Task function */
"my_task", /* Name (for debugging) */
4096, /* Stack size in bytes */
NULL, /* Parameter */
5, /* Priority (higher = more urgent) */
NULL, /* Task handle (optional) */
1 /* Core ID: 0 = PRO_CPU, 1 = APP_CPU */
);
}
Pass tskNO_AFFINITY as the last argument to let the scheduler decide which core runs the task. This is useful for general-purpose work, but for real-time or peripheral-bound tasks, pinning gives you predictable timing by avoiding contention with system tasks on core 0.
When to Pin Tasks
Pin a task when it has strict timing requirements (motor control, audio sampling), when it accesses hardware that is not thread-safe, or when you want to isolate it from Wi-Fi and Bluetooth stack activity on core 0. Leave tasks unpinned when they are not latency-sensitive and can benefit from load balancing.
Espressif chose symmetric multiprocessing (SMP) over asymmetric multiprocessing (AMP). In AMP, each core runs its own OS with separate memory. In SMP, both cores share one FreeRTOS instance and one address space, which simplifies inter-task communication (a shared queue or semaphore is enough) but requires locking when accessing shared data. One practical consequence: ISRs can run on either core by default. If your ISR writes to data that a pinned task reads, you need a spinlock (portMUX_TYPE), not just a mutex. The RTOS Programming course covers synchronization primitives in depth.
In production IoT devices, core 0 typically runs the networking stack (Wi-Fi, BLE, MQTT) while core 1 runs the application control loop. This pattern appears throughout this course: Lesson 4: Wi-Fi and Lesson 6: MQTT keep networking on core 0. The IoT Systems course applies the same split to multi-sensor systems where sampling must not be delayed by network retries. In the Capstone project at the end of this course, you will build a complete sensor network using this architecture.
LEDC PWM for RGB LED
The ESP32’s LEDC (LED Control) peripheral provides up to 16 independent PWM channels, split between high-speed and low-speed groups. Each channel is driven by a configurable timer. For an RGB LED, we need three channels sharing the same timer so all three colors operate at the same PWM frequency.
Timer and Channel Configuration
LEDC configuration is a two-step process: configure a timer (sets frequency and resolution), then configure channels (binds a GPIO to that timer with an initial duty cycle).
#include"driver/ledc.h"
#defineLEDC_TIMER LEDC_TIMER_0
#defineLEDC_MODE LEDC_LOW_SPEED_MODE
#defineLEDC_FREQUENCY5000 /* 5 kHz PWM */
#defineLEDC_RESOLUTION LEDC_TIMER_8_BIT /* 0-255 duty range */
To set a color, write duty values to each channel:
voidset_rgb(uint8_tr, uint8_tg, uint8_tb) {
ledc_set_duty(LEDC_MODE, LEDC_CHANNEL_0, r);
ledc_update_duty(LEDC_MODE, LEDC_CHANNEL_0);
ledc_set_duty(LEDC_MODE, LEDC_CHANNEL_1, g);
ledc_update_duty(LEDC_MODE, LEDC_CHANNEL_1);
ledc_set_duty(LEDC_MODE, LEDC_CHANNEL_2, b);
ledc_update_duty(LEDC_MODE, LEDC_CHANNEL_2);
}
The ledc_set_duty() call writes to a shadow register. The value only takes effect when you call ledc_update_duty(), which transfers the shadow value to the active register at the next timer overflow. This prevents glitches when updating multiple channels.
LEDC also supports hardware fading via ledc_set_fade_with_time(), which ramps the duty cycle smoothly without CPU involvement. We animate in software here because we need HSV conversion per frame, but for simple brightness transitions or single-color breathing effects, the hardware fader uses zero CPU cycles. The GPIO and Peripherals lesson explores additional LEDC features alongside the Pulse Counter and RMT peripherals.
HSV to RGB Conversion
RGB values are awkward for animations. To cycle smoothly through the color spectrum, it is much easier to work in HSV (Hue, Saturation, Value) space and convert to RGB for output. Hue sweeps through colors (0 = red, 120 = green, 240 = blue), saturation controls how vivid the color is, and value controls brightness.
uint8_t t = (v * (255- ((s * (255- remainder)) >>8))) >>8;
switch (region) {
case0: *r = v; *g = t; *b = p; break;
case1: *r = q; *g = v; *b = p; break;
case2: *r = p; *g = v; *b = t; break;
case3: *r = p; *g = q; *b = v; break;
case4: *r = t; *g = p; *b = v; break;
default: *r = v; *g = p; *b = q; break;
}
}
With this function, a rainbow animation is just a loop that increments hue from 0 to 359 and converts each value to RGB. No manual color blending or lookup tables needed.
Complete Firmware
Here is the complete main.c for the RGB mood lamp. Core 1 runs the color animation loop, and core 0 runs a serial command parser. A FreeRTOS queue carries mode-change commands from the parser task to the animation task.
#include<stdio.h>
#include<string.h>
#include<ctype.h>
#include"freertos/FreeRTOS.h"
#include"freertos/task.h"
#include"freertos/queue.h"
#include"driver/ledc.h"
#include"esp_log.h"
staticconstchar*TAG ="mood_lamp";
/* ---------- Pin and PWM configuration ---------- */
/* Create the mode queue (depth 4, each element is a led_mode_t) */
mode_queue =xQueueCreate(4, sizeof(led_mode_t));
/* Create the animation task, pinned to core 1 */
xTaskCreatePinnedToCore(
animation_task,
"animation",
4096,
NULL,
5,
NULL,
1 /* APP_CPU */
);
/* Create the parser task, pinned to core 0 */
xTaskCreatePinnedToCore(
parser_task,
"parser",
4096,
NULL,
5,
NULL,
0 /* PRO_CPU */
);
/* app_main can return; the tasks keep running */
}
How the Code Works
The firmware creates two independent tasks that communicate through a FreeRTOS queue:
animation_task (Core 1): Runs a tight loop that checks for mode changes via xQueueReceive() with zero timeout (non-blocking). Depending on the current mode, it either sets a solid color or computes the next animation frame using HSV conversion, then delays briefly before the next update.
parser_task (Core 0): Blocks on fgets() waiting for serial input. When a line arrives, it strips whitespace, converts to lowercase, and matches against known commands. Valid commands are sent to the queue where the animation task picks them up.
app_main(): Initializes the LEDC hardware, creates the queue, spawns both tasks, and returns. In ESP-IDF, app_main() itself is a FreeRTOS task, so returning from it simply deletes that task. The two pinned tasks continue running.
CMakeLists.txt Files
Top-Level CMakeLists.txt
cmake_minimum_required(VERSION 3.16)
include($ENV{IDF_PATH}/tools/cmake/project.cmake)
project(rgb-mood-lamp)
main/CMakeLists.txt
idf_component_register(SRCS "main.c"
INCLUDE_DIRS ".")
These two files are all the build system needs. ESP-IDF’s CMake integration handles toolchain selection, compiler flags, linker scripts, and partition table generation automatically. If you add more source files, list them in the SRCS argument separated by spaces.
Building and Flashing
Create the project directory and files:
Terminal window
mkdir-prgb-mood-lamp/main
# Place the top-level CMakeLists.txt in rgb-mood-lamp/
# Place main/CMakeLists.txt and main/main.c in rgb-mood-lamp/main/
Set the target chip:
Terminal window
cdrgb-mood-lamp
idf.pyset-targetesp32
This configures the build system for the ESP32 (as opposed to ESP32-S2, ESP32-C3, etc.) and generates an initial sdkconfig.
Build the project:
Terminal window
idf.pybuild
The first build takes a few minutes because it compiles the entire ESP-IDF framework. Subsequent builds are incremental and much faster.
Connect the ESP32 DevKitC via USB and flash:
Terminal window
idf.py-p/dev/ttyUSB0flashmonitor
On macOS, the port is usually /dev/cu.usbserial-XXXX or /dev/cu.SLAB_USBtoUART. On Windows, use COM3 or whichever port appears in Device Manager.
The serial monitor opens automatically at 115200 baud. You should see the startup log followed by the prompt. Type rainbow, red, pulse, or any other command and press Enter.
Press Ctrl+] to exit the serial monitor.
Wiring the RGB LED
ESP32 DevKitC
┌─────────────┐
│ GP25 ├──[R1 220R]──┐
│ GP26 ├──[R2 220R]──┤── RGB LED
│ GP27 ├──[R3 220R]──┤ (Common
│ GND ├─────────────┘ Cathode)
│ │
│ USB │
└──────┤├──────┘
Connect the common-cathode RGB LED to the ESP32 DevKitC:
LED Pin
Connection
Red anode
GPIO 25 through 220 ohm resistor
Green anode
GPIO 26 through 220 ohm resistor
Blue anode
GPIO 27 through 220 ohm resistor
Common cathode
GND
Each resistor limits current to a safe level for both the LED and the ESP32 GPIO (which can source up to 40 mA per pin, though 12 mA is the recommended maximum for continuous use).
Exercises
Add a “breathe” mode. Implement a new MODE_BREATHE that holds a single color (for example, warm white at hue 30) and slowly ramps brightness from 0 to 255 and back using the value parameter in HSV. Use a step delay of about 15 ms for a smooth 8-second breathing cycle.
Add speed control commands. Accept “fast” and “slow” commands that change the animation delay. Store the delay in a shared variable protected by a mutex, or send it through a second queue. “fast” should halve the current delay, and “slow” should double it, clamped between 5 ms and 100 ms.
Print mode and core info on each change. In the animation task, print the new mode name, the current core ID (xPortGetCoreID()), and the current tick count (xTaskGetTickCount()) every time a mode change is received. This helps verify that tasks are actually running on their pinned cores.
Add a “status” command. When the user types “status”, print the free heap size (esp_get_free_heap_size()), the number of running tasks (uxTaskGetNumberOfTasks()), and the system uptime in seconds (esp_timer_get_time() / 1000000). This exercises the ESP-IDF system API without affecting the animation loop.
Summary
You installed ESP-IDF v5.x and set up the Xtensa toolchain. You learned how menuconfig stores build-time configuration in sdkconfig, how the partition table divides flash into regions, and how the ESP32’s two Xtensa LX6 cores run FreeRTOS SMP. You built an RGB mood lamp that pins a color animation task to core 1 and a serial command parser to core 0, communicating through a FreeRTOS queue. The LEDC peripheral handles PWM generation for all three color channels, and HSV conversion provides smooth color cycling without manual blending.
Comments