FreeRTOS gives you tasks, queues, and semaphores, but everything else (board support, networking, Bluetooth, filesystem) you wire together yourself from vendor libraries. Porting a FreeRTOS project to a new chip means rewriting the HAL layer, reworking pin definitions, and often restructuring the build system. Zephyr RTOS takes the opposite approach: board support, networking, BLE, logging, and a shell are built in, and switching hardware is a one-line board change in the build command because pin mappings live in devicetree overlays, not in your source code. In this lesson you will take the traffic light controller from Lesson 2 and rebuild it in Zephyr from scratch. Same wiring, same behavior, completely different RTOS. By comparing the two implementations side by side, you will see which concepts transfer directly and where Zephyr makes fundamentally different design choices. #ZephyrRTOS #Devicetree #Portability
What We Are Building
Zephyr Traffic Light Controller (Port from Lesson 2)
The same priority-based traffic light controller from Lesson 2, rebuilt on Zephyr RTOS. Three threads manage the light cycle, pedestrian button, and emergency override. GPIO pins are defined in a devicetree overlay instead of hardcoded addresses. Build configuration uses Kconfig and the west build tool. The final result is identical behavior on identical hardware, through a completely different RTOS framework.
Project specifications:
Parameter
Value
MCU
STM32 Blue Pill or ESP32 DevKit (same as Lesson 2)
RTOS
Zephyr (latest LTS)
Build system
west (Zephyr meta-tool)
Hardware abstraction
Devicetree overlay for GPIO pins
Configuration
Kconfig (prj.conf)
Threads
3 (light cycle, pedestrian, emergency)
LEDs
Red, Yellow, Green (same wiring as Lesson 2)
Buttons
Pedestrian request, Emergency override
Parts List
Ref
Component
Quantity
Notes
U1
STM32 Blue Pill or ESP32 DevKit
1
Same board as Lesson 2
D1
Red LED
1
Same wiring as Lesson 2
D2
Yellow LED
1
Same wiring as Lesson 2
D3
Green LED
1
Same wiring as Lesson 2
R1, R2, R3
330 ohm resistor
3
LED current limiters
SW1
Tactile push button
1
Pedestrian request
SW2
Tactile push button
1
Emergency override
-
Breadboard and jumper wires
1 set
Same setup as Lesson 2
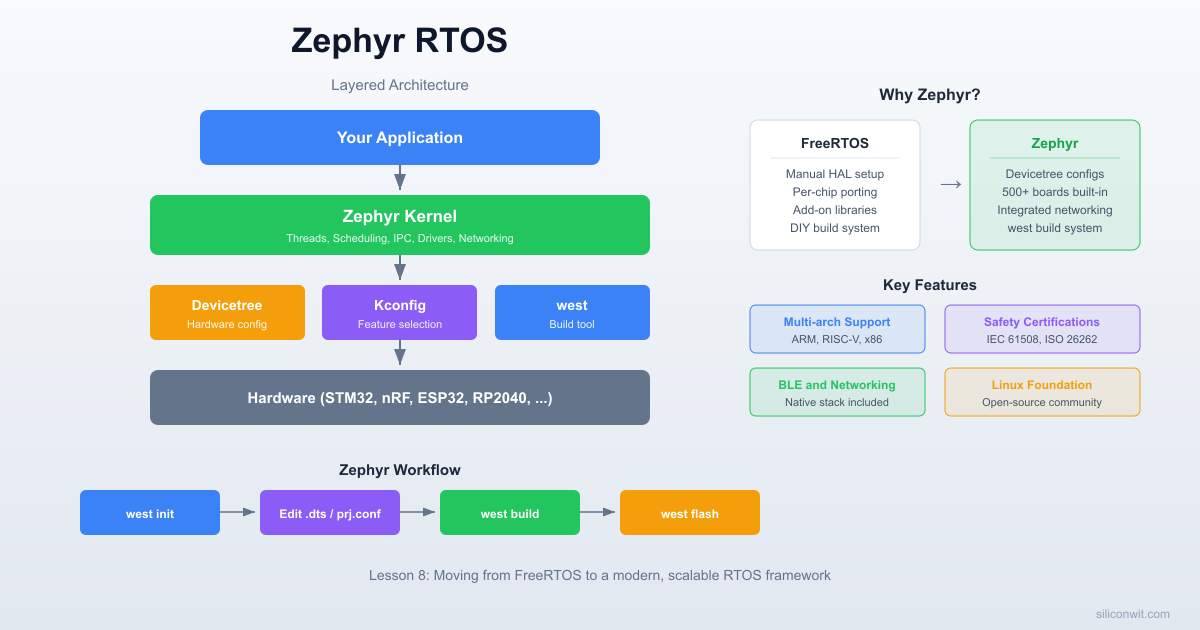
What Is Zephyr?
Zephyr is an open-source RTOS hosted by the Linux Foundation. It supports over 600 boards across architectures including ARM Cortex-M, RISC-V, x86, ARC, and Xtensa. Unlike FreeRTOS, which focuses primarily on task scheduling and leaves everything else to you or third-party libraries, Zephyr ships with integrated subsystems for Bluetooth, networking (TCP/IP, MQTT, CoAP), USB, filesystems, and device drivers.
The project started at Wind River as Rocket OS, was open-sourced in 2016, and has since attracted contributions from Intel, Nordic Semiconductor, NXP, and hundreds of other companies. Major products like the Google Nest thermostats and Gralmarly’s keyboard firmware run on Zephyr.
Key Differences from FreeRTOS
Aspect
FreeRTOS
Zephyr
Hardware description
Hardcoded pin definitions in C
Devicetree (.dts/.dtsi files)
Build configuration
FreeRTOSConfig.h header
Kconfig (prj.conf)
Build/project tool
Makefile, CMake, or IDE
west (meta-tool wrapping CMake)
API style
xTaskCreate, xSemaphoreTake
k_thread_create, k_sem_take
Driver model
You write your own or use vendor HAL
Built-in driver API with devicetree bindings
Connectivity
Add your own TCP/IP stack
Built-in networking, BLE, USB
Licensing
MIT
Apache 2.0
Scope
Kernel + minimal extras
Full OS with subsystems
  FreeRTOS vs Zephyr Scope  ──────────────────────────────────────────  FreeRTOS:  ┌───────────────┐  │  Task Sched.  │  You add everything else:  │  Queues       │  HAL, drivers, TCP/IP,  │  Semaphores   │  BLE, USB, filesystem...  │  Timers       │  └───────────────┘
  Zephyr:  ┌───────────────────────────────────────┐  │  Kernel + Scheduler                   │  │  Devicetree + Kconfig                 │  │  GPIO, I2C, SPI, UART drivers         │  │  TCP/IP, BLE, USB, CAN               │  │  Logging, Shell, Filesystem           │  │  600+ board support packages          │  └───────────────────────────────────────┘
FreeRTOS gives you a lean kernel and maximum freedom. Zephyr gives you a complete platform with opinions about how hardware should be described and configured. Neither approach is inherently better; it depends on your project requirements.
Installing Zephyr
Zephyr uses a meta-tool called west that handles workspace initialization, dependency management, building, and flashing. The installation process involves setting up west, fetching the Zephyr source tree, and installing the SDK (cross-compilation toolchains).
The SDK includes toolchains for ARM, RISC-V, Xtensa, and other architectures. The setup script registers the SDK location so west can find it automatically.
Set the Zephyr environment.
Terminal window
source~/zephyrproject/zephyr/zephyr-env.sh
Add this line to your .bashrc for persistence across terminal sessions.
Download the macOS SDK bundle from the Zephyr SDK releases page and run ./setup.sh after extracting.
The recommended approach on Windows is to use the Chocolatey package manager or install inside WSL2 (which then follows the Linux instructions). The Zephyr documentation provides detailed Windows-native instructions at docs.zephyrproject.org/latest/develop/getting_started.
Every Zephyr application follows a standard directory layout. The build system expects certain files in specific locations.
Directorytraffic-light-zephyr/
CMakeLists.txt
prj.conf
Directoryboards/
stm32_min_dev_blue.overlay
Directorysrc/
main.c
CMakeLists.txt tells west where to find your source files and links your application against the Zephyr kernel. prj.conf is the Kconfig configuration file where you enable kernel features and drivers. The boards/ directory contains devicetree overlays that customize pin assignments for specific boards. src/main.c is your application code.
The minimal CMakeLists.txt for any Zephyr application looks like this:
The find_package(Zephyr) call is where the magic happens. It pulls in the entire Zephyr build system, including the devicetree compiler, Kconfig processing, and toolchain configuration. Your application is built as a library (app) that gets linked against the Zephyr kernel.
Zephyr Build Pipeline
──────────────────────────────────────────
Board .dts prj.conf
+ your .overlay (Kconfig)
│ │
▼ ▼
┌──────────┐ ┌──────────────┐
│ dtc │ │ Kconfig │
│ compiler │ │ processor │
└────┬─────┘ └──────┬───────┘
│ │
▼ ▼
devicetree_ .config
generated.h (final config)
│ │
└────────┬─────────┘
▼
┌────────────┐
│ CMake + │
│ Compiler │◄── src/main.c
└─────┬──────┘
▼
zephyr.elf ──► west flash
How West Builds Your Project
When you run west build, the following happens:
West invokes CMake, which reads your CMakeLists.txt and the Zephyr build system scripts.
The devicetree compiler (dtc) merges the board’s base .dts file with your overlay file to produce a final devicetree. This is compiled into a C header (devicetree_generated.h) containing macros for every node.
Kconfig processes your prj.conf, the board’s default configuration, and all dependency rules to produce a final .config file. This determines which kernel features and drivers are compiled.
The C compiler builds your source files along with the selected Zephyr kernel modules, drivers, and libraries.
The linker produces an ELF binary. West can then flash it to your board with west flash.
Devicetree
Devicetree is borrowed from the Linux kernel world. Instead of hardcoding register addresses and pin numbers in your C code, you describe the hardware in a separate .dts file. The build system compiles this description into C macros that your code references. If you move to a different board, you change the devicetree overlay; the C code stays the same.
Base DTS and Overlays
Every board supported by Zephyr has a base .dts file that describes its hardware: the CPU, memory, peripherals, default pin configurations. When you build for stm32_min_dev_blue, Zephyr uses the file at boards/arm/stm32_min_dev_blue/stm32_min_dev_blue.dts as the starting point.
Your application adds an overlay file that extends or overrides the base. Overlays live in your project’s boards/ directory, named to match the board identifier.
GPIO Overlay for Our Traffic Light
Here is the devicetree overlay that defines our three LEDs and two buttons on the STM32 Blue Pill:
Each node (like led_red) describes a piece of hardware. The compatible property tells Zephyr which driver to use (gpio-leds is a built-in binding for simple GPIO-connected LEDs). The gpios property specifies the GPIO controller (&gpioa), pin number (0), and flags (GPIO_ACTIVE_HIGH).
The aliases block gives short, portable names to each node. In your C code, you reference DT_ALIAS(led_red) instead of hardcoding a pin number. If you port to a different board, you write a new overlay with different pin assignments, and the C code compiles unchanged.
Accessing Devicetree in C
Zephyr provides macros to extract information from the compiled devicetree:
/* Get a node identifier from an alias */
#defineLED_RED_NODEDT_ALIAS(led_red)
#defineBTN_PED_NODEDT_ALIAS(btn_ped)
/* Get the GPIO spec (controller + pin + flags) from a node */
The gpio_dt_spec structure holds the GPIO controller device pointer, pin number, and configuration flags. You pass it directly to GPIO API functions. If the devicetree node does not exist (wrong alias name, missing overlay), the build fails with a clear error message rather than silently using a wrong pin.
Kconfig (prj.conf)
Kconfig is Zephyr’s build-time configuration system. It determines which kernel features, drivers, and subsystems are compiled into your firmware. The syntax is the same as the Linux kernel’s Kconfig: CONFIG_FEATURE=y to enable, # CONFIG_FEATURE is not set to disable.
The fundamental difference: FreeRTOS configuration is a C header included at compile time. Zephyr’s Kconfig is processed by a separate tool that resolves dependencies automatically. If you enable CONFIG_LOG, Kconfig automatically pulls in the required subsystem dependencies without you listing them.
Zephyr Threading Model
Zephyr threads are functionally equivalent to FreeRTOS tasks. They have their own stack, a priority, and a scheduling state. The API names and creation patterns differ, but the underlying concepts are the same.
Static Thread Creation with K_THREAD_DEFINE
The most common pattern in Zephyr is to define threads at compile time:
/* Define a thread statically (stack allocated at compile time) */
K_THREAD_DEFINE(light_cycle_tid, /* Thread ID variable name */
1024, /* Stack size in bytes */
light_cycle_entry, /* Entry function */
NULL, NULL, NULL, /* Three parameters (p1, p2, p3) */
5, /* Priority */
0, /* Options (0 = preemptible) */
0); /* Delay before start (0 = immediate) */
K_THREAD_DEFINE allocates the stack and thread structure at compile time. No heap allocation, no runtime failure. This is Zephyr’s equivalent of FreeRTOS xTaskCreateStatic, but with a cleaner macro interface.
Dynamic Thread Creation with k_thread_create
For threads you need to create at runtime:
#defineSTACK_SIZE1024
K_THREAD_STACK_DEFINE(my_stack, STACK_SIZE);
staticstruct k_thread my_thread_data;
k_tid_t tid =k_thread_create(&my_thread_data, my_stack, STACK_SIZE,
my_entry_fn, NULL, NULL, NULL,
5, /* Priority */
0, /* Options */
K_NO_WAIT); /* Start immediately */
Priority System
Zephyr’s priority scheme differs from FreeRTOS in an important way:
Priority Range
Type
Behavior
Negative values (e.g., -1)
Cooperative
Thread runs until it explicitly yields or sleeps. Cannot be preempted by other threads (only by ISRs).
Zero and positive values (e.g., 0, 1, 5)
Preemptive
Can be preempted by higher-priority threads at any time.
Lower number = higher priority
(Both types)
Priority 0 is the highest preemptive priority. Priority 5 is lower than priority 2.
This is the opposite of FreeRTOS, where a higher number means higher priority. In FreeRTOS the emergency task was priority 3 (highest). In Zephyr it will be priority 2 (lowest number among the three, therefore highest priority).
Sleep Functions
FreeRTOS
Zephyr
Purpose
vTaskDelay(pdMS_TO_TICKS(1000))
k_msleep(1000)
Sleep for milliseconds
vTaskDelay(ticks)
k_sleep(K_TICKS(n))
Sleep for raw ticks
vTaskDelayUntil(...)
k_sleep(K_TIMEOUT_ABS_TICKS(t))
Sleep until absolute time
Zephyr Synchronization
Zephyr provides the same synchronization primitives as FreeRTOS, with different API names.
Semaphores (k_sem)
/* Define a semaphore (initial count 0, max count 1 = binary) */
K_SEM_DEFINE(ped_sem, 0, 1);
/* In the button callback or ISR */
k_sem_give(&ped_sem);
/* In the pedestrian thread */
k_sem_take(&ped_sem, K_FOREVER); /* Block until given */
Mutexes (k_mutex)
K_MUTEX_DEFINE(led_mutex);
k_mutex_lock(&led_mutex, K_FOREVER);
/* Critical section: access shared resource */
k_mutex_unlock(&led_mutex);
Zephyr mutexes support priority inheritance by default, which prevents the priority inversion problem discussed in earlier lessons.
Message Queues (k_msgq)
K_MSGQ_DEFINE(cmd_queue, sizeof(uint8_t), 10, 4);
uint8_t cmd =0x01;
k_msgq_put(&cmd_queue, &cmd, K_NO_WAIT);
uint8_t received;
k_msgq_get(&cmd_queue, &received, K_FOREVER);
API Comparison Table
Concept
FreeRTOS
Zephyr
Create task/thread
xTaskCreate()
k_thread_create() or K_THREAD_DEFINE
Delete task/thread
vTaskDelete()
k_thread_abort()
Sleep (ms)
vTaskDelay(pdMS_TO_TICKS(ms))
k_msleep(ms)
Binary semaphore create
xSemaphoreCreateBinary()
K_SEM_DEFINE(sem, 0, 1)
Semaphore give
xSemaphoreGive()
k_sem_give()
Semaphore take
xSemaphoreTake(sem, timeout)
k_sem_take(&sem, timeout)
Mutex create
xSemaphoreCreateMutex()
K_MUTEX_DEFINE(mtx)
Mutex lock
xSemaphoreTake(mtx, timeout)
k_mutex_lock(&mtx, timeout)
Mutex unlock
xSemaphoreGive(mtx)
k_mutex_unlock(&mtx)
Queue create
xQueueCreate(len, size)
K_MSGQ_DEFINE(q, size, len, align)
Queue send
xQueueSend(q, &item, timeout)
k_msgq_put(&q, &item, timeout)
Queue receive
xQueueReceive(q, &item, timeout)
k_msgq_get(&q, &item, timeout)
Notify task
xTaskNotify(handle, val, action)
k_sem_give() or k_poll()
Suspend task
vTaskSuspend(handle)
k_thread_suspend(tid)
Resume task
vTaskResume(handle)
k_thread_resume(tid)
Get tick count
xTaskGetTickCount()
k_uptime_get() (ms) or k_uptime_ticks()
GPIO in Zephyr
Zephyr’s GPIO API is device-model based. You obtain a gpio_dt_spec from the devicetree and pass it to configuration and control functions. No register-level code, no vendor-specific HAL calls.
The callback function runs in interrupt context, so it must be fast. Giving a semaphore is safe from ISR context in Zephyr. The thread waiting on that semaphore will wake up after the ISR completes.
Complete Traffic Light Controller on Zephyr
Here is the full implementation. The circuit wiring is identical to Lesson 2 (PA0, PA1, PA2 for LEDs; PB0, PB1 for buttons on the STM32 Blue Pill).
/* Threads are already started by K_THREAD_DEFINE.
main() can return; the kernel keeps running. */
return0;
}
What Changed from the FreeRTOS Version
The behavior is identical, but notice these structural differences:
Aspect
Lesson 2 (FreeRTOS)
This Lesson (Zephyr)
Pin definitions
#define LED_RED_PIN 0 (hardcoded)
DT_ALIAS(led_red) (from devicetree)
GPIO init
Register-level (GPIOA->CRL = ...)
gpio_pin_configure_dt()
GPIO write
GPIOA->BSRR = (1 << pin)
gpio_pin_set_dt(&led_red, 1)
Button events
Task notification from polling task
Semaphore from GPIO interrupt callback
Thread creation
xTaskCreate() at runtime in main()
K_THREAD_DEFINE at compile time
Priority
Higher number = higher priority
Lower number = higher priority
Sleep
vTaskDelay(pdMS_TO_TICKS(3000))
k_msleep(3000)
Serial output
Manual UART init + uart_send_string()
printk() (console configured by Kconfig)
Build system
Makefile with manual source lists
west build with CMake and Kconfig
The FreeRTOS version required 40+ lines of register-level GPIO and UART initialization. The Zephyr version replaces all of that with devicetree lookups and gpio_pin_configure_dt() calls. The tradeoff: you need to understand devicetree overlay syntax, and the Zephyr toolchain installation is heavier.
FreeRTOS vs Zephyr: Side-by-Side
This table extends beyond the traffic light to cover the broader differences you will encounter when choosing between the two.
Build for the STM32 Blue Pill. The -p always flag forces a pristine build, removing any cached configuration from a previous board.
Terminal window
westbuild-palways-bstm32_min_dev_blue
West looks for the overlay file at boards/stm32_min_dev_blue.overlay automatically based on the board name.
Flash the firmware via ST-Link.
Terminal window
westflash
If you have multiple debug probes connected, specify the runner:
Terminal window
westflash--runneropenocd
Open a serial monitor to see printk output. The default UART on the Blue Pill is USART1 (PA9/PA10) at 115200 baud.
Terminal window
minicom-D/dev/ttyUSB0-b115200
You should see:
Zephyr Traffic Light Controller starting...
Hardware initialized. Threads running.
[000000 ms] LightCycle: RED on
[003000 ms] LightCycle: YELLOW on
[004000 ms] LightCycle: GREEN on
When to Choose Which RTOS
There is no universally correct choice. The right RTOS depends on your project constraints.
Choose FreeRTOS when:
You need the smallest possible code footprint (under 10 KB kernel)
Your project uses a single MCU with no networking or connectivity requirements
Your team is familiar with bare-metal or register-level programming
You want maximum control over every aspect of the system
The vendor SDK already integrates FreeRTOS (common with STM32 HAL, ESP-IDF, TI SimpleLink)
You need the widest possible community support and examples
Choose Zephyr when:
Your project requires Bluetooth, Wi-Fi, or TCP/IP networking
You want a Linux-like development experience (devicetree, Kconfig, menuconfig)
You plan to support multiple hardware platforms from one codebase
Your team has Linux kernel experience and is comfortable with devicetree
You need built-in support for USB, CAN, sensors, or filesystems
Long-term maintenance matters and you want a single integrated platform
Choose neither (consider Linux) when:
Your hardware has an MMU and 32+ MB of RAM
You need a full filesystem, user-space processes, or POSIX compatibility
Real-time response under 1 ms is not critical
The skills transfer well between FreeRTOS and Zephyr. As this lesson demonstrates, the core concepts (threads, priorities, semaphores, mutexes, queues) are nearly identical. Learning one makes learning the other straightforward.
Experiments
Experiment 1: Port the Sensor Pipeline
Take the multi-stage sensor pipeline from Lesson 3 (queues and inter-task communication) and rewrite it using Zephyr’s k_msgq. Create a producer thread that reads a simulated sensor value, a processing thread that applies a filter, and a display thread that prints the result. Use K_MSGQ_DEFINE for the queues and compare the code structure with the FreeRTOS version.
Experiment 2: Enable the Zephyr Shell
Add CONFIG_SHELL=y and CONFIG_SHELL_BACKEND_SERIAL=y to prj.conf. The Zephyr shell gives you an interactive command line over UART at runtime. Register a custom shell command that prints the current traffic light state. This is far more powerful than printk for debugging deployed firmware.
Experiment 3: Use the Zephyr Logging Subsystem
Replace all printk calls with the Zephyr LOG module. Add #include <zephyr/logging/log.h> and use LOG_MODULE_REGISTER(traffic, LOG_LEVEL_INF) at the top of main.c. Replace printk with LOG_INF(), LOG_WRN(), and LOG_ERR(). This adds automatic timestamps, log levels, and the ability to filter output per module at runtime.
Experiment 4: Build for a Different Board
Pick a board you have available (nRF52840 DK, Nucleo F401RE, or any Zephyr-supported board) and create a new overlay file with the correct GPIO pins for that board. Build and flash without changing a single line of C code. This exercise demonstrates the power of the devicetree abstraction: hardware portability without #ifdef blocks.
Comments