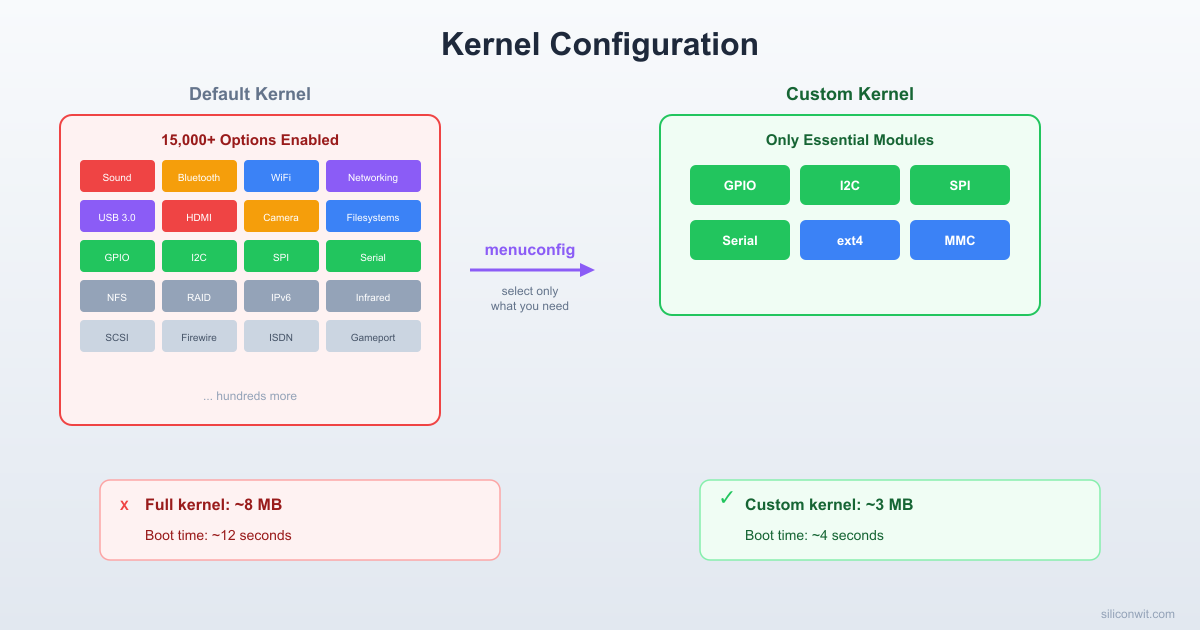
The stock Raspberry Pi kernel includes drivers for thousands of devices you will never connect and subsystems your embedded application will never use. Every extra module increases boot time, memory usage, and attack surface. In this lesson, you will clone the official Raspberry Pi kernel source, learn how the Kconfig system organizes over 15,000 configuration options, and use menuconfig to strip the kernel down to exactly what your board needs. The result is a custom kernel image that boots in under 4 seconds, giving you a fast, lean foundation for every project in this course. #LinuxKernel #Menuconfig #EmbeddedLinux
What We Are Building
Stripped-Down Kernel with Sub-4-Second Boot
A custom-compiled Linux kernel for the Raspberry Pi Zero 2 W, configured with only the subsystems and drivers needed for serial console, GPIO, I2C, SPI, and SD card storage. By disabling network file systems, sound, USB gadget classes, and dozens of other unused subsystems, the kernel image shrinks significantly and the time from power-on to shell prompt drops below 4 seconds.
Build specifications:
Parameter
Value
Kernel source
github.com/raspberrypi/linux (rpi-6.6.y branch)
Configuration tool
menuconfig (ncurses-based)
Base defconfig
bcm2711_defconfig (adapted for Zero 2 W)
Target boot time
Under 4 seconds (power-on to shell prompt)
Image format
Image.gz (compressed AArch64 kernel)
Modules
Minimal; most drivers built-in for faster boot
Build host
x86_64 Linux with aarch64-linux-gnu cross-toolchain
Verification
Serial console boot log with timestamp analysis
Key Subsystems to Disable
Subsystem
Config Symbol
Reason
Sound/ALSA
CONFIG_SOUND
No audio needed
Bluetooth
CONFIG_BT
Not used in this project
USB Gadget
CONFIG_USB_GADGET
Zero 2 W is host only here
Network filesystems
CONFIG_NETWORK_FILESYSTEMS
Local storage only
Wireless (initially)
CONFIG_WLAN
Re-enable later if needed
Virtualization
CONFIG_VIRTUALIZATION
Not applicable
Multimedia (V4L2)
CONFIG_MEDIA_SUPPORT
No camera in this lesson
  Menuconfig Decision: Built-in vs Module  ──────────────────────────────────────────  [*] = Built-in (compiled into kernel)      + Available immediately at boot      + No insmod step needed      - Larger kernel image
  [M] = Module (separate .ko file)      + Loaded only when needed      + Smaller kernel image      - Requires module load step
  [ ] = Disabled (not compiled at all)      + Saves flash and RAM      - Cannot be used without recompiling
  For fast boot: use [*] for essential  drivers, [ ] for everything else.
Cloning the Kernel Source
The Raspberry Pi Foundation maintains a fork of the Linux kernel with patches and drivers specific to Broadcom SoCs. This is the kernel you should use for any Pi project, as it includes support for hardware that has not yet been merged into the mainline kernel.
Kernel Source Tree (simplified)
──────────────────────────────────────────
rpi-linux/
├── arch/arm64/ ARM64 platform code
│ ├── boot/dts/ Device tree sources
│ └── configs/ defconfig files
├── drivers/ All device drivers
│ ├── gpio/
│ ├── i2c/
│ ├── spi/
│ └── usb/
├── kernel/ Core scheduler, IPC
├── mm/ Memory management
├── net/ Networking stack
├── fs/ Filesystems
├── include/ Header files
├── Kconfig Top-level config
└── Makefile Top-level build
Clone the repository with the rpi-6.6.y branch:
Terminal window
cd~/rpi-embedded
gitclone--depth1--branchrpi-6.6.y\
https://github.com/raspberrypi/linux.gitrpi-linux
cdrpi-linux
The --depth 1 flag creates a shallow clone, downloading only the latest commit rather than the full history. This reduces the download from several gigabytes to roughly 200 MB.
Check which branch you are on:
Terminal window
gitbranch
Expected output:
* rpi-6.6.y
The kernel source tree is organized into well-defined directories. Here are the most important ones for embedded work:
Directoryrpi-linux/
Directoryarch/
Directoryarm64/
Directoryboot/
Directorydts/
Directorybroadcom/
…
Directoryconfigs/
…
Directorydrivers/
Directorygpio/
…
Directoryi2c/
…
Directoryspi/
…
Directorymmc/
…
Directorytty/
Directoryserial/
…
Directoryfs/
…
Directoryinclude/
…
Directoryinit/
…
Directorykernel/
…
Directorymm/
…
Directorynet/
…
Directoryscripts/
…
Kconfig
Makefile
Key directories for this lesson:
arch/arm64/configs/ contains default configuration files (defconfigs) for various ARM64 platforms.
arch/arm64/boot/dts/broadcom/ contains device tree source files for Raspberry Pi boards.
drivers/ contains all hardware drivers organized by subsystem.
scripts/ contains build helper scripts, including kconfig tools.
init/ contains the code that runs during kernel initialization, including the init process launcher.
Understanding Kconfig
The Linux kernel has over 15,000 configuration options. The system that manages them is called Kconfig, and understanding it is essential for anyone building custom kernels.
Every directory in the kernel source contains a Kconfig file that defines the configuration options for that subsystem. These files use a simple language to declare options, their types, defaults, and dependencies. For example, a simplified entry looks like:
config SPI
bool "SPI support"
help
The Serial Peripheral Interface (SPI) bus is used to
communicate with sensors, displays, and other peripherals.
The configuration system works with three key files:
File
Purpose
Kconfig
Declares available options, their types, defaults, and dependencies. Distributed throughout the source tree.
.config
The active configuration file in the build root. Contains all selected options. This is what make reads.
defconfig
A minimal configuration file that records only the options that differ from defaults. Used to create reproducible configurations.
The workflow is: start from a defconfig that is close to your target hardware, then customize it. For the Raspberry Pi Zero 2 W, the closest defconfig is bcm2711_defconfig:
This generates a .config file with sensible defaults for Broadcom BCM27xx boards. You can examine it:
Terminal window
wc-l.config
You will see roughly 8,000 to 10,000 lines, each representing a configuration choice. Lines starting with CONFIG_ set a value; lines starting with # CONFIG_ explicitly disable an option.
Look at a few entries:
Terminal window
grepCONFIG_SPI.config
grepCONFIG_SOUND.config
grepCONFIG_BT.config
Why bcm2711_defconfig for a BCM2710?
The BCM2710A1 (used in the Zero 2 W) and BCM2711 (used in the Pi 4) share the same ARM Cortex-A53 architecture at the 64-bit level. The bcm2711_defconfig enables all the necessary Broadcom peripheral drivers that work across both chips. The differences (number of cores, peripheral addresses) are handled by the device tree, not the kernel configuration.
Using menuconfig
While you could edit .config by hand, the preferred method is menuconfig, a text-based graphical interface that lets you navigate options by category, search for symbols, and see dependency information.
A blue-and-gray interface appears in your terminal. Here are the key controls:
Key
Action
Arrow keys
Navigate up/down through menu items
Enter
Enter a submenu
Space
Toggle an option (cycles through y, m, n)
Y
Set to built-in (compiled into the kernel image)
M
Set to module (compiled as a loadable .ko file)
N
Disable the option entirely
/
Search for a config symbol by name
?
Show help text for the highlighted option
Esc Esc
Go back (double-press Escape)
The main menu is organized into top-level categories:
General setup --->
Processor type and features --->
Power management and ACPI options --->
Bus options --->
Networking support --->
Device Drivers --->
File systems --->
Security options --->
Cryptographic API --->
Library routines --->
To find a specific option, press / and type the config symbol name (without the CONFIG_ prefix). For example, searching for SOUND will show you where the sound subsystem option lives, what it depends on, and what selects it.
Save your configuration
When you exit menuconfig, it will ask if you want to save. Always save. The changes are written to .config. If you want to keep a backup before experimenting, copy the file: cp .config .config.backup
Stripping the Kernel
Now comes the most impactful part of this lesson: disabling subsystems that your embedded project does not need. Each disabled subsystem means less code to compile, a smaller kernel image, less memory usage, and faster boot time.
Navigate through menuconfig and disable the following. For each one, the location in the menu tree and the config symbol are provided.
Sound (CONFIG_SOUND)
Device Drivers --->
<*> Sound card support --->
Press N on “Sound card support” to disable the entire sound subsystem. The Pi Zero 2 W has no onboard audio codec, and our embedded application does not play audio.
Bluetooth (CONFIG_BT)
Networking support --->
Bluetooth subsystem support --->
Press N on “Bluetooth subsystem support”. Although the Zero 2 W has Bluetooth hardware, we are not using it in this project. You can re-enable it later.
USB Gadget (CONFIG_USB_GADGET)
Device Drivers --->
USB support --->
USB Gadget Support --->
Press N on “USB Gadget Support”. USB Gadget mode lets the Pi act as a USB device (like a serial port or Ethernet adapter when connected to a host). We are using the Pi as a standalone embedded system, so this is not needed.
Network Filesystems (CONFIG_NETWORK_FILESYSTEMS)
File systems --->
Network File Systems --->
Press N on “Network File Systems” to disable NFS, CIFS/SMB, and other network-mounted filesystems. Our root filesystem is on the SD card.
Virtualization (CONFIG_VIRTUALIZATION)
Virtualization --->
Press N on the top-level “Virtualization” entry. KVM and other hypervisor support is irrelevant for a 512 MB embedded board.
Multimedia / V4L2 (CONFIG_MEDIA_SUPPORT)
Device Drivers --->
Multimedia support --->
Press N on “Multimedia support”. This disables the entire Video4Linux2 framework, camera drivers, and TV tuner support.
Wireless (CONFIG_WLAN)
Device Drivers --->
Network device support --->
Wireless LAN --->
Press N on “Wireless LAN”. We will re-enable this in a later lesson when we configure WiFi. For now, a serial-only system boots faster without wireless drivers.
Additional options to disable
You can also turn off these to further reduce size:
Terminal window
# In menuconfig, search (/) for each symbol and disable:
# CONFIG_STAGING - experimental drivers
# CONFIG_DRM - Direct Rendering Manager (GPU/display)
# CONFIG_INPUT_TOUCHSCREEN - touchscreen drivers
# CONFIG_INPUT_JOYSTICK - joystick support
# CONFIG_HID - Human Interface Device (USB keyboards, mice)
After making all these changes, save and exit menuconfig.
You can verify your changes by comparing against the original defconfig:
Terminal window
scripts/diffconfig.config.backup.config
This shows a concise list of what changed. You should see dozens of options switching from y or m to n.
Module vs Built-in
Every kernel option that represents a driver or feature can typically be set to one of three states:
Symbol
menuconfig display
Meaning
y
[*] or <*>
Built-in. Compiled directly into the kernel image. Available immediately at boot.
m
[M] or <M>
Module. Compiled as a separate .ko file. Must be loaded at runtime with modprobe or insmod.
n
[ ] or < >
Disabled. Not compiled at all.
For an embedded system focused on fast boot times, the decision is straightforward:
Boot-critical drivers should be built-in (y). The SD card driver (CONFIG_MMC), the filesystem driver (CONFIG_EXT4_FS), and the serial console driver (CONFIG_SERIAL_AMBA_PL011) must all be built-in. If these are modules, the kernel cannot mount the root filesystem or print to the console during early boot, because the module files live on the root filesystem that has not been mounted yet.
Optional drivers can be modules (m). If you plan to occasionally use a USB Ethernet adapter, compile its driver as a module. It only takes up space on disk, not in RAM, and you load it only when needed.
Unused drivers should be disabled (n). This is where the biggest gains come from. Every disabled driver is code that does not need to be compiled, loaded, or initialized.
For this lesson, set the following to built-in:
Terminal window
# These should be y (built-in), not m
# Search for each in menuconfig and set to *
CONFIG_MMC=y
CONFIG_MMC_BCM2835=y
CONFIG_EXT4_FS=y
CONFIG_SERIAL_AMBA_PL011=y
CONFIG_I2C=y
CONFIG_I2C_BCM2835=y
CONFIG_SPI=y
CONFIG_SPI_BCM2835=y
CONFIG_GPIO_BCM_VIRT=y
CONFIG_GPIOLIB=y
You can also set these directly in .config if you prefer not to navigate menuconfig again, but always run make olddefconfig afterward to resolve any dependency issues:
This command reads .config, applies Kconfig dependency rules, and resolves any conflicts by choosing default values for newly required options.
Building the Kernel
With the configuration finalized, it is time to compile. The build process produces several artifacts: the kernel image, loadable modules, and device tree blobs.
Set up environment variables for convenience:
Terminal window
exportARCH=arm64
exportCROSS_COMPILE=aarch64-linux-gnu-
exportKERNEL_SRC=~/rpi-embedded/rpi-linux
Start the build:
Terminal window
cd$KERNEL_SRC
make-j$(nproc)Image.gzmodulesdtbs
The -j$(nproc) flag runs as many parallel compiler processes as your host has CPU cores. On a modern 8-core machine, the full kernel build takes roughly 5 to 15 minutes, depending on how much you disabled.
Let us break down what each target produces:
Target
Output File
Purpose
Image.gz
arch/arm64/boot/Image.gz
Compressed kernel image. The GPU firmware decompresses this into RAM at boot.
Image
arch/arm64/boot/Image
Uncompressed kernel image. Larger but boots slightly faster (no decompression step).
modules
Various .ko files
Loadable kernel modules for any option set to m.
dtbs
arch/arm64/boot/dts/broadcom/*.dtb
Device tree blobs. These describe hardware layout to the kernel.
Verify the build succeeded:
Terminal window
ls-lharch/arm64/boot/Image.gz
ls-lharch/arm64/boot/Image
Compare the sizes. Image.gz is typically 5 to 8 MB for a stripped kernel, while Image might be 15 to 25 MB. We use Image.gz to save space on the boot partition and reduce SD card read time.
This installs modules into ~/rpi-embedded/modules_out/lib/modules/<kernel-version>/.
Image vs Image.gz
For most embedded projects, Image.gz is the better choice. The compressed image is smaller (faster SD card read) and the decompression penalty is minimal on the Cortex-A53. However, if you are measuring boot time at the microsecond level and your storage is fast, the uncompressed Image eliminates one step from the boot sequence. In this lesson we use Image.gz.
Deploying to the SD Card
Insert the SD card you prepared in Lesson 1 and mount both partitions:
We copy Image.gz as kernel8.img because that is the filename specified in config.txt. The GPU firmware does not care about the actual format; it detects whether the file is compressed or not.
If you built everything as built-in, this directory may be nearly empty, which is expected.
Unmount and sync
Terminal window
sudoumount/mnt/boot
sudoumount/mnt/rootfs
sync
Measuring Boot Time
One of the most satisfying parts of building a custom kernel is seeing the boot time improvement. To measure it accurately, you need timestamps on every kernel log message.
Edit cmdline.txt on the boot partition to add the printk.time=1 parameter. Your full cmdline.txt should look like:
The timestamp on the “Run /sbin/init” line tells you the kernel boot time. For a stripped kernel, you should see this well under 3 seconds, compared to 5 or more seconds with the stock kernel.
To analyze the boot time more systematically, run dmesg on the Pi after boot:
Terminal window
dmesg|head-5
dmesg|tail-10
You can also extract the total kernel initialization time:
Terminal window
dmesg|grep"Run /sbin/init"
For a more detailed breakdown, you can identify the slowest subsystems:
Terminal window
# Show the 10 largest time gaps between consecutive messages
This helps you identify which driver or subsystem is consuming the most time during boot. If a particular driver takes 500 ms to initialize and you do not need it, that is a strong candidate for disabling.
Comparing before and after
If you completed Exercise 4 from Lesson 1, you have a baseline boot time measurement with the stock kernel. Compare that number with your custom kernel’s boot time. A typical result: stock kernel boots to init in 4 to 6 seconds; a stripped kernel boots to init in 1.5 to 2.5 seconds. That is a 2x to 3x improvement from configuration alone, without any code changes.
Kernel Command Line Parameters
The kernel command line (stored in cmdline.txt on the Raspberry Pi) controls kernel behavior at boot time. Understanding these parameters gives you fine-grained control over how the system starts.
Here are the most important parameters for embedded Linux work:
Parameter
Example
Purpose
console=
console=serial0,115200
Specifies the console device and baud rate. serial0 is the primary UART on the Pi. You can specify multiple consoles; output goes to all of them.
root=
root=/dev/mmcblk0p2
Tells the kernel which block device contains the root filesystem. mmcblk0p2 means the second partition of the first MMC (SD card) device.
rootfstype=
rootfstype=ext4
Specifies the filesystem type. Without this, the kernel tries each compiled-in filesystem driver until one works, which is slower.
rootwait
(no value)
Tells the kernel to wait indefinitely for the root device to appear. Essential for SD cards, which take time to initialize. Without this, the kernel may panic because the card is not ready yet.
init=
init=/sbin/init
Specifies the first userspace process. If omitted, the kernel tries /sbin/init, /etc/init, /bin/init, and /bin/sh in order.
printk.time=
printk.time=1
Adds timestamps to kernel log messages. Invaluable for boot time analysis.
quiet
(no value)
Suppresses most kernel log messages, printing only errors and warnings. Makes the console output cleaner but hides useful information during development.
loglevel=
loglevel=3
Controls which messages appear on the console. 0 = emergencies only; 7 = debug messages. Default is 7. Use 3 (errors and above) for production.
You can combine parameters for different scenarios:
Skip init entirely and run your application directly as PID 1. The kernel boots, mounts the root filesystem, and immediately executes your binary. This is the fastest possible path to running your code, but your application must handle everything that init normally does (mounting filesystems, etc.). Use this only for single-purpose appliances.
Passing custom parameters
You can also pass arbitrary parameters through cmdline.txt that your own init scripts or applications can read. Any parameter that the kernel does not recognize is passed to the init process in its environment. Your application can read these from /proc/cmdline. For example, adding myapp.debug=1 to cmdline.txt lets your app check /proc/cmdline for this flag.
Saving Your Configuration
After investing time in a carefully tuned kernel configuration, you should save it in a reproducible format. The .config file contains thousands of lines, many of which are just defaults. A defconfig is a minimal representation that only stores the options you explicitly set.
This is the standard practice in embedded Linux teams: check your defconfig into version control and rebuild from it on any machine.
Exercises
Exercise 1: Measure the difference
Boot with the stock kernel (the .stock backup you made) and record the time to reach init. Then boot with your custom kernel and record the same measurement. Calculate the percentage improvement. Document which disabled subsystems had the largest impact (hint: look at the timestamps around driver initialization in the stock kernel’s dmesg output).
Exercise 2: Find the smallest working kernel
Starting from your current configuration, try disabling additional subsystems one at a time. After each change, rebuild and boot. Find the absolute minimum configuration that still boots to a shell and runs hello_linux. Document each change and whether it broke the boot. This exercise teaches you which options are truly required.
Exercise 3: Build an uncompressed kernel
Build the kernel as Image (uncompressed) instead of Image.gz. Copy it to the boot partition as kernel8.img. Compare the file size and the boot time to the compressed version. Is the decompression overhead significant on the Cortex-A53? At what point would you choose one over the other?
Exercise 4: Explore Kconfig dependencies
In menuconfig, search for CONFIG_EXT4_FS and note its dependencies. Then search for CONFIG_MMC_BCM2835 and trace its dependency chain. Draw a dependency tree showing which options must be enabled for these two to work. This exercise helps you understand why some options cannot be disabled even when you press N.
Comments