A full Raspbian image carries hundreds of packages your embedded device will never use: a desktop environment, office tools, games, and services that consume memory and slow boot time. For a dedicated sensor node or industrial controller, you want an image containing only what your application needs. Buildroot is a build system that takes a configuration file and produces a complete Linux image (bootloader, kernel, root filesystem) with exactly the packages you select. In this lesson, you will configure Buildroot for the Raspberry Pi Zero 2 W, add the sensor application from earlier lessons as a custom package, lay down configuration files through a filesystem overlay, and generate a flashable SD card image. The final image boots directly into your application with nothing else running. #Buildroot #MinimalLinux #EmbeddedSystems
What We Are Building
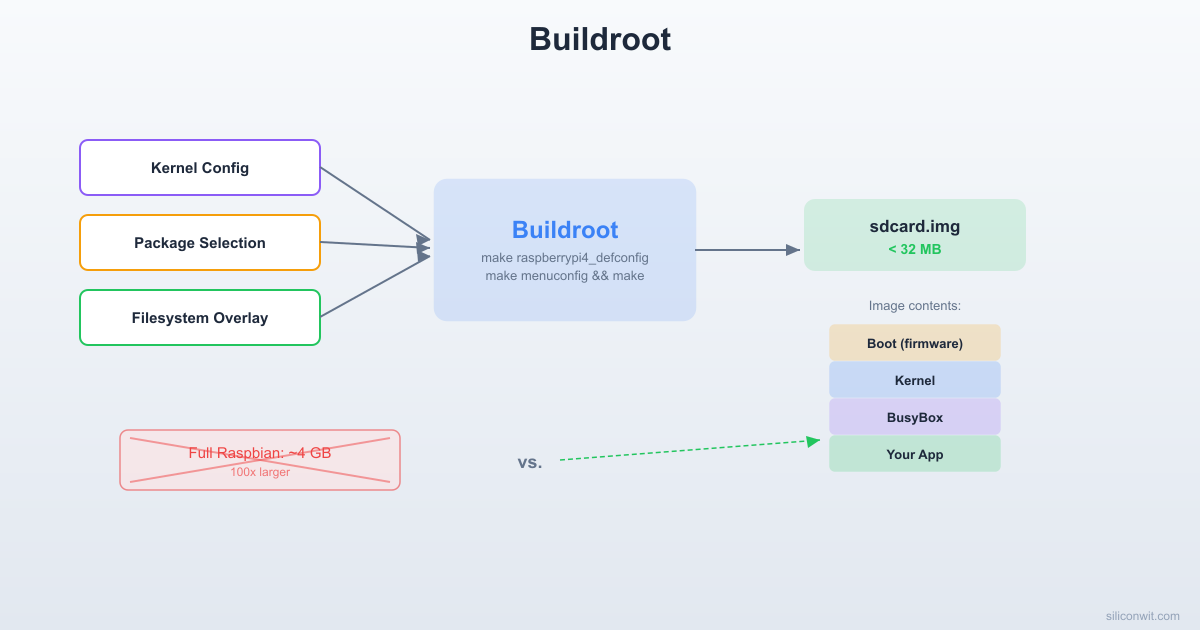
Minimal Buildroot Image with Sensor Application
A self-contained Linux image under 32 MB that boots the Raspberry Pi Zero 2 W directly into a sensor monitoring application. The image contains a custom-compiled kernel, BusyBox for essential shell utilities, your BME280 sensor reader as a custom Buildroot package, and a simple init script that launches the application at boot. No package manager, no login prompt, no unnecessary services.
Image specifications:
Parameter
Value
Build system
Buildroot (latest stable)
Target
Raspberry Pi Zero 2 W (AArch64)
Kernel
Custom-configured (from Lesson 2)
Init system
BusyBox init (simple, fast)
Root filesystem
ext4, read-only with tmpfs overlay for runtime data
Approximately 20 to 40 minutes on a modern x86_64 host
Buildroot Package Summary
Package
Purpose
busybox
Shell, coreutils, init, networking basics
sensor-monitor
Custom package: BME280 reader application
i2c-tools
Debugging I2C bus during development
dropbear
Lightweight SSH (optional, for remote access)
What is Buildroot?
Buildroot is an open-source build system that generates a complete embedded Linux image (cross-compilation toolchain, kernel, bootloader, and root filesystem) from source. You describe what you want through a configuration file, run make, and get a flashable image. Unlike Yocto (which uses a layer-based architecture with its own package format, recipe language, and extensive caching), Buildroot is simpler and faster to learn. A first Buildroot image can be ready in under an hour. The trade-off is that Buildroot offers less flexibility for large-scale product lines with multiple hardware variants and long-term maintenance. For a dedicated sensor node or single-purpose embedded device, Buildroot is an excellent fit.
Buildroot Build Pipeline
──────────────────────────────────────────
make menuconfig
│
▼
.config (target arch, packages, kernel)
│
▼
make
│
├──► Download sources ──► /dl/
├──► Build toolchain ──► /host/
├──► Build kernel ──► Image.gz
├──► Build BusyBox ──► rootfs utils
├──► Build packages ──► your app
└──► Generate image ──► sdcard.img
│
▼
dd to microSD
Boot the Pi!
Feature
Buildroot
Yocto
Learning curve
Low (Kconfig menus)
Steep (BitBake, layers, recipes)
First build time
20 to 40 minutes
1 to 3 hours
Package count
~2,800
~10,000+ (via layers)
Output
Single image
Image + SDK + package feeds
Best for
Single-purpose devices
Complex product families
Buildroot Output Directory
──────────────────────────────────────────
output/
├── build/ Extracted + compiled
│ ├── busybox-*/ sources for each
│ ├── linux-*/ selected package
│ └── sensor-monitor-*/
├── host/ Cross-toolchain +
│ └── bin/ build tools (runs
│ └── aarch64- on your x86 PC)
│ linux-gnu-gcc
├── images/ Final output
│ ├── Image.gz Kernel
│ ├── rootfs.ext4 Root filesystem
│ └── sdcard.img Flashable image
└── target/ Staging rootfs
├── bin/ (becomes / on target)
├── etc/
└── usr/
Downloading and Initial Configuration
Clone Buildroot
Terminal window
cd~
gitclonehttps://git.buildroot.net/buildroot
cdbuildroot
gitcheckout2024.02# Use a stable release tag
Load the default configuration for Raspberry Pi Zero 2 W
Buildroot ships with default configurations for many boards. The Pi Zero 2 W uses the AArch64 configuration:
Terminal window
makeraspberrypi0_2w_defconfig
This creates a .config file with sensible defaults: AArch64 target, internal toolchain, Linux kernel from the Raspberry Pi fork, and a minimal root filesystem.
Open the configuration menu
Terminal window
makemenuconfig
The menu is organized into major sections:
Menu Section
What It Controls
Target options
CPU architecture, ABI, floating point
Toolchain
Compiler version, C library (glibc/musl/uclibc)
System configuration
Hostname, init system, root password, overlays
Kernel
Source, version, defconfig, device tree
Target packages
All user-space packages
Filesystem images
ext4, squashfs, SD card image layout
Bootloader
U-Boot or direct kernel boot
Key Configuration Options
Navigate through menuconfig and set the following options. You can also edit the .config file directly, but menuconfig handles dependencies automatically.
The BCM2710A1 on the Pi Zero 2 W has four Cortex-A53 cores. Selecting the correct variant enables compiler optimizations specific to this core.
Toolchain --->
Toolchain type: Buildroot toolchain (internal)
C library: glibc
[*] Enable C++ support
GCC compiler Version: gcc 13.x
The internal toolchain is built from source as part of the Buildroot process. This ensures binary compatibility. For faster builds on repeated iterations, you can switch to an external pre-built toolchain like Linaro, but the internal option is simplest for getting started.
BusyBox init is minimal and fast. It reads /etc/inittab at boot. devtmpfs lets the kernel create device nodes automatically without needing udev or mdev.
Kernel --->
[*] Linux Kernel
Kernel version: Custom Git repository
URL of custom repository: https://github.com/raspberrypi/linux
Custom repository version: rpi-6.6.y
Defconfig name: bcm2711
[*] Build a Device Tree Blob (DTB)
Device Tree Source file names: broadcom/bcm2710-rpi-zero-2-w
If you have a custom kernel configuration from Lesson 2, you can use “Using a custom config file” instead of a defconfig and point it to your saved .config.
Filesystem images --->
[*] ext2/3/4 root filesystem
ext2/3/4 variant: ext4
exact size: 64M
[*] Create a GPT partition table image
Partition table type: hybrid (GPT + MBR)
A 64 MB root filesystem is generous for a minimal image. The final SD card image will include the boot partition (FAT32 with kernel and DTB) and the root partition (ext4).
Adding Standard Packages
Packages are selected under Target packages in menuconfig. Each package has a BR2_PACKAGE_* Kconfig variable. Some packages pull in dependencies automatically.
Add I2C tools for debugging sensor communication:
Target packages --->
Hardware handling --->
[*] i2c-tools
Add Dropbear for lightweight SSH access during development:
Target packages --->
Networking applications --->
[*] dropbear
You can also enable packages directly in the config file:
Terminal window
# Append to .config (or use menuconfig)
echo"BR2_PACKAGE_I2C_TOOLS=y">>.config
echo"BR2_PACKAGE_DROPBEAR=y">>.config
makeolddefconfig# Resolve dependencies
make olddefconfig applies the new settings and resolves any dependencies (for example, Dropbear requires the zlib library, which will be selected automatically).
Creating a Custom Package
Buildroot packages follow a strict directory and naming convention. You will create a sensor-monitor package that builds the BME280 sensor reader from earlier lessons.
Directorybuildroot/
Directorypackage/
Directorysensor-monitor/
Config.in
sensor-monitor.mk
Directorysrc/
sensor-monitor.c
Makefile
Create the package directory
Terminal window
mkdir-ppackage/sensor-monitor/src
Write Config.in
This file defines the package in Buildroot’s Kconfig system:
package/sensor-monitor/Config.in
configBR2_PACKAGE_SENSOR_MONITOR
bool"sensor-monitor"
help
BME280sensormonitoringapplication.
Readstemperature,humidity,andpressureviaI2C
andlogstostdoutorafile.
Write the Buildroot package recipe
The .mk file tells Buildroot how to fetch, build, and install your package:
A filesystem overlay is a directory tree that gets copied on top of the generated root filesystem. Any files you place in the overlay appear in the final image at the corresponding path. This is how you add custom configuration files, init scripts, and application settings without modifying Buildroot packages.
The overlay path must match what you set in System configuration --> Root filesystem overlay directories. Buildroot copies the entire overlay tree using rsync during the final filesystem assembly step.
Building the Image
With everything configured, build the complete image:
Alternatively, use balenaEtcher for a graphical flashing tool.
Connect the serial console
Attach a USB-to-serial adapter to the Pi’s UART pins (GPIO14 TX, GPIO15 RX, GND). Open a terminal:
Terminal window
picocom-b115200/dev/ttyUSB0
Boot and log in
Insert the SD card and power on. You should see kernel boot messages on the serial console. Login with:
siliconwit-sensor login: root
Password: siliconwit
Verify the sensor application is running
Terminal window
ps|grepsensor
You should see the sensor-monitor process. Check the log:
Terminal window
cat/var/log/sensor-monitor.csv
Expected output:
timestamp,temperature_c,pressure_hpa,humidity_pct
1709125200,23.45,1013.25,45.67
1709125210,23.47,1013.24,45.70
Check the image size
Terminal window
df-h
The root filesystem should show well under 32 MB of used space.
Verify only essential services are running
Terminal window
ps
You should see only: init, a few kernel threads, getty (serial console), dropbear (if enabled), and sensor-monitor. No desktop, no systemd, no unnecessary services.
Read-Only Root Filesystem
For production embedded systems, mounting the root filesystem as read-only dramatically improves reliability. SD cards wear out from repeated writes, and a read-only root prevents filesystem corruption from unexpected power loss.
Configure Buildroot for a read-only root:
System configuration --->
[*] remount root filesystem read-only at boot
You also need writable areas for runtime data. Add tmpfs mounts in your overlay’s /etc/fstab:
board/siliconwit/rpi0w2/rootfs_overlay/etc/fstab
# <device> <mount> <type> <options> <dump> <pass>
/dev/mmcblk0p1/bootvfatro00
/dev/mmcblk0p2/ext4ro,noatime01
tmpfs/tmptmpfsnosuid,nodev00
tmpfs/var/logtmpfsnosuid,nodev00
tmpfs/var/runtmpfsnosuid,nodev00
With this setup:
The root filesystem (/) and boot partition (/boot) are mounted read-only.
/tmp, /var/log, and /var/run are tmpfs (RAM-based). Data written here is lost on reboot, which is acceptable for logs and PID files.
The SD card receives zero writes during normal operation, extending its lifespan by orders of magnitude.
If power is cut at any point, the filesystem is always consistent because nothing was being written to it.
If the sensor application needs to persist data across reboots, you have two options: add a small writable data partition on the SD card, or use an external storage device.
Rebuilding and Iterating
One of Buildroot’s strengths is fast incremental rebuilds. You do not need to rebuild everything when you change one package.
Rebuild a single package:
Terminal window
# Rebuild only the sensor-monitor package
makesensor-monitor-rebuild
# Then regenerate the filesystem image
make
Rebuild the kernel (after changing kernel config):
Terminal window
makelinux-menuconfig# Modify kernel config
makelinux-rebuild# Rebuild just the kernel
make# Regenerate images
Full clean rebuild (when changing toolchain or major config):
This creates a minimal defconfig that you can version-control. To restore it later:
Terminal window
makesiliconwit_rpi0w2_defconfig
Useful make targets for debugging:
Command
Purpose
make sensor-monitor-rebuild
Rebuild one package
make sensor-monitor-dirclean
Delete package build directory entirely
make linux-menuconfig
Edit kernel config from within Buildroot
make busybox-menuconfig
Edit BusyBox config (select which utilities to include)
make graph-depends
Generate a dependency graph (requires Graphviz)
make graph-size
Generate a size breakdown of the image
make sdk
Build a relocatable SDK for external development
make source
Download all source tarballs (for offline builds)
Exercises
Exercise 1: Add a Web Dashboard
Enable the lighttpd web server package in Buildroot. Create a simple HTML page in your filesystem overlay at /var/www/index.html that displays “Sensor Dashboard.” Write a CGI script in /var/www/cgi-bin/data.sh that reads the sensor log CSV and returns the last 10 readings as JSON. Verify you can access the dashboard from a browser on the same network.
Exercise 2: Minimize Image Size
Start with your working image and reduce its size as much as possible. Disable dropbear (no SSH). Use musl instead of glibc (it is much smaller). Run make graph-size and identify the largest components. Strip all binaries with BR2_STRIP_strip=y. Use BR2_OPTIMIZE_S=y for size-optimized compilation. Target: get the root filesystem under 8 MB.
Exercise 3: Add the Kernel Module
Create a second custom Buildroot package called mydevice-driver that builds the kernel module from Lesson 5. Use $(LINUX_DIR) in your .mk file as the KERNELDIR. Install the .ko file to /lib/modules/$(LINUX_VERSION_PROBED)/extra/. Add an init script that runs insmod at boot. Verify with lsmod after booting the image.
Exercise 4: Dual Partition OTA Updates
Modify the SD card partition layout to have two root partitions (A and B). Write a shell script that downloads a new rootfs.ext4 image, writes it to the inactive partition, updates the boot configuration to point to the new partition, and reboots. This is a basic over-the-air update mechanism. Test by making a visible change (such as the hostname) and performing an update.
Comments