Skip to content

Edge Impulse Data Collection and Training

Edge Impulse Data Collection and Training hero image
Modified:
Published:
Edge Impulse Workflow
──────────────────────────────────────────
ESP32 + MPU6050
│ Serial forwarder
Edge Impulse Studio (cloud)
├──► 1. Data Collection (label samples)
├──► 2. Impulse Design
│ ├── Spectral Features (FFT)
│ └── Neural Network Classifier
├──► 3. Train Model (cloud GPU)
├──► 4. Test on held-out data
└──► 5. Deploy as C++ Library
ESP32 firmware (inference)

Real sensor data is messy. Collecting it, labeling it, extracting useful features, and iterating on models by hand is tedious and error prone. Edge Impulse is a cloud platform that handles the entire pipeline from raw sensor data to a deployable C++ library. In this lesson you will collect accelerometer data from an MPU6050 connected to an ESP32, upload it to Edge Impulse, train a motion classifier that distinguishes between idle, walking, and running, and deploy the quantized model back to the ESP32 for real-time inference. #EdgeImpulse #TinyML #MotionClassifier

What We Are Building

Motion Classifier

A wearable-style motion classifier that reads 3-axis accelerometer data from an MPU6050 at 50 Hz and classifies the current activity as idle, walking, or running. The classifier runs entirely on the ESP32 with no cloud connectivity required after deployment. An LED indicates the current state: off for idle, slow blink for walking, fast blink for running.

Project specifications:

ParameterValue
MCUESP32 (any dev board)
SensorMPU6050 (I2C, 3.3V)
Sample rate50 Hz (accelerometer X, Y, Z)
Classesidle, walking, running
Window size2 seconds (100 samples)
Inference platformEdge Impulse C++ library on ESP-IDF
OutputSerial log + LED blink pattern

Bill of Materials

RefComponentQuantityNotes
U1ESP32 DevKitC1Reuse from previous courses
U2MPU6050 breakout module1GY-521 or equivalent
D1LED (any color)1For activity indicator
R1220 ohm resistor1Current limiting for LED
Breadboard + jumper wires1 set
Impulse Design (Edge Impulse)
──────────────────────────────────────────
Raw Data Processing Learning
───────── ────────── ────────
┌──────────┐ ┌──────────┐ ┌────────┐
│ Accel X │ │ Spectral │ │ Neural │
│ Accel Y ├───►│ Features ├──►│Network │
│ Accel Z │ │ (FFT, │ │Classif.│
│ 50 Hz │ │ peaks, │ │ │
│ 2s window│ │ energy) │ │ idle │
└──────────┘ └──────────┘ │ walk │
100 samples 33 features │ run │
x 3 axes └────────┘

Wiring

MPU6050 PinESP32 PinFunction
VCC3.3VPower
GNDGNDGround
SCLGPIO 22I2C clock
SDAGPIO 21I2C data
LEDESP32 Pin
Anode (through 220R)GPIO 2
CathodeGND

Edge Impulse Overview


Edge Impulse provides a web-based pipeline with these stages:

  1. Data Acquisition. Upload sensor data as CSV or stream it live via the Edge Impulse CLI. Each sample is labeled with its class.

  2. Impulse Design. Define the processing pipeline: input axes, window size, feature extraction block (spectral analysis, MFE, raw), and learning block (classification NN, anomaly detection).

  3. Feature Extraction. The platform computes features (FFT peaks, spectral power, statistical moments) for each window and visualizes them in a 2D feature explorer.

  4. Training. A neural network classifier trains on the extracted features. You control the architecture (number of layers, neurons, dropout) and training parameters (epochs, learning rate).

  5. Testing. The platform evaluates accuracy on a held-out test set and shows the confusion matrix.

  6. Deployment. Export a quantized model as a C++ library, Arduino library, or WebAssembly. The C++ library drops directly into an ESP-IDF project.

Create a free account at edgeimpulse.com and create a new project called “Motion Classifier”.

Step 1: Data Collection Firmware


The first task is to write firmware that reads the MPU6050 at 50 Hz and outputs the data in a format that Edge Impulse can ingest.

data_collection.py
# Stream MPU6050 accelerometer data over serial for Edge Impulse ingestion
# Format: timestamp, accX, accY, accZ (CSV)
from machine import I2C, Pin
import time
# MPU6050 registers
MPU6050_ADDR = 0x68
PWR_MGMT_1 = 0x6B
ACCEL_XOUT_H = 0x3B
ACCEL_CONFIG = 0x1C
# Initialize I2C
i2c = I2C(0, scl=Pin(22), sda=Pin(21), freq=400000)
# Wake up MPU6050
i2c.writeto_mem(MPU6050_ADDR, PWR_MGMT_1, b'\x00')
time.sleep_ms(100)
# Set accelerometer range to +/- 2g
i2c.writeto_mem(MPU6050_ADDR, ACCEL_CONFIG, b'\x00')
def read_accel():
"""Read 3-axis accelerometer data, return as (x, y, z) in g."""
data = i2c.readfrom_mem(MPU6050_ADDR, ACCEL_XOUT_H, 6)
ax = (data[0] << 8 | data[1])
ay = (data[2] << 8 | data[3])
az = (data[4] << 8 | data[5])
# Convert from signed 16-bit
if ax > 32767: ax -= 65536
if ay > 32767: ay -= 65536
if az > 32767: az -= 65536
# Convert to g (16384 LSB/g at +/- 2g range)
return ax / 16384.0, ay / 16384.0, az / 16384.0
# Collection parameters
SAMPLE_RATE_HZ = 50
SAMPLE_INTERVAL_MS = 1000 // SAMPLE_RATE_HZ
DURATION_S = 10 # collect 10 seconds per recording
print("MPU6050 data collection ready.")
print(f"Sample rate: {SAMPLE_RATE_HZ} Hz, Duration: {DURATION_S} s")
print("Press the BOOT button or send 'start' to begin recording.")
print("")
# Wait for trigger
input("Press Enter to start recording...")
print("timestamp,accX,accY,accZ")
start_time = time.ticks_ms()
num_samples = SAMPLE_RATE_HZ * DURATION_S
for i in range(num_samples):
target_time = start_time + (i * SAMPLE_INTERVAL_MS)
ax, ay, az = read_accel()
ts = time.ticks_diff(time.ticks_ms(), start_time)
print(f"{ts},{ax:.4f},{ay:.4f},{az:.4f}")
# Wait for next sample
now = time.ticks_ms()
wait = time.ticks_diff(target_time, now)
if wait > 0:
time.sleep_ms(wait)
print("Recording complete.")

Step 2: Collecting and Labeling Data


You need at least 3 minutes of data per class. For three classes (idle, walking, running), plan to collect about 10 minutes total.

  1. Flash the data collection firmware to your ESP32.

  2. Collect idle data. Place the ESP32 + MPU6050 on a flat table. Start recording. Save the serial output to a file: idle_01.csv, idle_02.csv, etc. Collect at least 6 recordings of 10 seconds each.

  3. Collect walking data. Hold the sensor board in your hand (or strap it to your wrist/ankle) and walk at a normal pace. Save as walking_01.csv, etc.

  4. Collect running data. Same setup, but jog or run. Save as running_01.csv, etc.

  5. Capture serial output to files using a terminal tool (see commands below).

Capture serial output with any of these methods:

Terminal window
# Using screen with logging
screen -L -Logfile idle_01.csv /dev/ttyUSB0 115200
# Or using minicom
minicom -D /dev/ttyUSB0 -b 115200 -C idle_01.csv
# Or using Python
python -c "
import serial, sys
ser = serial.Serial('/dev/ttyUSB0', 115200, timeout=15)
with open(sys.argv[1], 'w') as f:
while True:
line = ser.readline().decode('utf-8', errors='ignore').strip()
if line:
print(line)
f.write(line + '\n')
if 'complete' in line.lower():
break
" idle_01.csv

Step 3: Uploading Data to Edge Impulse


You can upload data through the Edge Impulse web interface or the CLI.

Using the Edge Impulse CLI

Terminal window
# Install the CLI
npm install -g edge-impulse-cli
# Login (first time only)
edge-impulse-login
# Upload a CSV file with a label
edge-impulse-uploader --label idle --category training idle_01.csv
edge-impulse-uploader --label idle --category training idle_02.csv
edge-impulse-uploader --label walking --category training walking_01.csv
edge-impulse-uploader --label running --category training running_01.csv
# Reserve some files for testing
edge-impulse-uploader --label idle --category testing idle_06.csv
edge-impulse-uploader --label walking --category testing walking_06.csv
edge-impulse-uploader --label running --category testing running_06.csv

Using the Web Interface

  1. Go to your Edge Impulse project, select Data acquisition.
  2. Click Upload data, select your CSV files, set the label, and choose training or testing split.
  3. Make sure the CSV header matches: timestamp,accX,accY,accZ.

Step 4: Designing the Impulse


In the Edge Impulse Studio, go to Impulse design.

Input Block

SettingValue
Input axesaccX, accY, accZ
Window size2000 ms
Window increase500 ms
Frequency50 Hz

The window size of 2 seconds (100 samples at 50 Hz) gives the model enough context to distinguish between activities. The window increase of 500 ms means the model evaluates overlapping windows during inference.

Processing Block: Spectral Analysis

Select Spectral Analysis as the processing block. This computes frequency-domain features from each axis:

  • FFT length, spectral power in configurable bins
  • RMS, peak-to-peak, mean, standard deviation
  • Spectral entropy and skewness

These features are much more discriminative than raw time-domain samples. Walking has a characteristic frequency around 1.5 to 2 Hz. Running is faster (2.5 to 4 Hz). Idle has minimal spectral power.

Learning Block: Classification

Select Classification as the learning block.

SettingRecommended Value
Number of training cycles100
Learning rate0.0005
Minimum confidence rating0.6
Neural network architecture2 hidden layers, 20 and 10 neurons
Dropout0.25

Step 5: Training and Evaluating


Click Start training. Training takes 1 to 3 minutes for this dataset size. After training, Edge Impulse shows:

  • Accuracy on the validation split (aim for 90%+ with clean data)
  • Confusion matrix showing per-class precision and recall
  • On-device performance estimate (inference time and RAM usage for your target MCU)

A typical confusion matrix for a well-collected dataset:

Predicted IdlePredicted WalkingPredicted Running
Actual Idle96%3%1%
Actual Walking2%93%5%
Actual Running0%4%96%

If accuracy is low, check for:

  • Mislabeled samples (review the data in the Data acquisition tab)
  • Insufficient data (add more recordings)
  • Sensor mounting inconsistency (always mount the sensor the same way)

Go to Model testing and run the test set. This evaluates on data the model has never seen.

Step 6: Exporting the C++ Library


  1. Go to Deployment in Edge Impulse Studio.
  2. Select C++ library.
  3. Choose Quantized (int8) for optimization.
  4. Click Build. Edge Impulse generates a .zip file containing the model, feature extraction code, and inference API.
  5. Download and extract the zip.

The extracted library has this structure:

  • Directoryedge-impulse-sdk/
    • Directoryclassifier/
    • Directorydsp/
    • Directoryporting/
    • Directorytensorflow/
  • Directorymodel-parameters/
    • model_metadata.h
    • model_variables.h
  • Directorytflite-model/
    • trained_model_compiled.cpp
  • edge-impulse-sdk.cmake

Step 7: Integrating with ESP-IDF


Create a new ESP-IDF project and copy the Edge Impulse library into the components directory.

  • Directorymotion_classifier/
    • CMakeLists.txt
    • Directorymain/
      • CMakeLists.txt
      • main.cpp
    • Directorycomponents/
      • Directoryedge-impulse-sdk/

Inference Firmware

main/main.cpp
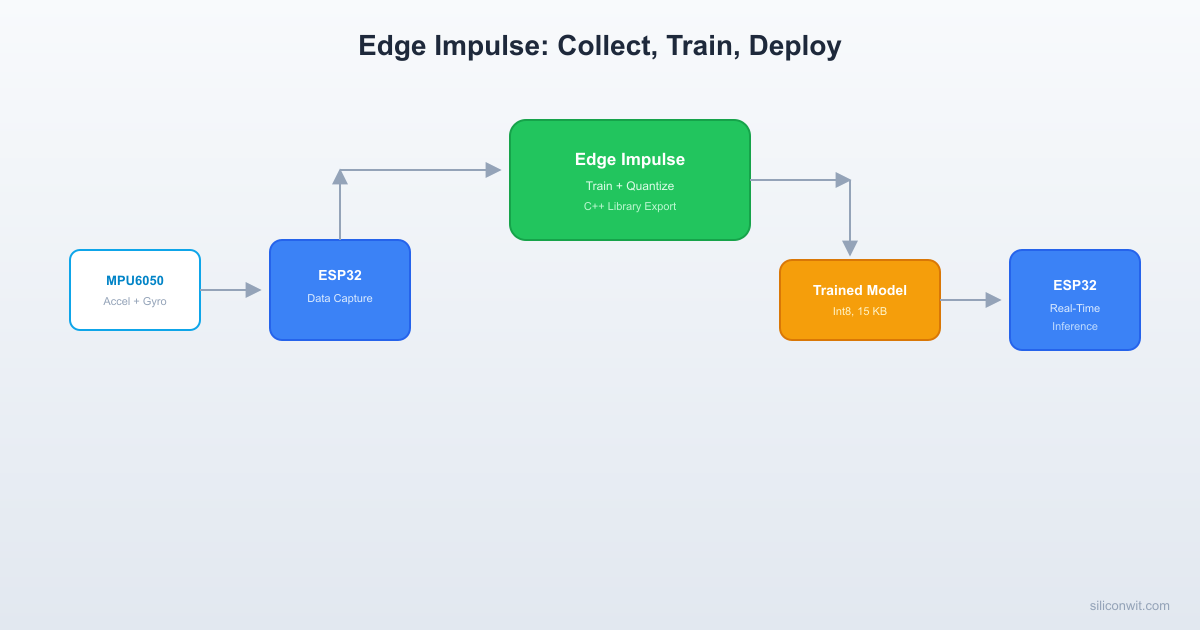
// Real-time motion classification using Edge Impulse on ESP32
#include <cstdio>
#include <cstring>
#include "freertos/FreeRTOS.h"
#include "freertos/task.h"
#include "driver/i2c.h"
#include "driver/gpio.h"
#include "esp_timer.h"
#include "esp_log.h"
// Edge Impulse includes
#include "edge-impulse-sdk/classifier/ei_run_classifier.h"
#include "edge-impulse-sdk/dsp/numpy.hpp"
#define MPU6050_ADDR 0x68
#define I2C_SDA_PIN 21
#define I2C_SCL_PIN 22
#define LED_PIN GPIO_NUM_2
#define SAMPLE_RATE_HZ 50
static const char *TAG = "motion_cls";
// Forward declarations
static void i2c_init(void);
static void mpu6050_init(void);
static void read_accel(float *ax, float *ay, float *az);
// Buffer for one inference window
// EI_CLASSIFIER_DSP_INPUT_FRAME_SIZE = axes * window_samples = 3 * 100 = 300
static float features[EI_CLASSIFIER_DSP_INPUT_FRAME_SIZE];
// Callback that provides features to the classifier
static int get_feature_data(size_t offset, size_t length, float *out_ptr) {
memcpy(out_ptr, features + offset, length * sizeof(float));
return 0;
}
static void led_init(void) {
gpio_reset_pin(LED_PIN);
gpio_set_direction(LED_PIN, GPIO_MODE_OUTPUT);
gpio_set_level(LED_PIN, 0);
}
// LED blink patterns for each class
static void indicate_class(const char *label) {
if (strcmp(label, "idle") == 0) {
gpio_set_level(LED_PIN, 0); // LED off
} else if (strcmp(label, "walking") == 0) {
// Slow blink (toggle)
static int state = 0;
state = !state;
gpio_set_level(LED_PIN, state);
} else if (strcmp(label, "running") == 0) {
// Fast blink (always toggle)
static int state2 = 0;
state2 = !state2;
gpio_set_level(LED_PIN, state2);
}
}
extern "C" void app_main(void) {
i2c_init();
mpu6050_init();
led_init();
ESP_LOGI(TAG, "Motion classifier starting");
ESP_LOGI(TAG, "Window size: %d ms, Features: %d, Labels: %d",
EI_CLASSIFIER_INTERVAL_MS * EI_CLASSIFIER_RAW_SAMPLE_COUNT,
EI_CLASSIFIER_DSP_INPUT_FRAME_SIZE,
EI_CLASSIFIER_LABEL_COUNT);
int interval_ms = 1000 / SAMPLE_RATE_HZ;
int window_samples = EI_CLASSIFIER_RAW_SAMPLE_COUNT; // 100 for 2s at 50 Hz
while (1) {
// Collect one window of accelerometer data
for (int i = 0; i < window_samples; i++) {
float ax, ay, az;
read_accel(&ax, &ay, &az);
features[i * 3 + 0] = ax;
features[i * 3 + 1] = ay;
features[i * 3 + 2] = az;
vTaskDelay(pdMS_TO_TICKS(interval_ms));
}
// Run classifier
signal_t signal;
signal.total_length = EI_CLASSIFIER_DSP_INPUT_FRAME_SIZE;
signal.get_data = &get_feature_data;
ei_impulse_result_t result = {0};
EI_IMPULSE_ERROR err = run_classifier(&signal, &result, false);
if (err != EI_IMPULSE_OK) {
ESP_LOGE(TAG, "Classifier error: %d", err);
continue;
}
// Find the class with highest confidence
float max_val = 0.0f;
const char *max_label = "unknown";
for (size_t ix = 0; ix < EI_CLASSIFIER_LABEL_COUNT; ix++) {
ESP_LOGI(TAG, " %s: %.4f",
result.classification[ix].label,
result.classification[ix].value);
if (result.classification[ix].value > max_val) {
max_val = result.classification[ix].value;
max_label = result.classification[ix].label;
}
}
ESP_LOGI(TAG, "=> %s (%.1f%%) | DSP: %d ms, Classification: %d ms",
max_label, max_val * 100.0f,
result.timing.dsp, result.timing.classification);
indicate_class(max_label);
}
}
// I2C and MPU6050 driver functions
static void i2c_init(void) {
i2c_config_t conf = {
.mode = I2C_MODE_MASTER,
.sda_io_num = I2C_SDA_PIN,
.scl_io_num = I2C_SCL_PIN,
.sda_pullup_en = GPIO_PULLUP_ENABLE,
.scl_pullup_en = GPIO_PULLUP_ENABLE,
.master = { .clk_speed = 400000 },
};
i2c_param_config(I2C_NUM_0, &conf);
i2c_driver_install(I2C_NUM_0, conf.mode, 0, 0, 0);
}
static void mpu6050_init(void) {
uint8_t buf[2];
// Wake up
buf[0] = 0x6B; buf[1] = 0x00;
i2c_master_write_to_device(I2C_NUM_0, MPU6050_ADDR, buf, 2, pdMS_TO_TICKS(100));
vTaskDelay(pdMS_TO_TICKS(100));
// Accel range +/- 2g
buf[0] = 0x1C; buf[1] = 0x00;
i2c_master_write_to_device(I2C_NUM_0, MPU6050_ADDR, buf, 2, pdMS_TO_TICKS(100));
}
static void read_accel(float *ax, float *ay, float *az) {
uint8_t reg = 0x3B;
uint8_t data[6];
i2c_master_write_read_device(I2C_NUM_0, MPU6050_ADDR,
&reg, 1, data, 6, pdMS_TO_TICKS(100));
int16_t raw_x = (int16_t)((data[0] << 8) | data[1]);
int16_t raw_y = (int16_t)((data[2] << 8) | data[3]);
int16_t raw_z = (int16_t)((data[4] << 8) | data[5]);
*ax = raw_x / 16384.0f;
*ay = raw_y / 16384.0f;
*az = raw_z / 16384.0f;
}

Step 8: Build and Flash


The Edge Impulse SDK integrates with ESP-IDF through CMake. Your top-level CMakeLists.txt needs to include the SDK:

motion_classifier/CMakeLists.txt
cmake_minimum_required(VERSION 3.16)
set(EXTRA_COMPONENT_DIRS "components")
include($ENV{IDF_PATH}/tools/cmake/project.cmake)
project(motion_classifier)
motion_classifier/main/CMakeLists.txt
idf_component_register(
SRCS "main.cpp"
INCLUDE_DIRS "."
REQUIRES edge-impulse-sdk
)
Terminal window
cd motion_classifier
idf.py set-target esp32
idf.py build
idf.py -p /dev/ttyUSB0 flash monitor

Running Real-Time Inference


With the inference firmware running, move the sensor through the three activities. The serial monitor shows output like:

I (1234) motion_cls: Motion classifier starting
I (1234) motion_cls: Window size: 2000 ms, Features: 300, Labels: 3
I (3250) motion_cls: idle: 0.9531
I (3250) motion_cls: walking: 0.0312
I (3250) motion_cls: running: 0.0156
I (3250) motion_cls: => idle (95.3%) | DSP: 12 ms, Classification: 3 ms
I (5270) motion_cls: idle: 0.0625
I (5270) motion_cls: walking: 0.8750
I (5270) motion_cls: running: 0.0625
I (5270) motion_cls: => walking (87.5%) | DSP: 12 ms, Classification: 3 ms

Performance on ESP32

MetricTypical Value
DSP (feature extraction) time10 to 15 ms
Classification (inference) time2 to 5 ms
Total per-window time12 to 20 ms
Model flash usage15 to 40 KB
RAM for inference8 to 20 KB
Overall accuracy90 to 97% (depends on data quality)

The DSP step (spectral feature extraction) takes longer than the neural network inference itself. This is typical for Edge Impulse models because the spectral analysis involves FFTs and statistical calculations.

Accuracy Evaluation


Common Issues and Fixes

Low accuracy on one class

Check that you have enough data for that class. Edge Impulse recommends at least 3 minutes per class. Also verify that the sensor was mounted consistently across all recordings.

Confusion between walking and running

These classes can overlap if walking speed is high or running speed is low. Collect data at clearly different speeds. You can also add a fourth class (“jogging”) to create a buffer zone.

High training accuracy, low test accuracy

This is overfitting. Reduce the network size (fewer neurons), increase dropout, or collect more varied training data.

Model too large for flash

Reduce the number of spectral features in the processing block. Fewer FFT bins and fewer statistical features shrink the input vector, which allows a smaller network.

Improving the Model

If your initial accuracy is below 85%, try these steps in order:

  1. Review and clean your data. In Edge Impulse, go to Data acquisition and listen to / inspect each sample. Remove any mislabeled or corrupted recordings.

  2. Increase training data. Collect 5 more recordings per class with varied conditions (different walking surfaces, different sensor orientations).

  3. Tune the processing block. Experiment with different FFT lengths (128, 256, 512) and enable/disable specific features.

  4. Adjust the neural network. Add a third hidden layer, or increase neurons to 32 and 16. Watch the estimated RAM usage to stay within the ESP32’s budget.

  5. Retrain and test. Each iteration should improve accuracy by 2 to 5 percentage points.

Exercises


Exercise 1: Add a Fourth Class

Add “jumping” as a fourth activity. Collect data, retrain, and evaluate how it affects the confusion matrix.

Exercise 2: MQTT Integration

After classifying the activity, publish the result to an MQTT broker over Wi-Fi. This connects your edge classifier to a cloud dashboard (similar to the IoT Systems course).

Exercise 3: Sliding Window

Modify the firmware to use a sliding window instead of collecting a fresh window each time. Shift the buffer by 500 ms (25 samples) and re-run inference for faster response time.

Exercise 4: Anomaly Detection

In Edge Impulse, add an Anomaly Detection (K-means) block alongside the classifier. Deploy the combined model and test what happens when you perform an untrained motion (e.g., shaking the sensor vigorously).

What Comes Next


You have now used Edge Impulse to build a complete data-to-deployment pipeline with real sensor data. In the next lesson, you will go deeper into the TensorFlow Lite for Microcontrollers runtime. You will train a gesture classifier locally in TensorFlow (no cloud platform), convert it manually, and deploy it on both an ESP32 and an STM32 to compare cross-platform performance.

Comments

Loading comments...


© 2021-2026 SiliconWit®. All rights reserved.