MQTT excels at real-time streaming, but not every interaction fits the publish/subscribe model. Querying historical data, registering a new device, updating firmware configuration, or revoking an API key: these are all request/response operations where REST is the natural fit. In this lesson you will build a Flask REST API that manages devices and serves sensor data, then add a webhook receiver that processes push notifications with HMAC signature verification. By the end, your MQTT pipeline populates the database and your REST API reads from it, giving you both real-time and on-demand access to your IoT data. #REST #Webhooks #API
When to Use REST vs MQTT
Before writing any code, it is worth understanding when each protocol is the right choice. They are not competitors; they solve different problems and work best together.
Use MQTT When
Devices push sensor readings continuously (every few seconds or minutes)
You need low-latency, event-driven updates
Bandwidth and power are constrained (battery devices, cellular links)
Multiple consumers need the same data stream (fan-out via topics)
You need QoS guarantees for unreliable networks
Use REST When
A client requests data on demand (dashboard loads, report generation)
You need to query historical data with filters (time range, aggregation)
Integration with third-party services that expect HTTP endpoints
You need standard authentication (API keys, OAuth, Bearer tokens)
  REST + MQTT Unified Pipeline  ──────────────────────────────────────────  ESP32 ──MQTT──► Mosquitto ──► Telegraf                   Broker         │                                  ▼  Admin ──REST──► Flask API ◄── InfluxDB  (browser)       │                │                  │                ▼                  │            Grafana                  │           (queries DB)                  │                  └──► Device registry                       (SQLite/Postgres)
  MQTT: real-time sensor data flow  REST: on-demand queries and management
In a typical production IoT system, both protocols coexist:
Data Flow
Protocol
Example
Sensor readings, device to broker
MQTT
ESP32 publishes temperature every 30s
Broker to database
MQTT (subscriber)
Telegraf subscribes and writes to InfluxDB
Dashboard queries database
REST (GET)
Grafana or custom UI fetches last 24h of data
Admin registers new device
REST (POST)
Web portal sends device metadata to API
Admin updates device config
REST (PUT)
Change sampling interval from 30s to 10s
REST API Request/Response Flow
──────────────────────────────────────────
Client (browser/curl) Flask Server
──────────────────── ────────────
GET /api/v1/devices
│
├──────────────────────► Query DB
│ │
│ 200 OK │
│ [{"id":"esp32-01", ◄┘
│ "last_seen":"..."}]
▼
POST /api/v1/devices/esp32-01/config
{"interval": 10}
│
├──────────────────────► Validate
│ Publish MQTT cmd
│ 200 OK ◄┘
│ {"status":"updated"}
▼
| Platform notifies external service | Webhook (POST) | Alert fires, platform POSTs to your endpoint |
The lesson builds each piece of this architecture.
REST Fundamentals for IoT
REST (Representational State Transfer) maps CRUD operations to HTTP methods. For IoT, the “resources” are devices, sensor readings, configurations, and commands.
HTTP Methods
Method
Operation
IoT Example
Idempotent
GET
Read
Fetch latest sensor reading
Yes
POST
Create
Register a new device, send a command
No
PUT
Update/Replace
Update device configuration
Yes
PATCH
Partial update
Change only the sampling interval
Yes
DELETE
Remove
Decommission a device
Yes
Status Codes That Matter
You do not need to memorize every HTTP status code, but these appear constantly in IoT APIs:
Code
Meaning
When You See It
200
OK
Successful GET, PUT, PATCH
201
Created
Successful POST that created a resource
204
No Content
Successful DELETE
400
Bad Request
Malformed JSON, missing required fields
401
Unauthorized
Missing or invalid API key
403
Forbidden
Valid key but insufficient permissions
404
Not Found
Device ID does not exist
409
Conflict
Device already registered
429
Too Many Requests
Rate limit exceeded
500
Internal Server Error
Server bug or database down
JSON Payload Conventions
IoT APIs typically return JSON. A consistent response envelope makes client code simpler:
Successful response
{
"status": "ok",
"data": {
"device_id": "esp32-001",
"temperature": 23.4,
"humidity": 61.2,
"timestamp": "2026-03-10T14:30:00Z"
}
}
Error response
{
"status": "error",
"error": {
"code": 404,
"message": "Device esp32-999 not found"
}
}
Building a Flask REST API for Device Management
Flask is lightweight and widely used for IoT backends. The API server manages device registration, serves sensor data, accepts commands, and updates configuration. In production you would use a proper database; here we use SQLite to keep the focus on the API design.
Project Structure
Directoryiot-rest-api/
app.py
models.py
auth.py
requirements.txt
devices.db
Dependencies
requirements.txt
flask==3.1.0
flask-limiter==3.5.0
Install with:
Terminal window
pipinstall-rrequirements.txt
Database Models
models.py
import sqlite3
import json
from datetime import datetime, timezone
DB_PATH="devices.db"
defget_db():
"""Get a database connection with row factory enabled."""
If you prefer a managed IoT platform instead of running your own server, SiliconWit.io provides a REST API that handles device management, data storage, and alerting for you.
API Endpoints
SiliconWit.io exposes two API surfaces:
Base URL
Purpose
Authentication
siliconwit.io/api/
Device management, dashboard config
Session or API key
api.siliconwit.io/v1/
Public data API, integrations
API key (swk_... format)
HTTP Data Ingestion
Devices that cannot use MQTT (or need a fallback) can POST sensor data directly over HTTP:
This is especially useful for devices behind restrictive firewalls that block MQTT ports but allow outbound HTTPS. The platform stores the data in the same time-series database as MQTT-ingested data, so your dashboards and alerts work identically regardless of ingestion method.
You can use either SiliconWit.io or your own Flask API for the rest of this lesson. The concepts are identical; only the base URL changes.
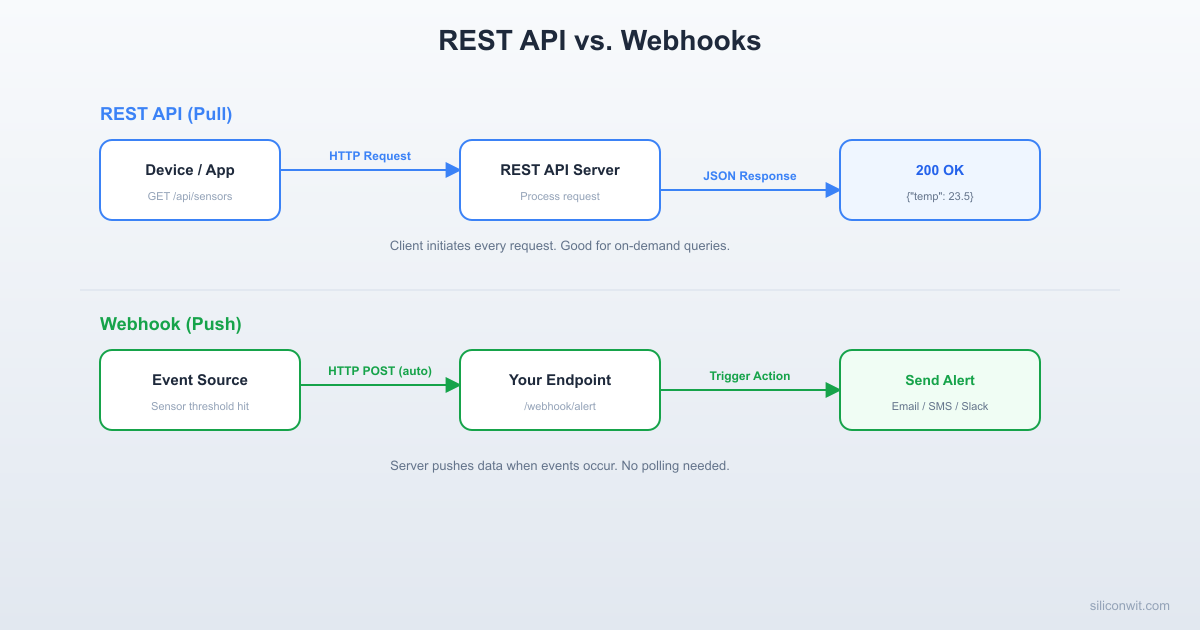
Webhooks: Server Push Notifications
Polling an API every few seconds to check if something changed is wasteful. Webhooks flip the model: the server calls your endpoint when an event occurs. You register a URL, and the platform POSTs to it whenever a condition triggers.
Event occurs. The device misses three consecutive heartbeats. The platform detects it is offline.
Platform sends POST. The platform constructs a JSON payload describing the event, signs it with a shared secret, and POSTs it to your registered URL.
Your server processes the event. Your endpoint validates the signature, extracts the event data, takes action (send a Slack message, page an engineer, log to a database), and returns HTTP 200.
Platform confirms delivery. If your endpoint does not return 2xx within a timeout (typically 5 to 10 seconds), the platform retries with exponential backoff.
Security: Why Signatures Matter
Anyone who knows your webhook URL could send fake events. HMAC-SHA256 signatures prevent this. The platform and your server share a secret key. The platform computes HMAC-SHA256(secret, request_body) and includes it in a header. Your server recomputes the HMAC and compares. If they match, the request is authentic.
The X-Webhook-Signature header uses the same sha256=<hex> format shown in the receiver code. The shared secret is generated when you create the webhook configuration in the SiliconWit.io dashboard.
Integrating MQTT and REST
In Lessons 2 through 4, you set up an MQTT broker, wrote firmware clients, and stored data in InfluxDB via Telegraf. The REST API from this lesson reads from a database. How do these fit together?
The Data Flow
ESP32 --[MQTT]--> Broker --[Telegraf]--> InfluxDB
|
v
REST API --[HTTP]--> Dashboard / Mobile App
|
v
Webhook --> External Services
MQTT handles the real-time ingestion path. Telegraf subscribes to the broker topics and writes every message to InfluxDB (or SQLite, or PostgreSQL). The REST API does not touch MQTT at all; it queries the database directly. This separation means:
MQTT can be down temporarily without affecting historical queries.
The REST API can serve thousands of dashboard users without adding load to the broker.
Webhooks fire based on database triggers or rule engines, not directly from MQTT messages.
Connecting the Flask API to InfluxDB
If you followed Lesson 4 and have InfluxDB running with Telegraf, you can swap the SQLite backend for InfluxDB queries. Here is how the data endpoint changes:
Both backends serve the same REST endpoints. The client code (dashboard, mobile app, CLI tool) does not care where the data is stored. This is the value of putting a REST API in front of your data.
ESP32 as HTTP Client: Fallback Data Ingestion
MQTT is the primary data path, but sometimes the broker is unreachable. A robust device should fall back to HTTP POST. This ESP-IDF code sends sensor data to your REST API (or to SiliconWit.io’s ingest endpoint) when MQTT fails.
This dual-path approach ensures data reaches the backend even during broker outages. The REST API ingest endpoint stores the data in the same database, so no readings are lost.
Rate Limiting and Pagination
Production APIs need to protect against abuse and handle large result sets efficiently.
Rate Limiting
The Flask API already includes flask-limiter with a global limit of 100 requests per minute per IP. For sensitive endpoints (data ingestion, commands), you can set tighter limits:
Avoid this in production. The key appears in server logs, browser history, and proxy caches.
Key Management Best Practices
Practice
Why
Prefix keys with a service identifier (swk_)
Easy to identify in logs and code scans
Hash keys before storing in the database
A database leak does not expose raw keys
Support key rotation (issue new key, deprecate old)
Limits exposure window if a key is compromised
Assign permissions per key (read, write, admin)
Principle of least privilege
Set expiration dates on keys
Forces periodic rotation
Log key usage (not the key itself)
Audit trail for troubleshooting
Bearer Tokens (JWT)
For more complex systems, JSON Web Tokens (JWT) carry claims (user ID, permissions, expiration) inside the token itself. The server verifies the signature without a database lookup. This is common in platforms like SiliconWit.io where a user logs in, receives a JWT, and uses it for subsequent API calls.
For this course, API keys are sufficient. JWT adds complexity that is only justified when you have user accounts with different roles.
Putting It All Together
Here is the complete architecture from this lesson in context with the previous lessons:
Full IoT Data Pipeline
Lesson 2: Mosquitto broker with TLS and ACLs.
Lesson 3: ESP32, Pico W, and STM32 publish sensor data via MQTT.
Lesson 4: Telegraf subscribes to MQTT topics and writes to InfluxDB. Grafana dashboards visualize the data.
Lesson 5 (this lesson): REST API serves data on demand. Webhooks push alerts to external services. ESP32 falls back to HTTP when MQTT is unavailable.
The separation of concerns is clear:
MQTT handles the high-frequency, low-latency ingestion path.
REST handles the request/response, query, and management path.
Webhooks handle the event-driven notification path.
Each protocol does what it is best at. No single protocol handles everything well, and trying to force one into the wrong role leads to fragile, inefficient systems.
Exercises
Add device registration via the REST API and verify with curl. Start the Flask server, register three devices with different types (sensor, actuator, gateway), ingest at least five readings per device, then query the historical data for one device using the start and end parameters. Export the results as a CSV file using a Python script that calls the API and writes the output.
Implement a webhook relay that forwards events to Discord. Extend the webhook receiver so that when it receives a threshold_exceeded event with severity critical, it sends a message to a Discord channel using a Discord webhook URL. Test the full chain: send a test event to your receiver, verify the message appears in Discord. Add a severity_filter configuration so that only events above a certain severity (info, warning, critical) are forwarded.
Build a combined MQTT subscriber and REST API server. Write a single Python application that subscribes to MQTT topics (using paho-mqtt) and also runs a Flask REST API. MQTT messages are stored in SQLite as they arrive. The REST API serves the stored data. Note that paho-mqtt runs callbacks in a background thread, so you must create a new sqlite3.connect() inside each callback rather than sharing a connection from the main thread (SQLite raises a threading error otherwise). Test by publishing MQTT messages from your ESP32, then querying the REST API from a browser or curl. This eliminates the need for Telegraf and InfluxDB for simple setups.
Implement API key rotation. Extend the auth.py module to support key rotation. Add endpoints to generate a new key (POST /api/keys), list active keys (GET /api/keys), and revoke a key (DELETE /api/keys/{key_id}). Each key should have a creation timestamp and an optional expiration date. Test by generating a new key, using it successfully, revoking it, and confirming that subsequent requests with the revoked key return 401.
Summary
You built a complete REST API for IoT device management with endpoints for registration, data ingestion, historical queries, commands, and configuration updates. The API uses proper HTTP methods (GET, POST, PUT, DELETE), returns consistent JSON responses, authenticates requests with API keys, and enforces rate limits. You then built a webhook receiver that validates HMAC-SHA256 signatures to ensure only authentic events are processed. The ESP32 HTTP client provides a fallback data path when MQTT is unavailable. Together with the MQTT pipeline from previous lessons, you now have a three-protocol architecture: MQTT for real-time streaming, REST for on-demand queries and management, and webhooks for push notifications.
Comments