Lesson 1 showed that MQTT wins the IoT protocol comparison for most sensor workloads: low overhead, built-in QoS, and a publish/subscribe model that decouples devices from consumers. But you tested against a public broker with no authentication and no encryption. That is fine for a benchmark, not for production. In this lesson you build a real Mosquitto broker from scratch on Linux, lock it down with passwords and topic ACLs, encrypt every connection with TLS, and then bridge it to the SiliconWit.io platform so your data reaches both your local network and the internet. #MQTT #Mosquitto #TLS
What We Are Building
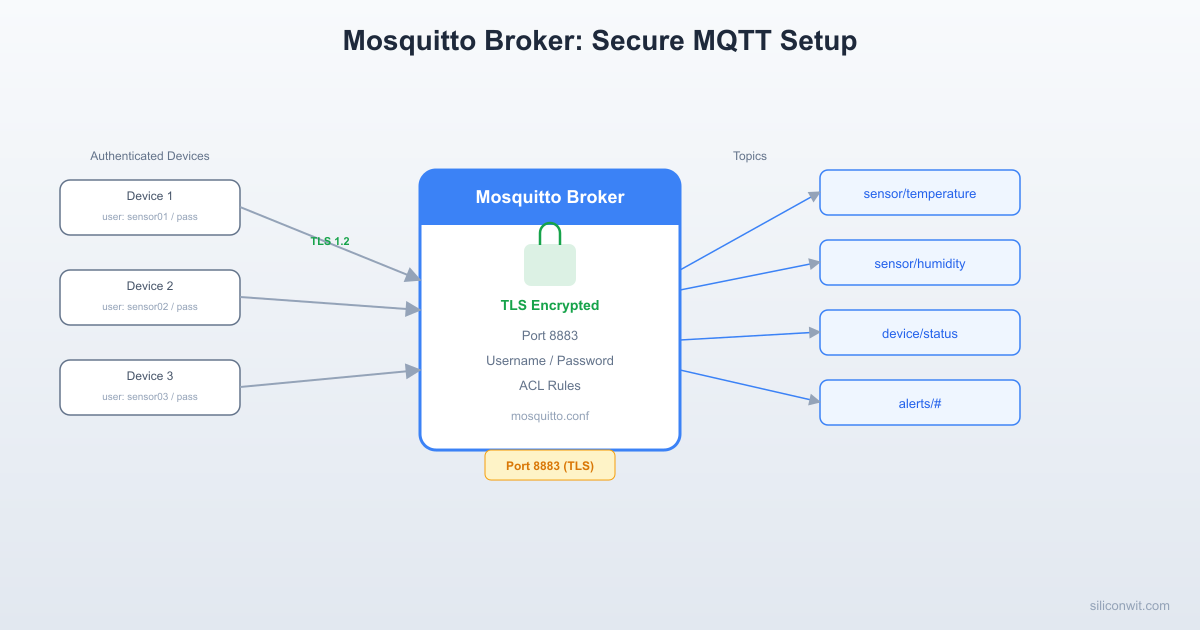
Production-Ready Mosquitto Broker
A self-hosted MQTT broker on a Raspberry Pi or Linux machine with password authentication, per-user topic ACLs, TLS on port 8883, WebSocket support on port 8084, and a bridge connection that forwards selected topics to the SiliconWit.io platform. You will test every feature with the mosquitto_pub and mosquitto_sub command-line tools before connecting any MCU.
Infrastructure overview:
Component
Details
Broker software
Eclipse Mosquitto 2.x
Host
Raspberry Pi, Ubuntu/Debian VM, or any Linux machine
Plain MQTT port
1883 (local testing only, disabled in production)
TLS MQTT port
8883
WebSocket TLS port
8084 (WSS)
Authentication
Username/password via mosquitto_passwd
Authorization
Per-user topic ACLs with pattern matching
TLS certificates
Self-signed CA, server cert, server key (OpenSSL)
Cloud bridge
Forwarding to mqtt.siliconwit.io:8883
MQTT Fundamentals
TLS Handshake (Mosquitto + ESP32)
──────────────────────────────────────────
ESP32 Client Mosquitto Broker
──────────── ────────────────
│ ClientHello │
├──────────────────────►│
│ │
│ ServerHello + │
│ Server Certificate │
│◄──────────────────────┤
│ │
│ Verify cert against │
│ embedded CA cert │
│ │
│ Key Exchange │
├──────────────────────►│
│ │
│ Encrypted MQTT │
│◄─────────────────────►│
│ CONNECT / CONNACK │
Before touching any configuration files, make sure the core MQTT concepts are solid. Everything in this lesson (authentication, ACLs, TLS, bridging) builds on these fundamentals.
The Publish/Subscribe Model
  MQTT Publish/Subscribe Topology  ──────────────────────────────────────────  Publishers              Subscribers  ──────────   ┌────────┐ ───────────  ESP32 ──pub──►│        │──sub──► Grafana  (temp data)  │ MQTT   │               │ Broker │──sub──► Alert Engine  Pico W ──pub─►│        │  (humidity)   │(Mosqu- │──sub──► Mobile App               │ itto)  │  STM32 ──pub──►│        │──sub──► Data Logger  (air qual)   └────────┘
  Devices never talk directly to each other.  The broker routes messages by topic match.
MQTT uses a broker as the central message router. Devices never communicate directly. A publisher sends a message to a topic on the broker. A subscriber registers interest in one or more topics. The broker delivers each published message to every client whose subscription matches the topic.
This decoupling is what makes MQTT powerful for IoT. The temperature sensor does not know (or care) whether zero, one, or fifty clients are listening. It publishes to sensors/temperature and moves on. A dashboard, an alert engine, and a data logger can all subscribe to the same topic independently.
Topics are hierarchical strings separated by forward slashes:
sensors/greenhouse/temperature
sensors/greenhouse/humidity
sensors/rooftop/wind_speed
actuators/greenhouse/ventilation
Subscribers can use two wildcards:
+ matches exactly one level: sensors/+/temperature matches sensors/greenhouse/temperature and sensors/rooftop/temperature but not sensors/greenhouse/zone1/temperature.
# matches all remaining levels: sensors/# matches every topic that starts with sensors/.
Quality of Service (QoS) Levels
MQTT defines three QoS levels. Each level adds reliability at the cost of additional network overhead.
QoS 0: At Most Once
The publisher sends the message once with no acknowledgment. The message might arrive, or it might be lost. This is “fire and forget.” Use it for high-frequency sensor data where a single lost reading is acceptable. The overhead is minimal: one PUBLISH packet, no response.
QoS 1: At Least Once
The publisher sends the message and waits for a PUBACK from the broker. If the acknowledgment does not arrive within a timeout, the publisher retransmits. The message is guaranteed to arrive at least once, but duplicates are possible. This is the best default for most IoT data. Two packets: PUBLISH and PUBACK.
QoS 2: Exactly Once
A four-step handshake ensures the message arrives exactly once: PUBLISH, PUBREC, PUBREL, PUBCOMP. No duplicates, no losses. Use this for critical events like alarms, billing records, or state-change commands where a duplicate would cause problems. The overhead is significant: four packets per message.
Choosing the right QoS:
Scenario
Recommended QoS
Reasoning
Temperature reading every 10 seconds
QoS 0
High frequency, next reading replaces the last
Hourly energy meter reading
QoS 1
Important for billing, duplicates can be filtered
Fire alarm trigger
QoS 2
Must arrive exactly once, no duplicates
Remote actuator command
QoS 1 or QoS 2
Depends on whether the actuator is idempotent
Retained Messages
When a publisher sets the retain flag on a message, the broker stores the last retained message for that topic. Any new subscriber immediately receives this stored message upon subscribing, even if the original publisher sent it days ago.
This is essential for status topics. If a sensor publishes "online" to devices/sensor01/status with retain=true, any client that subscribes later instantly knows the sensor is online without waiting for the next heartbeat.
To clear a retained message, publish an empty payload (zero bytes) to the same topic with retain=true.
Last Will and Testament (LWT)
When a client connects to the broker, it can register a “last will” message: a topic, payload, QoS, and retain flag. If the client disconnects unexpectedly (network failure, crash, power loss, or keepalive timeout), the broker automatically publishes the last will message.
This is the standard way to detect offline devices. The pattern is:
On connect, the client registers LWT: topic devices/sensor01/status, payload "offline", retain=true.
After connecting, the client publishes "online" to devices/sensor01/status with retain=true.
If the client disconnects gracefully, it publishes "offline" to the status topic before disconnecting.
If the client disconnects unexpectedly, the broker publishes the LWT "offline" message automatically.
Either way, subscribers always see an accurate status.
Clean Session vs. Persistent Session
When a client connects with clean session = true (the default), the broker discards any previous session state. Subscriptions from a prior connection are gone, and queued messages are deleted. Every connection starts fresh.
With clean session = false, the broker remembers the client’s subscriptions and queues any QoS 1/QoS 2 messages that arrive while the client is offline. When the client reconnects with the same client ID, it receives all queued messages. This requires:
A stable, unique client ID so the broker can identify the returning client.
QoS 1 or QoS 2 on the subscription. QoS 0 messages are never queued.
Persistent sessions are valuable for battery-powered devices that sleep for minutes or hours between connections. The broker buffers important messages and delivers them in bulk when the device wakes up.
Installing Mosquitto on Linux
Mosquitto is the most widely used open-source MQTT broker. It is lightweight, fast, and runs comfortably on a Raspberry Pi alongside other services.
Update the package list and install Mosquitto along with the client tools:
Install Mosquitto broker and clients
sudoaptupdate
sudoaptinstall-ymosquittomosquitto-clients
Mosquitto starts automatically as a systemd service. Verify it is running:
Check Mosquitto service status
sudosystemctlstatusmosquitto
You should see Active: active (running).
Check the installed version:
Verify Mosquitto version
mosquitto-v2>&1|head-1
You need version 2.0 or later. Older versions (1.x) have a different default configuration that allows anonymous access.
The main configuration file is at /etc/mosquitto/mosquitto.conf. Additional config files are loaded from /etc/mosquitto/conf.d/. The default data directory is /var/lib/mosquitto/.
Raspberry Pi OS is Debian-based, so the installation is the same:
Install Mosquitto on Raspberry Pi
sudoaptupdate
sudoaptinstall-ymosquittomosquitto-clients
Enable the service to start on boot (usually enabled by default):
Enable Mosquitto on boot
sudosystemctlenablemosquitto
sudosystemctlstartmosquitto
If you are running a minimal (Lite) image without a desktop, Mosquitto uses very little memory (under 10 MB for thousands of clients) and is an excellent choice for an always-on edge broker.
Install from the default repositories:
Install Mosquitto on Fedora
sudodnfinstall-ymosquitto
Start and enable the service:
Start Mosquitto service
sudosystemctlenable--nowmosquitto
Configuration File Layout
Directory/etc/mosquitto/
mosquitto.conf
Directoryconf.d/
default.conf
Directoryca_certificates/
…
Directorycerts/
…
Directory/var/lib/mosquitto/
mosquitto.db
Directory/var/log/mosquitto/
mosquitto.log
The default mosquitto.conf on Mosquitto 2.x is minimal. It typically contains just a pid_file directive and an include for conf.d/. You will create your own config file in conf.d/.
Basic Mosquitto Configuration
Start with a baseline configuration that defines a listener, disables anonymous access, and enables persistence.
/etc/mosquitto/conf.d/default.conf
# ── Listener ──
listener 1883
protocol mqtt
# ── Authentication ──
allow_anonymous false
password_file /etc/mosquitto/passwd
# ── Persistence ──
persistence true
persistence_location /var/lib/mosquitto/
autosave_interval 300
# ── Limits ──
max_connections 100
max_inflight_messages 20
max_queued_messages 1000
message_size_limit 262144
# ── Logging ──
log_dest file /var/log/mosquitto/mosquitto.log
log_type error
log_type warning
log_type notice
log_type information
connection_messages true
log_timestamp true
log_timestamp_format %Y-%m-%dT%H:%M:%S
Key directives explained:
Directive
Purpose
listener 1883
Open a listener on TCP port 1883
allow_anonymous false
Require username/password for all connections
password_file
Path to the password file created by mosquitto_passwd
persistence true
Store retained messages and subscriptions to disk
autosave_interval 300
Write the persistence database every 300 seconds
max_connections 100
Limit total simultaneous connections
max_queued_messages 1000
Maximum queued messages per client (persistent sessions)
message_size_limit 262144
Maximum message payload size in bytes (256 KB)
After saving the config, restart Mosquitto:
Restart Mosquitto with new config
sudosystemctlrestartmosquitto
sudosystemctlstatusmosquitto
If the service fails to start, check the log:
View Mosquitto log for errors
sudotail-50/var/log/mosquitto/mosquitto.log
Password Authentication
Mosquitto uses the mosquitto_passwd utility to manage a password file. Passwords are stored as salted SHA512 hashes.
In a second terminal, subscribe to verify the message arrives:
Subscribe with authentication
mosquitto_sub-hlocalhost-ttest/hello\
-udashboard_user-P"YourPasswordHere"
Topic ACLs
Passwords control who can connect. ACLs (Access Control Lists) control what each user can publish and subscribe to. Without ACLs, any authenticated user can read and write any topic.
Creating an ACL File
Create an ACL file that defines per-user permissions:
/etc/mosquitto/acl
# ── Admin user: full access to everything ──
user admin_user
topic readwrite #
# ── Sensor node 01: publish to its own topics, subscribe to commands ──
user sensor_node_01
topic write sensors/node01/temperature
topic write sensors/node01/humidity
topic write sensors/node01/status
topic read commands/node01/#
# ── Dashboard user: read all sensor data, no publishing ──
user dashboard_user
topic read sensors/#
topic read devices/+/status
# ── Actuator node 01: subscribe to commands, publish status ──
user actuator_node_01
topic read commands/actuator01/#
topic write actuators/actuator01/status
topic write actuators/actuator01/feedback
Pattern Matching with %u and %c
Mosquitto supports two substitution patterns in ACL rules:
%u is replaced with the connecting client’s username.
%c is replaced with the connecting client’s client ID.
This lets you write generic rules that apply to many users:
Pattern-based ACL rules
# Every user can publish to their own sensor topic
pattern write sensors/%u/+
# Every user can read commands addressed to them
pattern read commands/%u/#
# Every user can publish their own status
pattern write devices/%u/status
# Every client can publish to a topic named after its client ID
pattern write clients/%c/data
With pattern rules, you do not need to add a new ACL block every time you provision a new device. As long as the username matches the expected pattern, permissions are automatic.
Enabling ACLs
Add the ACL file directive to your Mosquitto configuration:
Add to /etc/mosquitto/conf.d/default.conf
acl_file /etc/mosquitto/acl
Set the correct ownership and restart:
Apply ACL file
sudochownmosquitto:mosquitto/etc/mosquitto/acl
sudochmod600/etc/mosquitto/acl
sudosystemctlrestartmosquitto
Testing ACLs
Verify that sensor_node_01 can publish to its allowed topic:
Plain MQTT on port 1883 sends everything in clear text: usernames, passwords, and message payloads. TLS encrypts the entire connection. For a self-hosted broker, you need three files: a CA certificate, a server certificate, and a server private key.
Generating Certificates
Create a directory for the certificates:
Create certificate directory
sudomkdir-p/etc/mosquitto/certs
cd/etc/mosquitto/certs
Generate the Certificate Authority (CA) private key:
Server public certificate, presented to clients during TLS handshake
No
server.csr
Certificate signing request (no longer needed)
Can delete
Configuring Mosquitto for TLS
Update your configuration to add a TLS listener on port 8883:
/etc/mosquitto/conf.d/default.conf (updated with TLS)
# ── Plain MQTT listener (disable in production) ──
# listener 1883
# protocol mqtt
# ── TLS MQTT listener ──
listener 8883
protocol mqtt
cafile /etc/mosquitto/certs/ca.crt
certfile /etc/mosquitto/certs/server.crt
keyfile /etc/mosquitto/certs/server.key
tls_version tlsv1.2
# ── Authentication ──
allow_anonymous false
password_file /etc/mosquitto/passwd
# ── ACLs ──
acl_file /etc/mosquitto/acl
# ── Persistence ──
persistence true
persistence_location /var/lib/mosquitto/
autosave_interval 300
# ── Limits ──
max_connections 100
max_inflight_messages 20
max_queued_messages 1000
message_size_limit 262144
# ── Logging ──
log_dest file /var/log/mosquitto/mosquitto.log
log_type error
log_type warning
log_type notice
log_type information
connection_messages true
log_timestamp true
log_timestamp_format %Y-%m-%dT%H:%M:%S
Notice that the plain listener on port 1883 is commented out. In production, you should only expose the TLS listener. During development, you can keep both active if needed.
You should see a line indicating the listener opened on port 8883.
Testing TLS Connections
Copy the ca.crt file to the machine where you will run the test clients. Then test:
Publish over TLS
mosquitto_pub-hyour-broker-hostname-p8883\
--cafile/path/to/ca.crt\
-usensor_node_01-P"YourPasswordHere"\
-tsensors/node01/temperature-m'{"temp_c": 24.1}'
Subscribe over TLS
mosquitto_sub-hyour-broker-hostname-p8883\
--cafile/path/to/ca.crt\
-udashboard_user-P"YourPasswordHere"\
-t"sensors/#"
If connecting by IP address and your certificate CN is a hostname, you may need to add --insecure to skip hostname verification during testing. Do not use --insecure in production.
Connect by IP (testing only)
mosquitto_pub-h192.168.1.50-p8883\
--cafile/path/to/ca.crt--insecure\
-usensor_node_01-P"YourPasswordHere"\
-tsensors/node01/temperature-m'{"temp_c": 24.1}'
Connecting to the SiliconWit.io Platform
SiliconWit.io is a connected operations platform that provides real-time monitoring, dashboards, alerts (email, SMS, Discord, Slack, Telegram), remote device control, automation rules, AI analytics, and a REST API. Its MQTT endpoint lets devices publish telemetry and receive commands. When you register a device on the platform, you receive credentials and a topic structure that keeps each device isolated.
Connection Details
Parameter
Value
Host
mqtt.siliconwit.io
Port
8883 (MQTT over TLS)
WebSocket port
8084 (WSS)
Username
Your device ID (from siliconwit.io, Dashboard -> Devices)
Password
Your access token (from siliconwit.io, Dashboard -> Devices)
Publish topic
d/{device_id}/t (telemetry data)
Subscribe topic
d/{device_id}/c (commands from the cloud)
TLS
Required, uses a publicly trusted CA certificate
Testing with Command-Line Tools
Publish telemetry to SiliconWit.io
mosquitto_pub-hmqtt.siliconwit.io-p8883\
--capath/etc/ssl/certs/\
-u"YOUR_DEVICE_ID"-P"YOUR_ACCESS_TOKEN"\
-t"d/YOUR_DEVICE_ID/t"\
-m'{"temperature": 23.5, "humidity": 61.2}'
Subscribe to commands from SiliconWit.io
mosquitto_sub-hmqtt.siliconwit.io-p8883\
--capath/etc/ssl/certs/\
-u"YOUR_DEVICE_ID"-P"YOUR_ACCESS_TOKEN"\
-t"d/YOUR_DEVICE_ID/c"
Because mqtt.siliconwit.io uses a certificate signed by a public CA (not self-signed), you can use --capath /etc/ssl/certs/ to point to the system’s trusted CA bundle instead of a specific CA file.
Topic Structure
The SiliconWit.io topic structure follows a simple convention:
d/{device_id}/t Telemetry: device publishes sensor data here
d/{device_id}/c Commands: device subscribes here for remote commands
d/{device_id}/s Status: device publishes online/offline status
The ACL on the SiliconWit.io platform ensures that each device can only access its own topics. Device A cannot read or write to Device B’s topics.
WebSocket Support
WebSockets allow browser-based JavaScript clients to connect to MQTT. This is how web dashboards receive live sensor data without polling a REST API. Mosquitto supports WebSocket listeners alongside standard TCP listeners.
Configuring WebSocket TLS (WSS)
Add a WebSocket listener to your configuration:
Add to /etc/mosquitto/conf.d/default.conf
# ── WebSocket TLS listener ──
listener 8084
protocol websockets
cafile /etc/mosquitto/certs/ca.crt
certfile /etc/mosquitto/certs/server.crt
keyfile /etc/mosquitto/certs/server.key
tls_version tlsv1.2
This shares the same certificate files as the MQTT TLS listener. The protocol websockets directive tells Mosquitto to expect WebSocket connections on this port.
Restart Mosquitto after adding the WebSocket listener:
Restart for WebSocket support
sudosystemctlrestartmosquitto
Testing with a Browser Client
You can test WebSocket connectivity using any MQTT.js-based client. A quick test with the mqtt npm package:
For SiliconWit.io, the WebSocket endpoint is wss://mqtt.siliconwit.io:8084. The same device credentials (device ID as username, access token as password) work for both MQTT and WebSocket connections.
Mosquitto Bridge Configuration
A bridge connects two MQTT brokers so that messages published on one automatically appear on the other. This is the standard pattern for edge computing: your local Mosquitto broker collects data from sensors on the LAN, and a bridge forwards selected topics to the cloud for storage and visualization.
Bridge to SiliconWit.io
Add a bridge configuration to your Mosquitto config:
/etc/mosquitto/conf.d/bridge.conf
# ── Bridge to SiliconWit.io ──
connection siliconwit_bridge
address mqtt.siliconwit.io:8883
# Authentication
remote_username YOUR_DEVICE_ID
remote_password YOUR_ACCESS_TOKEN
# TLS for the bridge connection
bridge_capath /etc/ssl/certs/
bridge_protocol_version mqttv311
# Topic mapping:
# Forward local "sensors/#" to cloud "d/DEVICE_ID/t" (outgoing only)
out: Forward messages from local broker to remote broker.
in: Forward messages from remote broker to local broker.
both: Bidirectional forwarding.
In this configuration:
Local messages matching sensors/# are forwarded to the cloud under d/DEVICE_ID/t/sensors/#.
Cloud messages under d/DEVICE_ID/c/# appear locally under commands/cloud/#.
The cleansession false setting ensures that if the bridge disconnects temporarily (internet outage), the cloud platform queues messages, and the bridge receives them when it reconnects.
Verifying the Bridge
After restarting Mosquitto, check that the bridge connected:
Check bridge status
mosquitto_sub-hlocalhost-p8883\
--cafile/etc/mosquitto/certs/ca.crt\
-uadmin_user-P"YourPasswordHere"\
-t"bridge/siliconwit/status"
You should see a 1 (connected) message. If the bridge fails to connect, check the Mosquitto log for TLS or authentication errors.
Publish a test message locally and verify it arrives on the cloud:
Test bridge forwarding
mosquitto_pub-hlocalhost-p8883\
--cafile/etc/mosquitto/certs/ca.crt\
-usensor_node_01-P"YourPasswordHere"\
-tsensors/node01/temperature-m'{"temp_c": 25.0}'
Check the SiliconWit.io dashboard to confirm the telemetry data arrived.
Monitoring with $SYS Topics
Mosquitto publishes internal statistics on special $SYS/ topics. These are read-only system topics that you can subscribe to for real-time monitoring.
Key $SYS Topics
Topic
Description
$SYS/broker/version
Mosquitto version string
$SYS/broker/uptime
Broker uptime in seconds
$SYS/broker/clients/connected
Number of currently connected clients
$SYS/broker/clients/total
Total clients (connected + disconnected with sessions)
$SYS/broker/messages/received
Total messages received since startup
$SYS/broker/messages/sent
Total messages sent since startup
$SYS/broker/messages/stored
Number of retained messages currently stored
$SYS/broker/bytes/received
Total bytes received
$SYS/broker/bytes/sent
Total bytes sent
$SYS/broker/load/messages/received/1min
Messages received per minute (1-minute average)
$SYS/broker/load/messages/sent/1min
Messages sent per minute (1-minute average)
$SYS/broker/subscriptions/count
Total active subscriptions
Subscribing to $SYS
Monitor all $SYS topics
mosquitto_sub-hlocalhost-p8883\
--cafile/etc/mosquitto/certs/ca.crt\
-uadmin_user-P"YourPasswordHere"\
-t'$SYS/#'-v
The -v flag prints the topic alongside the payload, which is essential when subscribing to a wildcard.
To monitor just the connected client count in a script:
Watch connected clients
mosquitto_sub-hlocalhost-p8883\
--cafile/etc/mosquitto/certs/ca.crt\
-uadmin_user-P"YourPasswordHere"\
-t'$SYS/broker/clients/connected'-C1
The -C 1 flag exits after receiving one message, which is useful for scripting.
Logging and Debugging
Good logging configuration helps you diagnose connection issues, ACL denials, and message flow problems.
Log Type Settings
Mosquitto supports several log types that you can enable independently:
Logging options in mosquitto.conf
log_dest file /var/log/mosquitto/mosquitto.log
log_dest stdout
# Log types (enable the ones you need):
log_type error # Always enable
log_type warning # Always enable
log_type notice # Connection/disconnection events
log_type information # Subscription and unsubscription events
log_type subscribe # Log all subscribe/unsubscribe actions
log_type unsubscribe
For production, use error, warning, notice, and information. Enable debug only when actively troubleshooting, as it generates a large volume of output.
Connection refused: not authorised (bad username/password)
OpenSSL Error (certificate problem)
Socket error (network/firewall issue)
Client connects but cannot publish or subscribe:
ACL denials are logged when log_type information or log_type debug is enabled. Look for:
Denied PUBLISH ... (ACL) (user lacks write permission on that topic)
Denied SUBSCRIBE ... (ACL) (user lacks read permission on that topic)
Messages are not arriving at subscribers:
Check that the publisher and subscriber are using the same topic string (topic matching is case-sensitive). Use mosquitto_sub -v -t '#' with an admin account to see all messages flowing through the broker.
Log Rotation
For long-running brokers, configure logrotate to prevent the log file from growing indefinitely:
Set up a multi-user broker with ACLs. Create a Mosquitto broker with four users: sensor_a, sensor_b, dashboard, and admin. Configure ACLs so that sensor_a can only publish to sensors/a/# and subscribe to commands/a/#, sensor_b can only publish to sensors/b/# and subscribe to commands/b/#, dashboard can read all sensor topics but cannot publish, and admin has full read/write access to all topics. Test every permission boundary: verify that sensor_a cannot publish to sensors/b/temperature, that dashboard cannot publish at all, and that admin can do everything. Use pattern-based ACL rules with %u so a single rule covers both sensors.
Generate certificates and enable TLS. Follow the OpenSSL steps in this lesson to generate your own CA certificate, server certificate, and server key. Configure Mosquitto to listen on port 8883 with TLS. Test the connection using mosquitto_pub and mosquitto_sub with the --cafile flag. Then intentionally break something (use the wrong CA file, use an expired certificate, use a mismatched hostname) and observe the error messages in both the client output and the Mosquitto log. Document each error and its cause.
Configure a bridge to SiliconWit.io. Register a device on siliconwit.io and note your device ID and access token. Configure a Mosquitto bridge that forwards all messages under sensors/# to the cloud topic d/{device_id}/t. Publish test messages locally and verify they appear on the SiliconWit.io dashboard. Then disconnect your internet connection for 30 seconds while continuing to publish locally. Reconnect and verify that the queued messages arrive at the cloud (this tests cleansession false on the bridge). Measure the delay between reconnection and message delivery.
Deploy Mosquitto in Docker with persistence testing. Set up the Docker deployment described in this lesson. Publish 10 retained messages to different topics. Stop the container with docker compose down, then start it again. Subscribe to the retained topics and verify all 10 messages survived the restart (this tests that the persistence volume mount works correctly). Then run a load test: use a bash loop to publish 1000 messages as fast as possible and check $SYS/broker/messages/received to confirm all 1000 arrived. Record the messages-per-second rate.
Summary
You built a production-ready Mosquitto MQTT broker from scratch. Starting with the MQTT fundamentals (publish/subscribe, QoS 0/1/2, retained messages, last will, persistent sessions), you installed Mosquitto on Linux and configured password authentication with mosquitto_passwd. You wrote topic ACLs that restrict each user to specific read and write permissions, including pattern-based rules with %u and %c for scalable device provisioning. You generated a self-signed CA and server certificate with OpenSSL, configured TLS on port 8883, and tested encrypted connections with the command-line tools. You connected to the SiliconWit.io platform using device credentials and its d/{device_id}/t topic structure. You added WebSocket support for browser clients and configured a bridge to forward local sensor data to the cloud automatically. Finally, you explored $SYS monitoring topics, logging best practices, and Docker deployment with persistent volumes. In the next lesson, you will write MQTT client firmware for ESP32, RPi Pico W, and STM32 that connects to this broker.
Comments