Pick the wrong protocol for a battery-powered sensor node and it drains in days instead of months. Use HTTP where MQTT would suffice and you burn 100x the bandwidth on headers alone. Use MQTT where CoAP fits better and you pay for a persistent TCP connection that a constrained device cannot afford. These are not theoretical differences: they show up in your power budget, your cellular data bill, and your network capacity. In this lesson you will implement MQTT, CoAP, and HTTP on the same ESP32 with the same BME280 sensor, measure message size, round-trip time, and power draw with real numbers, and walk away with a clear framework for when to use each protocol. #IoT #MQTT #Protocols
Protocol Comparison at a Glance
──────────────────────────────────────────
MQTT CoAP HTTP
──────── ───── ───── ─────
Transport TCP UDP TCP
Overhead 2 bytes 4 bytes ~200 bytes
(min hdr) (min hdr) (headers)
Model Pub/Sub Req/Resp Req/Resp
QoS 0, 1, 2 CON/NON N/A
Power Low Lowest High
Best for Streaming Constrained On-demand
telemetry networks queries
What We Are Building
Protocol Comparison Bench
A single ESP32 reads temperature, humidity, and pressure from a BME280 sensor, then transmits the same JSON payload over MQTT, CoAP, and HTTP to three separate endpoints. Software timing captures the round-trip time and payload size for each protocol. A Python script on the receiving end logs every message so you can compare bandwidth, latency, and reliability across protocols.
Project specifications:
Parameter
Value
MCU
ESP32 DevKitC
Sensor
BME280 (I2C, 0x76 or 0x77)
MQTT Broker
Mosquitto on localhost:1883 (or mqtt.siliconwit.io:8883 with TLS)
Before comparing protocols, you need to understand the network topologies that IoT systems use. The architecture you choose determines which protocols are practical, how data flows, and where processing happens.
Star Topology
In a star topology, every device connects directly to a central server or broker. This is the simplest architecture. Each sensor node has its own network connection (Wi-Fi, cellular, Ethernet) and sends data to the cloud or a local server without any intermediary.
Advantages:
Simple to implement and debug
Each device is independent; one failing does not affect others
Low latency because there is no hop between devices
Disadvantages:
Every device needs its own internet connection
Not practical for battery-powered devices in remote locations
Central server is a single point of failure
Best for: Wi-Fi connected devices in buildings, cellular IoT with SIM cards, small deployments (fewer than 50 devices).
Mesh Topology
In a mesh network, devices relay messages for each other. A sensor node that cannot reach the server directly passes its data through neighboring nodes until it reaches a gateway with internet access. Protocols like Zigbee, Thread, and BLE Mesh use this approach.
Advantages:
Extended range without additional infrastructure
Self-healing: if one node fails, traffic routes around it
Low power per node (short-range radio hops)
Disadvantages:
Higher latency due to multi-hop routing
More complex firmware (routing tables, neighbor discovery)
Throughput decreases as the network grows
Best for: Large sensor networks (100+ nodes), agricultural monitoring, building automation, industrial floors.
Gateway Architecture
A gateway sits between constrained devices and the cloud. Local devices communicate with the gateway using lightweight protocols (BLE, Zigbee, LoRa, UART), and the gateway translates and forwards data to the cloud over Wi-Fi, Ethernet, or cellular. A Raspberry Pi running an MQTT bridge is a classic example.
Advantages:
Constrained devices do not need IP networking
Gateway handles protocol translation, buffering, and encryption
Reduces cloud bandwidth (gateway can aggregate and filter)
Disadvantages:
Gateway is a single point of failure for its local devices
Adds one more piece of hardware to maintain
Firmware updates require managing two different platforms
Best for: Mixed-protocol environments, LoRa/BLE sensor networks, brownfield retrofits where sensors cannot reach Wi-Fi directly.
Edge/Fog Computing
Edge computing pushes processing closer to the data source. Instead of sending raw sensor readings to the cloud, an edge node (gateway, local server, or powerful MCU) runs analytics, filtering, or ML inference locally. Only results, anomalies, or aggregated summaries go to the cloud.
Advantages:
Dramatically reduces cloud bandwidth and storage costs
Lower latency for time-critical decisions (safety shutoffs, motor control)
Works during internet outages (local autonomy)
Disadvantages:
More capable (and expensive) hardware at the edge
Distributed processing is harder to debug and update
Data governance becomes more complex (where is the authoritative copy?)
Best for: Video analytics, predictive maintenance, real-time control loops, bandwidth-constrained sites (satellite links, remote facilities).
This Course Uses Star + Gateway
Most lessons in this course use a star topology: ESP32 devices connect directly to an MQTT broker over Wi-Fi. In Lesson 3 you will also see the gateway pattern when an STM32 sends data through an ESP-01 Wi-Fi module. The edge computing pattern appears in Lesson 8 when the Raspberry Pi runs local analytics before forwarding to the cloud.
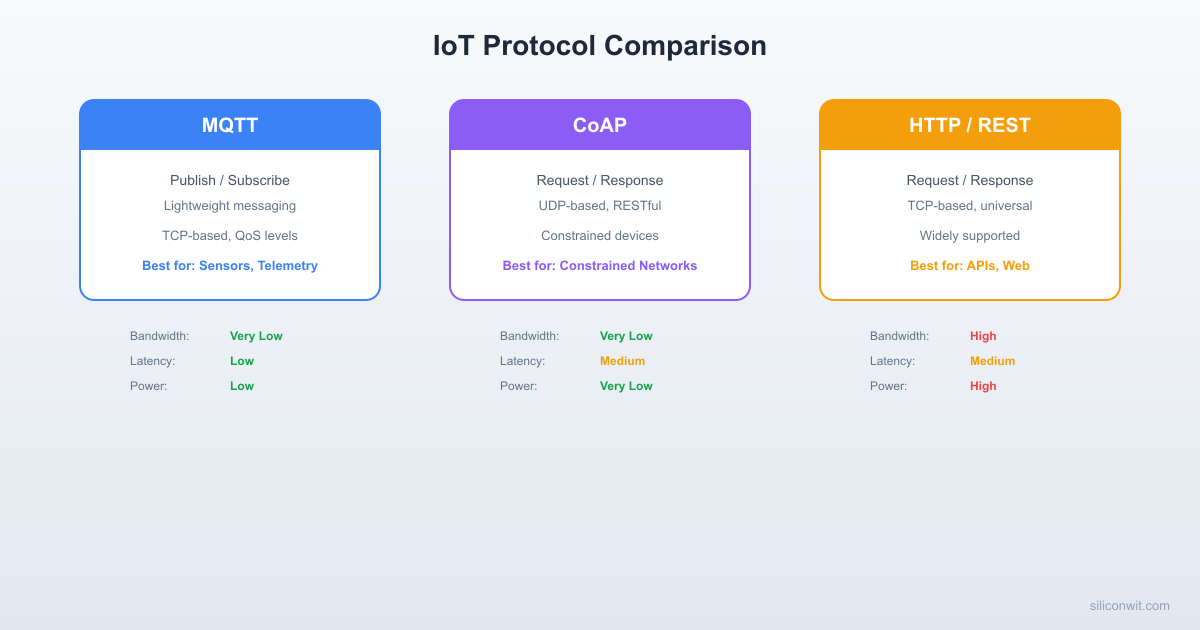
The Three Main IoT Protocols
Every IoT protocol solves the same fundamental problem: how does a small device with limited memory, CPU, and battery send data to a server reliably? The three dominant protocols take very different approaches.
MQTT (Message Queuing Telemetry Transport)
MQTT uses a publish/subscribe model over TCP. Devices never talk to each other directly. Instead, they communicate through a central broker. A device that has data publishes a message to a topic (a hierarchical string like site/building/floor/room/device/sensor). Any device that wants that data subscribes to the same topic. The broker routes messages from publishers to all matching subscribers.
Key characteristics:
Runs over TCP (port 1883 plain, 8883 TLS)
Persistent connections: the device opens one TCP connection and keeps it alive with periodic PINGREQ/PINGRESP packets
Three QoS levels: 0 (fire and forget), 1 (at least once), 2 (exactly once)
Retained messages: the broker stores the last message on a topic and delivers it immediately to new subscribers
Last Will and Testament: the broker publishes a predefined message if a device disconnects unexpectedly
Minimal overhead: a PUBLISH packet with QoS 0 adds only 2 bytes of header to the payload
When to use MQTT:
You need real-time push from device to server (or server to device)
Devices are behind firewalls or NAT (outbound TCP works everywhere)
You want decoupled publishers and subscribers
Battery life matters (one persistent connection beats repeated HTTP handshakes)
CoAP (Constrained Application Protocol)
CoAP uses a request/response model over UDP. It was designed for extremely constrained devices (8-bit MCUs with 10 KB of RAM) that cannot afford TCP’s overhead. CoAP messages are compact binary packets with a 4-byte fixed header. The protocol supports GET, PUT, POST, and DELETE methods, making it feel like a lightweight HTTP.
Key characteristics:
Runs over UDP (port 5683 plain, 5684 DTLS)
Connectionless: no persistent connection, no TCP handshake
Confirmable (CON) and non-confirmable (NON) message types for reliability control
Observe option: a client can subscribe to a resource and receive notifications when it changes (similar to MQTT subscriptions but resource-based)
Block-wise transfer for payloads larger than one UDP datagram
Content negotiation via media type options (application/json, application/cbor)
When to use CoAP:
Devices are extremely RAM/ROM constrained
The network is lossy and you want fast recovery (UDP retransmit is simpler than TCP backoff)
You need a REST-like interface on the device itself (e.g., reading a sensor value with GET)
Multicast discovery is needed (CoAP supports UDP multicast)
HTTP (Hypertext Transfer Protocol)
HTTP is the universal protocol of the web. Every server, every browser, every proxy, every CDN speaks HTTP. For IoT, HTTP means POSTing JSON to a REST API endpoint. It works, it is well understood, and every cloud platform has an HTTP ingestion endpoint.
Key characteristics:
Runs over TCP (port 80 plain, 443 TLS)
Stateless: every request is independent, no persistent session by default
Text-based headers add significant overhead (often 500+ bytes per request)
TLS handshake is expensive on constrained devices (CPU, memory, time)
Universal firewall and proxy compatibility
Native browser support (fetch, XMLHttpRequest, WebSocket upgrade)
When to use HTTP:
You are integrating with existing web services or REST APIs
Data is sent infrequently (once per minute or less)
The device has plenty of RAM and a fast CPU (ESP32, Raspberry Pi)
You need browser-based device interaction without a broker
Protocol Comparison Table
Feature
MQTT
CoAP
HTTP
Transport
TCP
UDP
TCP
Default Port
1883 / 8883 (TLS)
5683 / 5684 (DTLS)
80 / 443 (TLS)
Model
Publish/Subscribe
Request/Response
Request/Response
Header Overhead
2 bytes minimum
4 bytes fixed
200-800+ bytes
Payload Format
Any (binary, JSON, CBOR)
Any (binary, JSON, CBOR)
Any (typically JSON)
Persistent Connection
Yes (keep-alive)
No (UDP)
Optional (HTTP/1.1 keep-alive)
Reliability
QoS 0/1/2
CON/NON + retransmit
TCP guarantees delivery
Latency
Low (persistent conn)
Very low (no handshake)
High (TCP + TLS handshake per request)
Bandwidth
Very low
Lowest
High
Power Consumption
Low (sleep between pings)
Lowest (no connection to maintain)
Highest (full handshake each time)
Firewall Friendly
Yes (outbound TCP)
Sometimes blocked (UDP)
Yes (ports 80/443 always open)
Browser Support
Via WebSocket bridge
No native support
Native
NAT Traversal
Yes (persistent TCP)
Difficult (UDP, needs NAT binding)
Yes (standard HTTP)
Bidirectional
Yes (subscribe)
Yes (observe)
No (requires polling or WebSocket)
Multicast
No
Yes (UDP multicast)
No
Best For
Real-time telemetry, alerts
Constrained devices, LAN
Web integration, infrequent uploads
Circuit Connections
Connect the BME280 to the ESP32 via I2C:
ESP32 Pin
BME280 Pin
Notes
GPIO 21 (SDA)
SDA
I2C data
GPIO 22 (SCL)
SCL
I2C clock
3.3V
VIN (or VCC)
Power supply
GND
GND
Common ground
If your BME280 module has a voltage regulator (most breakout boards do), you can power it from 3.3V. Check the address jumper: the default I2C address is 0x76 (SDO pulled low) or 0x77 (SDO pulled high).
MQTT Implementation
We will use the Arduino framework with PubSubClient for the MQTT implementation. This keeps the code focused on the protocol differences rather than ESP-IDF boilerplate.
Arduino Setup
Install Arduino IDE or PlatformIO.
Install the following libraries:
PubSubClient by Nick O’Leary (MQTT client)
Adafruit BME280 (sensor driver)
Adafruit Unified Sensor (dependency)
ArduinoJson (JSON serialization)
Select the ESP32 Dev Module as your board.
MQTT Code
mqtt_sender.ino
#include<WiFi.h>
#include<PubSubClient.h>
#include<Wire.h>
#include<Adafruit_BME280.h>
#include<ArduinoJson.h>
/* ---- Configuration ---- */
constchar* WIFI_SSID ="YourSSID";
constchar* WIFI_PASS ="YourPassword";
/* Option A: Self-hosted Mosquitto (no TLS) */
constchar* MQTT_SERVER ="192.168.1.100";
constint MQTT_PORT =1883;
/* Option B: SiliconWit.io (TLS on port 8883)
* See siliconwit.io (Dashboard -> Devices) for connection details.
* For TLS you need WiFiClientSecure instead of WiFiClient.
await asyncio.get_event_loop().create_future() # Run forever
if __name__ =="__main__":
asyncio.run(main())
Install the dependency with:
Terminal
pipinstallaiocoap
HTTP Implementation
HTTP is the simplest protocol to implement on the ESP32 because the Arduino core includes a full HTTP client. The trade-off is overhead: every request carries text headers, and TLS requires a full handshake unless you use HTTP/1.1 keep-alive.
The most informative way to compare protocols is to run all three from the same firmware, one after another, using the same sensor reading. This eliminates variables like network conditions changing between tests.
The numbers you see will vary depending on your network, but the relative order is consistent: MQTT is fastest because the TCP connection is already established, CoAP is close but waits for a UDP ACK, and HTTP is slowest because it performs a full TCP handshake and sends verbose headers with every request.
Measuring and Analyzing Results
What the Numbers Mean
Payload bytes: The JSON string you are sending. This is identical across all three protocols (same sensor data, same JSON structure). In our test, approximately 128 bytes.
Wire bytes (estimated): The total bytes actually transmitted on the network, including protocol headers:
MQTT: 2-byte fixed header + 2-byte topic length + topic string + payload. On an existing connection, MQTT adds roughly 35 bytes of overhead. The TCP connection was already established, so there is no handshake cost.
CoAP: 4-byte fixed header + 1-byte token + options (Uri-Path, Content-Format) + 1-byte payload marker + payload + 8-byte UDP header. Total overhead is about 29 bytes. No connection setup.
HTTP: The POST request includes the method line, Host header, Content-Type, Content-Length, and other headers. A typical HTTP POST adds 300 to 500 bytes of overhead. If TLS is used, the initial handshake adds several kilobytes.
RTT (round-trip time): The time from starting the send to receiving confirmation:
MQTT QoS 0: The publish() call returns as soon as the data is written to the TCP buffer. This is not a true round-trip; it measures only the local write time. For QoS 1, the broker sends a PUBACK, giving a true RTT.
CoAP CON: The server sends an ACK packet, so the measured time is a genuine round-trip.
HTTP: The full request/response cycle, including TCP write, server processing, and response read.
Power Consumption Implications
You cannot directly measure power with software timing alone, but you can reason about it:
Factor
MQTT
CoAP
HTTP
Radio on time per message
Short (write to existing conn)
Short (one UDP packet + ACK)
Long (TCP handshake + headers + response)
Idle power (connection maintenance)
Low (PINGREQ every 30-60s)
None (connectionless)
None (stateless)
TLS handshake per message
None (done once)
Per session (DTLS)
Per request (unless keep-alive)
Sleep friendliness
Good (reconnect is cheap)
Best (no state to maintain)
Poor (TLS renegotiation is expensive)
For a battery-powered device that wakes up, reads a sensor, sends data, and goes back to sleep:
CoAP wins if the device sleeps for minutes between readings (no connection overhead on wake)
MQTT wins if the device stays awake and sends frequently (amortized connection cost)
HTTP is rarely the best choice for battery-powered devices
Running a Proper Benchmark
For statistically meaningful results, run at least 100 iterations per protocol and compute the mean, median, and 95th percentile. Modify the bench loop:
statistical_bench_snippet.ino
#defineBENCH_ITERATIONS100
voidrun_statistical_bench() {
unsignedlongmqtt_times[BENCH_ITERATIONS];
unsignedlongcoap_times[BENCH_ITERATIONS];
unsignedlonghttp_times[BENCH_ITERATIONS];
for (int i =0; i < BENCH_ITERATIONS; i++) {
float temp =bme.readTemperature();
float hum =bme.readHumidity();
float pres =bme.readPressure() /100.0F;
String payload =build_payload(temp, hum, pres);
BenchResult r_mqtt =bench_mqtt(payload);
mqtt_times[i] =r_mqtt.rtt_us;
delay(100); /* Small gap between protocols */
BenchResult r_coap =bench_coap(payload);
coap_times[i] =r_coap.rtt_us;
delay(100);
BenchResult r_http =bench_http(payload);
http_times[i] =r_http.rtt_us;
delay(500);
}
/* Sort each array and print statistics */
/* (Implement a simple insertion sort for each array) */
Serial.println("Benchmark complete. Process the arrays for statistics.");
}
Collect the raw numbers over serial and analyze them in a spreadsheet or Python script for proper percentile calculations.
MQTT Topic Hierarchy Design
A well-designed topic hierarchy makes your IoT system scalable, queryable, and maintainable. The general pattern follows a location-to-sensor path:
site / building / floor / room / device / measurement
Concrete Examples
Topic Hierarchy Examples
# Single office building
office/hq/3/server-room/esp32-01/temperature
office/hq/3/server-room/esp32-01/humidity
office/hq/3/server-room/esp32-01/pressure
office/hq/3/lobby/esp32-02/occupancy
# Agricultural deployment
farm/greenhouse-a/zone1/soil-node-01/moisture
farm/greenhouse-a/zone1/soil-node-01/temperature
farm/greenhouse-a/zone2/soil-node-02/moisture
farm/outdoor/weather-station/wind_speed
# Industrial floor
factory/plant-1/line-3/motor-07/vibration
factory/plant-1/line-3/motor-07/temperature
factory/plant-1/line-3/plc-01/cycle_count
Design Principles
Start general, end specific. The leftmost segments are the broadest categories (site, building). The rightmost segment is the measurement type. This lets you subscribe to office/hq/# to get everything in a building, or +/+/+/+/+/temperature to get all temperature readings across all sites.
Use lowercase and hyphens. Topics are case-sensitive in MQTT. Stick to lowercase with hyphens for consistency: server-room not ServerRoom or server_room.
Keep segments meaningful. Each level should answer a question: Where? (site, building, floor, room) What? (device) Which measurement? (sensor type). Do not add empty or redundant levels.
Avoid leading or trailing slashes. The topic /site/building/sensor creates an empty first level. Use site/building/sensor instead.
Reserve system topics. Use a prefix like $SYS/ or cmd/ for control messages. For example, cmd/esp32-01/config for configuration updates and status/esp32-01/online for health monitoring.
Plan for wildcards. Think about how subscribers will query data. If a dashboard needs all sensors in a room, the hierarchy should group by room. If analytics needs all temperature readings, the hierarchy should end with the measurement type.
JSON Payload Design
A consistent JSON payload structure across all your devices makes backend processing straightforward. Here is a recommended schema:
Standard Sensor Payload
{
"device_id": "esp32-proto-bench",
"timestamp_ms": 1741612800000,
"temperature_c": 23.45,
"humidity_pct": 48.12,
"pressure_hpa": 1013.25
}
Field Descriptions
Field
Type
Description
device_id
string
Unique identifier for the device. Use the same ID across MQTT client ID, database tags, and API keys.
timestamp_ms
integer
Milliseconds since the device booted (or Unix epoch if the device has NTP). The server should add its own receive timestamp for authoritative timing.
temperature_c
float
Temperature in Celsius. Always include the unit in the field name.
humidity_pct
float
Relative humidity as a percentage (0 to 100).
pressure_hpa
float
Barometric pressure in hectopascals.
Extended Payload with Metadata
For production systems, include diagnostic fields:
Extended Payload with Diagnostics
{
"device_id": "esp32-proto-bench",
"firmware_version": "1.2.0",
"timestamp_ms": 1741612800000,
"uptime_s": 86400,
"wifi_rssi": -62,
"free_heap": 124000,
"temperature_c": 23.45,
"humidity_pct": 48.12,
"pressure_hpa": 1013.25
}
The wifi_rssi field helps you detect connectivity degradation before messages start failing. The free_heap field catches memory leaks in long-running firmware. The firmware_version field lets your backend handle schema differences across firmware updates.
SiliconWit.io: Connected Operations Platform
SiliconWit.io is a connected operations platform that provides real-time monitoring, dashboards, alerts (email, SMS, Discord, Slack, Telegram), remote device control, automation rules, AI analytics, and a REST API. It accepts data over all three protocols covered in this lesson: MQTT, CoAP, and HTTP. This makes it a convenient target for protocol comparison benchmarks and a practical option for production deployments.
Connection Summary
Protocol
Endpoint
Port
Authentication
MQTT
mqtt.siliconwit.io
8883 (TLS)
Username + password from dashboard
CoAP
coap.siliconwit.io
5684 (DTLS)
Token in Uri-Query option
HTTP
api.siliconwit.io
443 (TLS)
API key in Authorization header
Connection details, certificates, and API keys are available after registration at siliconwit.io (Dashboard -> Devices). The free tier supports 3 devices with 7-day data retention, which is sufficient for all lessons in this course.
Why Multiple Protocols Matter
A real IoT deployment often has mixed device types. Your ESP32 with Wi-Fi might use MQTT for real-time telemetry. A constrained LoRa sensor behind a gateway might forward data via CoAP. A third-party integration or mobile app might push data via HTTP REST. A platform that supports all three lets you unify data from diverse sources into a single dashboard and alert pipeline.
When to Choose Each Protocol
Decision Guide
Choose MQTT when:
Devices need real-time bidirectional communication
You have many devices publishing to a shared broker
Devices are behind firewalls or NAT (outbound TCP works everywhere)
You need QoS guarantees, retained messages, or last will
The device stays powered and connected (or reconnects cheaply)
Choose CoAP when:
Devices are extremely constrained (less than 64 KB RAM)
The network supports UDP (no restrictive firewalls)
You need a REST-like interface directly on the device
Battery life is critical and the device sleeps between transmissions
You need multicast discovery on a local network
Choose HTTP when:
You are integrating with existing web APIs or cloud services
Data is sent infrequently (every few minutes or longer)
The device has ample resources (ESP32, Raspberry Pi, or similar)
You need universal firewall compatibility (ports 80/443)
Browser-based interaction with the device is required
In practice, most IoT systems use MQTT as the primary protocol for device-to-broker communication and HTTP for backend APIs, dashboards, and third-party integrations. CoAP is less common outside of highly constrained environments (6LoWPAN, Thread networks), but understanding it helps you make informed trade-offs.
MQTT Broker Quick Setup (Mosquitto)
To run the protocol bench, you need a local MQTT broker. Mosquitto is the standard open-source broker. Lesson 2 covers a full production setup with TLS and ACLs; here we set up a minimal instance for testing.
Start the three servers on your development machine. Open three terminal windows:
Terminal 1 (MQTT broker):
Terminal window
mosquitto-v
Terminal 2 (CoAP server):
Terminal window
pythoncoap_server.py
Terminal 3 (HTTP server):
Terminal window
pythonhttp_server.py
Update the IP addresses in protocol_bench.ino. Replace 192.168.1.100 with your development machine’s actual IP address on the same Wi-Fi network. Find it with ip addr (Linux), ifconfig (macOS), or ipconfig (Windows).
Open the serial monitor at 115200 baud. Watch for the comparison table printed every 15 seconds.
Observe the server terminals. You should see messages arriving at all three servers within the same 15-second cycle.
Collect at least 20 cycles (5 minutes) for meaningful averages. Copy the serial output for analysis.
Optional: add TLS to MQTT. Change the MQTT connection to use mqtt.siliconwit.io:8883 with WiFiClientSecure and compare the TLS MQTT latency against plain MQTT. TLS adds latency only on the first connection; subsequent publishes on the same connection have minimal overhead.
Typical Results Summary
After running 100 iterations on a local network (ESP32 on the same Wi-Fi as the servers), you should see results similar to these:
Metric
MQTT (QoS 0)
CoAP (CON)
HTTP POST
Payload size
128 bytes
128 bytes
128 bytes
Wire overhead
~35 bytes
~29 bytes
~350 bytes
Mean RTT
1.5 ms
3.0 ms
25 ms
P95 RTT
4 ms
8 ms
45 ms
Connection setup
0 ms (reused)
0 ms (UDP)
5-10 ms (TCP)
TLS addition
0 ms (done once)
Per session
Per request
Your numbers will differ based on network conditions, server load, and ESP32 variant, but the relative relationships are consistent across environments.
Exercises
Add MQTT QoS 1 to the benchmark. Modify the MQTT bench function to publish with QoS 1 (mqttClient.publish(topic, payload, true) for retained, or set QoS in PubSubClient). QoS 1 requires a PUBACK from the broker before the publish is considered complete. Measure how the RTT changes compared to QoS 0. Then try QoS 2 (exactly once) if your client library supports it. Document the latency increase at each QoS level and explain why.
Implement CoAP Observe. Instead of repeatedly sending POST requests, modify the CoAP implementation to support the Observe option (option number 6). Register an observer from a Python client using aiocoap-client observe coap://[esp32-ip]:5683/sensor/bme280, and have the ESP32 act as a CoAP server that pushes new readings to all registered observers whenever the sensor data changes by more than 0.5 degrees. Compare the bandwidth usage of observe-based push versus repeated POST requests over a 10-minute window.
Measure actual power consumption. Connect a current sense resistor (0.1 ohm) in series with the ESP32’s power supply and use an oscilloscope or a dedicated power analyzer (like the Nordic PPK2 or an INA219 breakout) to measure the current draw during each protocol’s send cycle. Record the current profile for: (a) MQTT publish on an existing connection, (b) CoAP POST with ACK, (c) HTTP POST with full TCP handshake. Calculate the energy per message in microjoules and project battery life for a 1000 mAh battery at one message per minute for each protocol.
Build a protocol auto-selector. Write firmware that starts with MQTT as the default protocol. If the MQTT broker is unreachable (three consecutive connection failures), fall back to HTTP POST. If HTTP also fails, buffer readings locally in SPIFFS and retry both protocols every 60 seconds. When MQTT reconnects, replay the buffered readings in order. Log every protocol switch to the serial monitor with the reason and timestamp. This pattern is common in production IoT systems that need to survive infrastructure outages.
Summary
You examined four IoT network architectures (star, mesh, gateway, edge/fog) and learned when each one fits. You studied the three dominant IoT protocols, MQTT, CoAP, and HTTP, understanding their transport layers, overhead, and trade-offs. You implemented all three protocols on the same ESP32 with the same BME280 sensor and built a combined benchmark that measures payload size, wire overhead, and round-trip time side by side. The results confirmed that MQTT offers the best balance of low latency and reliability for connected devices, CoAP provides the lowest overhead for constrained devices and lossy networks, and HTTP is best reserved for infrequent uploads and web API integration. You designed MQTT topic hierarchies following the site/building/floor/room/device/sensor pattern and structured JSON payloads with consistent field naming. You set up a local Mosquitto broker and two Python servers (CoAP and HTTP) for testing, and learned how SiliconWit.io supports all three protocols as a managed alternative.
Comments