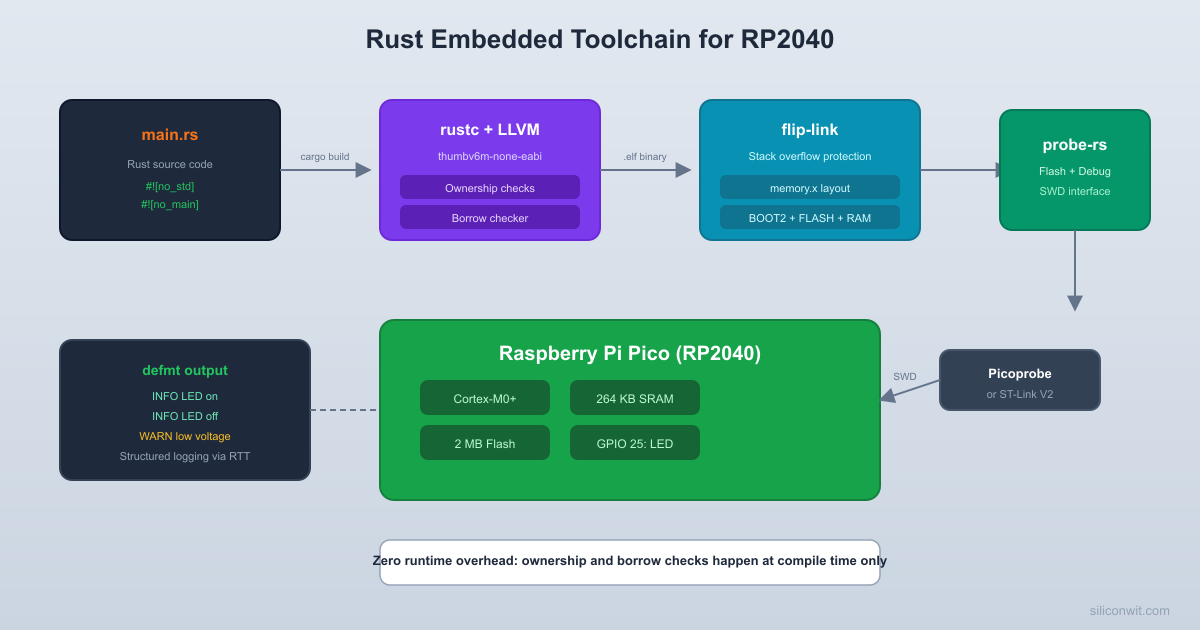
Every embedded Rust project begins with the same question: how do I get Rust code running on a microcontroller? The answer involves a cross-compilation target, a linker script that maps your code to the chip’s memory layout, and a flash tool that speaks the debug probe’s protocol. In this lesson, you will install everything from scratch, create an RP2040 project using Cargo, and flash a blinking LED with structured log output streaming back to your terminal over RTT. By the end, you will have a repeatable workflow for every lesson that follows. #EmbeddedRust #RP2040 #Toolchain
What We Are Building
Blinking LED with defmt RTT Logging
An LED that blinks at 1 Hz on the Raspberry Pi Pico, with structured log messages streaming to your terminal over RTT (Real-Time Transfer). The LED toggles every 500 ms using an alarm timer from the rp2040-hal crate. Each toggle prints the current state and a cycle counter through defmt, so you can verify timing and confirm the toolchain works end to end.
Project specifications:
Parameter
Value
Board
Raspberry Pi Pico (RP2040)
Debug probe
Picoprobe (second Pico) or ST-Link V2
LED pin
GP25 (onboard LED) and GP15 (external LED)
Blink rate
1 Hz (500 ms on, 500 ms off)
Logging
defmt over RTT via probe-rs
HAL crate
rp2040-hal 0.10
Toolchain
Rust nightly, thumbv6m-none-eabi target
Bill of Materials
Component
Quantity
Notes
Raspberry Pi Pico
1
Main target board
Raspberry Pi Pico (Picoprobe) or ST-Link V2
1
Debug probe for flashing and RTT
Breadboard
1
Half-size or full-size
LED (any color, 3mm or 5mm)
1
External LED on GP15
220 ohm resistor
1
Current limiting for external LED
Jumper wires
6+
For connections
Micro USB cables
2
One for target Pico, one for probe
Wiring Table
Pico Pin
Connection
Notes
GP25
Onboard LED
Built into the Pico board
GP15
External LED anode (long leg)
Through 220 ohm resistor
GND
External LED cathode (short leg)
Via resistor to GND
SWDIO (debug header)
Probe SWDIO
SWD data
SWCLK (debug header)
Probe SWCLK
SWD clock
GND (debug header)
Probe GND
Common ground
If using a Picoprobe, the probe Pico connects to the target Pico through the SWD debug header at the bottom of the board. The three pins are SWCLK, SWDIO, and GND.
1. Download and run rustup-init.exe from https://rustup.rs   Choose the default installation.
2. Open a new terminal (Command Prompt or PowerShell):
   rustup target add thumbv6m-none-eabi   cargo install probe-rs-tools   cargo install flip-link   cargo install elf2uf2-rs
3. Install the WinUSB driver for your debug probe:   - Download Zadig from https://zadig.akeo.ie/   - Plug in the debug probe   - In Zadig, select the probe and install WinUSB driver
4. Verify:   rustc --version   cargo --version   probe-rs --version
Why Each Tool?
Tool
Purpose
rustup
Manages Rust toolchain versions and cross-compilation targets
thumbv6m-none-eabi
Compilation target for ARM Cortex-M0+ (the RP2040 core)
probe-rs
Flashes firmware, provides RTT log output, and drives GDB debugging
flip-link
Custom linker wrapper that flips the stack to detect overflows
elf2uf2-rs
Converts ELF binaries to UF2 format for drag-and-drop flashing (backup)
Connecting the Debug Probe
The Pico has a 3-pin SWD debug header at the bottom of the board (SWCLK, SWDIO, GND). If you are using a second Pico as a Picoprobe, flash it with the Picoprobe firmware first by holding BOOTSEL, plugging it in, and dragging the UF2 file onto the drive.
SWD Debug Connection
──────────────────────────────────────────
Picoprobe / ST-Link Target Pico
(debug adapter) (bottom edge)
┌─────────┐ ┌─────────┐
│ SWDIO ├────────────────┤ SWDIO │
│ SWCLK ├────────────────┤ SWCLK │
│ GND ├────────────────┤ GND │
└─────────┘ └─────────┘
Probe Pin
Target Pico Pin
SWCLK
SWCLK
SWDIO
SWDIO
GND
GND
Test the connection:
Terminal window
probe-rslist
You should see your probe listed (e.g., Picoprobe (CMSIS-DAP) or STLink V2). Then test the target:
Terminal window
probe-rsinfo--chipRP2040
This should print the RP2040 memory layout and core information.
Creating the Project
Project Structure
Directoryrp2040-blink/
Directory.cargo/
config.toml
Directorysrc/
main.rs
Cargo.toml
memory.x
build.rs
Embed.toml
Cargo.toml
Create a new project and configure its dependencies:
Terminal window
cargoinitrp2040-blink
cdrp2040-blink
Replace the generated Cargo.toml with:
[package]
name = "rp2040-blink"
version = "0.1.0"
edition = "2021"
[dependencies]
# RP2040 HAL (Hardware Abstraction Layer)
rp2040-hal = { version = "0.10", features = ["rt", "critical-section-impl"] }
# Board support package for Raspberry Pi Pico pinout
rp-pico = "0.9"
# Cortex-M runtime and support
cortex-m = "0.7"
cortex-m-rt = "0.7"
# Panic handler: halt on panic (required for no_std)
panic-halt = "1.0"
# defmt logging framework (lightweight, no format strings on target)
defmt = "0.3"
defmt-rtt = "0.4"
# Embedded HAL traits
embedded-hal = "1.0"
[profile.dev]
codegen-units = 1
debug = 2
debug-assertions = true
incremental = false
opt-level = "s"
overflow-checks = true
[profile.release]
codegen-units = 1
debug = 2
debug-assertions = false
incremental = false
lto = "fat"
opt-level = "s"
overflow-checks = false
Understanding the Dependencies
Crate
Role
rp2040-hal
Provides typed access to all RP2040 peripherals (GPIO, timers, PWM, I2C, SPI, etc.)
rp-pico
Maps physical Pico board pins to RP2040 GPIO numbers
cortex-m
Low-level access to ARM Cortex-M core features (interrupts, registers). The rp2040-hal already provides the critical-section implementation, so do not add critical-section-single-core here
The RP2040 has a unique boot process. The first 256 bytes of flash (the BOOT2 region) contain a second-stage bootloader that configures the external QSPI flash (the RP2040 has no internal flash; it executes from an external chip). The rp2040-hal crate provides this bootloader, and the linker script places it at the correct address. The main application code starts at 0x10000100, after the boot2 block.
Region
Address
Size
Purpose
BOOT2
0x10000000
256 bytes
Second-stage bootloader for QSPI flash
FLASH
0x10000100
~2 MB
Application code and read-only data
RAM
0x20000000
256 KB
Stack, heap, and mutable data
.cargo/config.toml
Create .cargo/config.toml to set the default build target and linker:
[target.thumbv6m-none-eabi]
runner = "probe-rs run --chip RP2040"
rustflags = [
"-C", "linker=flip-link",
"-C", "link-arg=--nmagic",
"-C", "link-arg=-Tlink.x",
"-C", "link-arg=-Tdefmt.x",
]
[build]
target = "thumbv6m-none-eabi"
[env]
DEFMT_LOG = "debug"
This configuration does several important things:
target: Every cargo build cross-compiles for ARM Cortex-M0+ without needing --target each time.
runner: cargo run flashes the firmware to the Pico and streams RTT output.
flip-link: The linker wrapper that places the stack at the bottom of RAM, so a stack overflow triggers a HardFault instead of silently corrupting data.
-Tlink.x: The cortex-m-rt linker script that sets up the vector table and memory sections.
-Tdefmt.x: The defmt linker script that sets up the logging framework’s string table.
#![no_std] tells the compiler not to link the standard library. Microcontrollers do not have an operating system, so there is no heap allocator, file system, or networking stack. You get core (basic types, iterators, Option, Result) but not std.
#![no_main] tells the compiler that we provide our own entry point. The #[entry] attribute from cortex-m-rt generates the real entry point, which sets up the stack pointer and calls our function.
fn main() -> ! returns the “never” type. Embedded main loops must never return, because there is no operating system to return to. If this function somehow returned, the runtime would enter an infinite loop.
pac::Peripherals::take() returns Some(peripherals) the first time it is called, and None on every subsequent call. This is the singleton pattern in Rust: it guarantees at compile time (through the type system) that only one part of your code can access the raw peripheral registers. In C, you simply write to peripheral addresses from anywhere, which enables subtle bugs when two modules configure the same peripheral differently.
pins.led.into_push_pull_output() consumes the pin in its unconfigured state and returns a new value with a different type representing a push-pull output. The original pin variable is no longer usable. This is the typestate pattern, and it means the compiler prevents you from reading a pin that is configured as an output or writing to a pin that is still unconfigured.
set_high().unwrap() returns Result<(), Error>. In embedded Rust, even simple GPIO operations return Results because the operation could theoretically fail (infallible implementations exist but the trait is generic). We call unwrap() here because RP2040 GPIO writes are infallible in practice.
Building and Flashing
Build the Project
Terminal window
cargobuild--release
The first build downloads and compiles all dependencies. Subsequent builds are much faster. The output binary is at target/thumbv6m-none-eabi/release/rp2040-blink.
Check the binary size:
Terminal window
cargosize--release---A
A minimal blink program typically uses 8-15 KB of flash. Compare this to a C blink compiled with the Pico SDK, which is similar in size. Rust does not add significant overhead for simple programs.
Flash and Run
Terminal window
cargorun--release
This builds, flashes via probe-rs, and immediately starts streaming defmt RTT output to your terminal. You should see:
INFO Booting rp2040-blink
INFO System clock: 125 MHz
INFO GPIO configured. Starting blink loop.
INFO Cycle 0: LEDs ON
INFO Cycle 0: LEDs OFF
INFO Cycle 1: LEDs ON
INFO Cycle 1: LEDs OFF
...
The onboard LED and the external LED on GP15 should blink in sync at 1 Hz.
Alternative: UF2 Drag-and-Drop
If you do not have a debug probe, you can flash via UF2:
Nothing prevents calling gpio_put() before gpio_init()
Nothing prevents calling gpio_put() with an invalid pin number (e.g., pin 99)
Nothing prevents two modules from calling gpio_init() on the same pin
gpio_set_dir() could be called with an incorrect direction and the compiler would not notice
If you forget gpio_init(), the code compiles and runs, but the pin does not work
letpins= rp_pico::Pins::new(/* ... */);
letmutled=pins.led.into_push_pull_output();
loop {
led.set_high().unwrap();
timer.delay_ms(500);
led.set_low().unwrap();
timer.delay_ms(500);
}
What Rust catches at compile time:
into_push_pull_output() consumes the pin; you cannot configure it twice
set_high() only exists on output pin types; calling it on an input pin is a type error
pins.led is consumed after into_push_pull_output(); no other code can access it
Pin numbers are type-checked; there is no gpio_put(99, 1) equivalent
The peripheral singleton ensures Pins::new() can only be called once
The key insight: in C, these are runtime bugs that show up during testing (or in the field). In Rust, they are compile-time errors. The compiler acts as a static analysis tool that understands hardware state.
defmt: Structured Logging for Embedded
defmt (de-format) is a logging framework designed for resource-constrained targets. Unlike printf, which stores format strings in flash on the target, defmt stores only compact log frame IDs. The format strings stay on the host. This dramatically reduces flash usage and log overhead.
Feature
printf (C)
defmt (Rust)
Format string storage
On target (flash)
On host only
Bandwidth per log
Full string over UART
Compact frame over RTT
Structured data
No
Yes (derives, custom types)
Log levels
Manual
Built-in (trace, debug, info, warn, error)
Transport
Typically UART
RTT (through debug probe, zero pins used)
defmt Log Levels
defmt::trace!("very detailed, usually disabled");
defmt::debug!("development-time debugging info");
defmt::info!("normal operational messages");
defmt::warn!("something unexpected but recoverable");
defmt::error!("something went wrong");
Set the minimum level in .cargo/config.toml with DEFMT_LOG = "info" to suppress trace and debug messages in release builds.
Linker script defining FLASH and RAM regions for the RP2040
.cargo/config.toml
Default target, linker flags, runner command
build.rs
Build script that copies memory.x into the output directory
Embed.toml
probe-rs configuration (chip, RTT, GDB settings)
src/main.rs
Application code
Cargo.lock
Exact dependency versions (auto-generated, commit to version control)
How the Build Works
cargo build invokes rustc with --target thumbv6m-none-eabi, cross-compiling for ARM Cortex-M0+.
build.rs runs first, copying memory.x to the output directory so the linker can find it.
The linker (flip-link wrapping rust-lld) combines your code with cortex-m-rt’s startup code, places sections according to memory.x and link.x, and generates an ELF binary.
cargo run passes the ELF to probe-rs run, which flashes it to the Pico over SWD and resets the chip.
RTT starts streaming. probe-rs reads the defmt frames from a RAM buffer through the debug probe and decodes them on your machine using the format strings embedded in the ELF’s debug info.
Production Notes
Production Considerations
Flash protection: The RP2040 does not have read-out protection like STM32. Your firmware can be read back from the external QSPI flash. For commercial products, consider encrypting the firmware and using a signed boot flow.
Panic behavior: We use panic-halt which simply loops forever. In production, switch to panic-probe (logs the panic message over defmt then halts) during development, and panic-reset (triggers a watchdog reset) for deployed firmware.
Binary size: Run cargo size --release -- -A regularly. The opt-level = "s" profile optimizes for size. For even smaller binaries, try opt-level = "z". LTO (lto = "fat") in release mode enables cross-crate optimization.
Watchdog timer: Production firmware should enable the watchdog timer to recover from hangs. The rp2040-hal Watchdog driver supports this. We will use it in later lessons.
flip-link justification: On Cortex-M, the default stack grows downward from the top of RAM. If it overflows, it silently corrupts variables at the bottom of RAM. flip-link places the stack at the bottom, so an overflow triggers a HardFault that you can catch and log, instead of causing mysterious data corruption.
What You Have Learned
Lesson 1 Complete
Toolchain skills:
Installed Rust with rustup, added the thumbv6m-none-eabi target
Installed probe-rs, flip-link, and elf2uf2-rs
Connected a debug probe (Picoprobe or ST-Link) to the Pico via SWD
Project structure:
Created a Cargo project with rp2040-hal and defmt dependencies
Configured memory.x for the RP2040’s flash and RAM layout
Set up .cargo/config.toml for cross-compilation, flip-link, and probe-rs runner
Rust embedded concepts:
#![no_std] and #![no_main] for bare-metal programs
Comments