HTTP works well when a browser requests data, but IoT devices need to push updates on their own schedule. MQTT solves this with a lightweight publish/subscribe model that uses minimal bandwidth and handles unreliable connections gracefully. In this lesson you will connect your ESP32 to a free cloud broker, publish soil moisture readings on a schedule, and subscribe to command topics so you can remotely adjust thresholds. When the soil gets too dry, your phone gets a notification within seconds. #ESP32 #MQTT #IoT
What We Are Building
Plant Soil Moisture Monitor
A connected plant monitor that reads a capacitive soil moisture sensor, publishes readings to a free MQTT broker (HiveMQ Cloud or EMQX), and sends alerts when moisture drops below a configurable threshold. A phone app (MQTT Dashboard or similar) subscribes to the data topic for live readings and receives push notifications on the alert topic. TLS encryption secures all communication. A last will message notifies subscribers if the device goes offline unexpectedly.
Project specifications:
Parameter
Value
MCU
ESP32 DevKitC
Sensor
Capacitive soil moisture sensor (analog output)
ADC Channel
ADC1 (GPIO36 or GPIO34)
MQTT Broker
HiveMQ Cloud (free tier) or EMQX Cloud
MQTT Port
8883 (TLS)
Publish Topic
home/garden/moisture
Alert Topic
home/garden/alert
Command Topic
home/garden/config
QoS
QoS 1 for data, QoS 2 for alerts
Publish Interval
Every 60 seconds (configurable via MQTT command)
Last Will
”sensor-offline” on home/garden/status
Encryption
TLS 1.2 with server certificate verification
Bill of Materials
Ref
Component
Quantity
Notes
U1
ESP32 DevKitC
1
Same board from previous lessons
S1
Capacitive soil moisture sensor
1
Analog output, 3.3V compatible
Breadboard + jumper wires
1 set
Plant in a pot
1
For real-world testing
Circuit Connections
Connect the capacitive soil moisture sensor to the ESP32 on a breadboard:
ESP32 Pin
Component
Notes
GPIO 36 (VP)
Sensor analog output (AOUT)
ADC1_CHANNEL_0
3.3V
Sensor VCC
Power supply
GND
Sensor GND
Common ground
The capacitive soil moisture sensor has three pins: VCC, GND, and AOUT (analog output). Insert the sensor into the soil up to the marked line on the PCB. Do not submerge the electronics section above that line. The analog output varies from about 1.2V (wet soil) to 2.8V (dry air), and you will calibrate the exact values for your sensor later in this lesson.
GPIO 36 is one of the input-only pins on the ESP32, and it connects to ADC1_CHANNEL_0. Using an ADC1 channel is important because ADC2 conflicts with the Wi-Fi driver and produces unreliable readings when Wi-Fi is active.
MQTT Protocol Overview
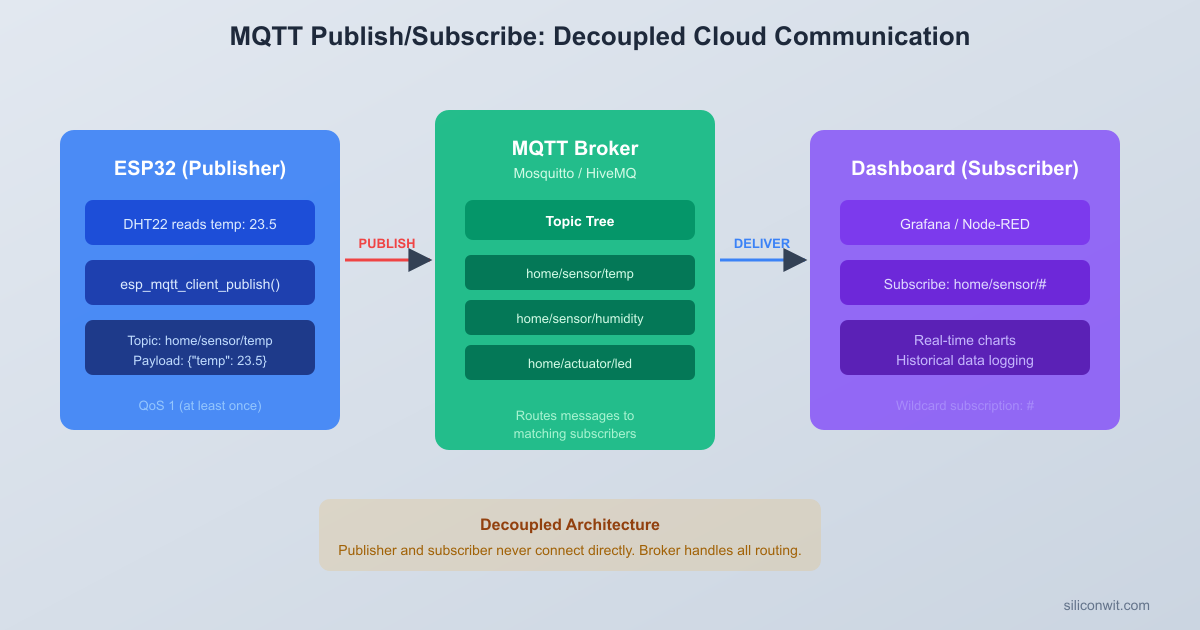
HTTP follows a request/response model: the client asks, the server answers. That works well for web pages, but IoT devices need something different. A temperature sensor does not wait for someone to ask for the current reading. It measures periodically and pushes the data out. MQTT was designed for exactly this pattern. It is a lightweight publish/subscribe protocol that uses minimal bandwidth, handles unreliable networks gracefully, and runs over TCP (typically on port 1883 for plain text or 8883 for TLS).
Publish/Subscribe Model
In MQTT, devices never talk directly to each other. Instead, they communicate through a central server called a broker. A device that has data sends (publishes) a message to a topic. A device that wants that data subscribes to the same topic. The broker routes messages from publishers to all matching subscribers.
MQTT Publish/Subscribe Model
┌──────────┐ ┌──────────┐
│ ESP32 │ PUBLISH │ Phone │
│ Sensor ├──"home/garden/──>┌─┤ App │
│ Node │ moisture" │ │ (MQTT │
└──────────┘ │ │ Dashboard│
┌────────┐ │ └──────────┘
│ MQTT │ │
│ Broker │───┘ SUBSCRIBE
│(Cloud) │───┐ "home/garden/#"
└───┬────┘ │
┌──────────┐ │ ┌┴─────────┐
│ ESP32 │ SUB │ │ Laptop │
│ Display │<────────┘ │ Script │
│ Node │ "home/garden/ └──────────┘
└──────────┘ moisture"
Topics are hierarchical strings separated by forward slashes. For example:
A subscriber can use wildcards: + matches a single level (home/+/moisture matches home/garden/moisture and home/balcony/moisture), while # matches all remaining levels (home/# matches everything under home/).
Quality of Service (QoS) Levels
MQTT defines three QoS levels that control delivery guarantees:
QoS 0 (At most once): The sender publishes the message and does not wait for any acknowledgment. The message might arrive, or it might not. This is the fastest option and works fine for frequently published sensor data where a single lost reading does not matter.
QoS 1 (At least once): The sender publishes the message and waits for a PUBACK from the broker. If no acknowledgment arrives within a timeout, the sender retransmits. The message is guaranteed to arrive at least once, but duplicates are possible. This is a good default for most IoT data.
QoS 2 (Exactly once): A four-step handshake (PUBLISH, PUBREC, PUBREL, PUBCOMP) ensures the message arrives exactly once with no duplicates. This is the slowest option but necessary for critical messages like alerts or billing events where duplicates would cause problems.
For our soil moisture monitor, we use QoS 1 for regular readings (a duplicate reading is harmless) and QoS 2 for alerts (we do not want duplicate alert notifications on your phone).
Retained Messages
When you publish a message with the retain flag set, the broker stores the last retained message on that topic. Any new subscriber immediately receives this stored message upon subscribing, even if the original publisher sent it hours ago. This is useful for status topics: a new subscriber instantly learns whether the sensor is online or offline without waiting for the next status update.
Clean Sessions vs Persistent Sessions
When a client connects with clean_session = true, the broker discards any previous session state (subscriptions, queued messages). The client starts fresh every time.
With clean_session = false, the broker remembers the client’s subscriptions and queues any QoS 1 or QoS 2 messages that arrive while the client is offline. When the client reconnects, it receives all queued messages. This requires a unique client ID so the broker can identify returning clients.
Last Will and Testament (LWT)
When a client connects, it can register a “last will” message with the broker. If the client disconnects unexpectedly (network failure, crash, power loss), the broker automatically publishes this last will message on the specified topic. Other subscribers see the message and know the device has gone offline. The client sets the LWT during the connection setup, not at disconnect time, because an unplanned disconnect gives the client no chance to send a goodbye.
Setting Up a Free MQTT Broker
You need a broker that your ESP32 and phone app can both reach over the internet. Several cloud providers offer free tiers. We will use HiveMQ Cloud, which provides a free “serverless” cluster with TLS encryption.
After signing in, HiveMQ automatically creates a free serverless cluster. Note the cluster URL shown on the dashboard, it looks like xxxxxxxxxxxxxxxx.s1.eu.hivemq.cloud.
Go to the Access Management tab and create a set of credentials (username and password). These credentials authenticate your ESP32 and phone app to the broker.
Note the connection details:
Host:xxxxxxxxxxxxxxxx.s1.eu.hivemq.cloud
Port:8883 (TLS)
Username: the one you just created
Password: the one you just created
The free tier supports up to 100 connections and 10 GB of traffic per month, which is more than enough for development and small deployments.
Alternatives:SiliconWit IoT provides an MQTT broker for course projects. EMQX Cloud (www.emqx.com/en/cloud) offers a similar free tier. The ESP-IDF code in this lesson works with any standard MQTT broker.
ESP-MQTT Client Basics
The ESP-IDF includes the esp_mqtt component (also called mqtt_client), which implements MQTT 3.1.1 with support for QoS 0, 1, and 2, TLS, persistent sessions, and last will messages. The client runs as a FreeRTOS task internally, and you interact with it through an event-driven API.
Client Configuration
The esp_mqtt_client_config_t structure holds all connection parameters. Here is the basic setup for connecting to a TLS-secured broker:
The uri field uses the mqtts:// scheme to indicate TLS. The broker’s root CA certificate is embedded in the firmware binary (more on this in the TLS section). The last_will fields configure the LWT message that the broker publishes if the ESP32 disconnects unexpectedly.
Event Handler
All MQTT activity is reported through a single event handler function. The key events are:
The esp_mqtt_client_start() function creates an internal task that manages the TCP connection, TLS handshake, MQTT protocol, keep-alive pings, and automatic reconnection. If the connection drops, the client retries automatically with exponential backoff.
TLS Configuration
The free tier of HiveMQ Cloud requires TLS. Even if your broker allowed plain text, you should always use TLS for IoT devices that transmit over the internet. Without encryption, anyone on the network path can read your sensor data and inject commands.
MQTT over TLS Connection
┌──────────┐ ┌───────────────┐
│ ESP32 │ │ MQTT Broker │
│ │ TCP │ (HiveMQ) │
│ mbedTLS ├─────────>│ Port 8883 │
│ Client │ TLS 1.2 │ │
│ │<─────────┤ Root CA: │
│ CA cert │ Verify │ ISRG X1 │
│ embedded │ chain │ │
└──────────┘ └───────────────┘
Firmware embeds Broker presents
root CA PEM file server certificate
Obtaining the Root CA Certificate
HiveMQ Cloud uses certificates signed by the ISRG Root X1 certificate authority (the same CA behind Let’s Encrypt). You need to embed this root CA certificate in your firmware so the ESP32 can verify the broker’s identity during the TLS handshake.
Download the ISRG Root X1 certificate in PEM format from letsencrypt.org/certs/isrgrootx1.pem. Alternatively, you can export it from your browser by visiting the broker URL and inspecting the certificate chain.
Save the file as main/hivemq_server_cert.pem in your project directory.
Tell the build system to embed the certificate by adding it to CMakeLists.txt:
idf_component_register(SRCS "main.c"
INCLUDE_DIRS "."
EMBED_TXTFILES "hivemq_server_cert.pem")
Reference the embedded certificate in your code using the linker symbols:
externconstuint8_t server_cert_pem_start[]
asm("_binary_hivemq_server_cert_pem_start");
externconstuint8_t server_cert_pem_end[]
asm("_binary_hivemq_server_cert_pem_end");
The EMBED_TXTFILES directive tells the ESP-IDF build system to include the file contents in the firmware binary and expose them through linker symbols. At runtime, server_cert_pem_start points to the first byte of the PEM file. The MQTT client uses this certificate to verify that the broker’s TLS certificate was signed by a trusted authority.
What Happens During the TLS Handshake
When esp_mqtt_client_start() opens the connection, the underlying esp_tls layer performs a standard TLS 1.2 handshake:
The ESP32 sends a ClientHello to the broker.
The broker responds with its certificate chain.
The ESP32 verifies the chain against the embedded root CA certificate.
If verification succeeds, both sides negotiate a symmetric session key.
All subsequent MQTT traffic is encrypted with this session key.
If the certificate does not match (wrong CA, expired certificate, hostname mismatch), the connection fails and the MQTT client reports an error through the event handler. Check the esp_tls_last_esp_err field in the error handle for the specific TLS error code.
Capacitive Soil Moisture Sensor
A capacitive soil moisture sensor measures the dielectric permittivity of the soil surrounding its plates. Water has a much higher dielectric constant (about 80) than dry soil (about 4), so wet soil causes a measurable change in capacitance. The sensor’s onboard circuit converts this capacitance into an analog voltage.
Capacitive vs Resistive Sensors
Older resistive sensors pass current through the soil between two exposed metal probes. This works but has a serious problem: the probes corrode quickly due to electrolysis. After a few weeks of continuous use, the probes degrade and readings drift. Capacitive sensors have no exposed metal contacts. The sensing plates are behind a waterproof coating on the PCB, so they do not corrode. This makes them suitable for long-term outdoor deployments.
Reading the ADC
The ESP-IDF v5.x ADC driver uses a calibrated “oneshot” API. You configure an ADC unit and channel, then read calibrated voltage values:
#include"esp_adc/adc_oneshot.h"
#include"esp_adc/adc_cali.h"
#include"esp_adc/adc_cali_scheme.h"
staticadc_oneshot_unit_handle_t adc_handle;
staticadc_cali_handle_t cali_handle;
staticvoidadc_init(void)
{
/* Configure ADC1 unit */
adc_oneshot_unit_init_cfg_t unit_cfg = {
.unit_id = ADC_UNIT_1,
};
adc_oneshot_new_unit(&unit_cfg, &adc_handle);
/* Configure channel 0 (GPIO 36) with 11 dB attenuation for
The 11 dB attenuation setting allows the ADC to read voltages up to about 3.1V, which covers the full output range of most capacitive soil moisture sensors.
Calibrating Wet and Dry Values
Every sensor unit has slightly different output voltages. You need to determine the dry and wet reference points for your specific sensor:
Hold the sensor in open air (completely dry) and read the ADC voltage. This is your DRY_VALUE_MV. A typical value is 2700 mV.
Insert the sensor into a cup of water up to the marked line (do not submerge the electronics). Read the ADC voltage. This is your WET_VALUE_MV. A typical value is 1200 mV.
Use these values to convert millivolts to a 0-100% moisture percentage:
#defineDRY_VALUE_MV2700
#defineWET_VALUE_MV1200
staticintvoltage_to_moisture_pct(intvoltage_mv)
{
if (voltage_mv >= DRY_VALUE_MV) return0;
if (voltage_mv <= WET_VALUE_MV) return100;
int pct = (DRY_VALUE_MV - voltage_mv) *100
/ (DRY_VALUE_MV - WET_VALUE_MV);
return pct;
}
Notice that the voltage is inversely proportional to moisture: higher voltage means drier soil. This is because water increases the capacitance, which lowers the oscillator frequency, which the sensor circuit converts to a lower output voltage.
Publishing Sensor Data
With the ADC reading working and the MQTT client connected, you can now publish soil moisture data to the broker. We format the data as JSON so any subscriber (phone app, web dashboard, another microcontroller) can parse it easily.
JSON Payload Formatting
The ESP-IDF includes the cJSON library for JSON construction. However, for simple payloads like ours, snprintf is lighter and faster:
The esp_mqtt_client_publish() function returns a message ID for QoS 1 and QoS 2 messages (used internally to track acknowledgments) or 0 for QoS 0. The last parameter is the retain flag. We do not retain regular readings because subscribers only care about live data.
Alert Publishing
When moisture drops below a threshold, we publish an alert on a separate topic with QoS 2 to guarantee exactly-once delivery:
The s_alert_sent flag prevents flooding the alert topic. Once an alert is sent, it is not sent again until moisture recovers above the threshold plus a 10% hysteresis band. This avoids the problem of receiving dozens of identical alerts while you walk to the watering can.
Subscribing to Commands
A useful IoT device is not just a data source. It should also accept remote commands. By subscribing to a configuration topic, you can change the publish interval and moisture threshold without reflashing the firmware.
Subscribe After Connection
In the MQTT event handler, subscribe to the config topic immediately after connecting:
if (cJSON_IsNumber(threshold)&&threshold->valueint>=0
&&threshold->valueint<=100) {
s_moisture_threshold =threshold->valueint;
s_alert_sent =false; /* Re-evaluate with new threshold */
ESP_LOGI(TAG, "Moisture threshold changed to %d%%",
s_moisture_threshold);
}
cJSON_Delete(root);
}
The function validates the input ranges: interval must be between 5 and 3600 seconds, and threshold must be between 0 and 100 percent. Invalid values are silently ignored. When the interval changes, the timer is stopped and restarted with the new period.
Last Will and Testament in Detail
The LWT is configured in the esp_mqtt_client_config_t structure before calling esp_mqtt_client_init(). You have already seen it in the configuration section, but let us look at how it works end to end.
Configuration
.session = {
.last_will = {
.topic ="home/garden/status",
.msg ="sensor-offline",
.msg_len =14,
.qos =1,
.retain =1,
},
},
Setting retain = 1 on the LWT message is important. When a new subscriber connects and subscribes to home/garden/status, it immediately receives the retained message. If the sensor is offline, the subscriber sees “sensor-offline” right away. If the sensor is online, the retained message is “sensor-online” (published when the sensor connects). Without the retain flag, a new subscriber would not know the sensor’s status until the next status change.
The Complete Status Flow
The ESP32 connects to the broker. During the CONNECT handshake, it registers the LWT: topic home/garden/status, message sensor-offline, QoS 1, retain.
Once connected, the ESP32 publishes sensor-online to home/garden/status with retain. This overwrites any previous retained message on that topic.
The sensor operates normally, publishing moisture readings.
If the ESP32 loses power or the network drops, the broker’s keep-alive timer expires (default 120 seconds with no ping response).
The broker publishes the LWT message sensor-offline to home/garden/status with retain.
Any subscriber on that topic receives the offline notification. New subscribers see it immediately because it is retained.
When the ESP32 reconnects, it publishes sensor-online again, overwriting the offline message.
This mechanism gives you reliable presence detection without any polling or heartbeat logic in your application code.
Complete Firmware
The full source code below combines everything: Wi-Fi connection, MQTT with TLS, capacitive soil moisture reading, periodic publishing, alert logic, remote configuration via subscribed commands, and last will. This is a single main.c file.
/* main.c -- Plant Soil Moisture Monitor with MQTT
*
* ESP-IDF v5.x project.
* Reads a capacitive soil moisture sensor via ADC1, publishes readings
* to a TLS-secured MQTT broker, sends alerts on low moisture, and
* accepts configuration changes (interval, threshold) via MQTT commands.
* Last will message notifies subscribers if the device goes offline.
*/
#include<string.h>
#include<stdlib.h>
#include<stdio.h>
#include"freertos/FreeRTOS.h"
#include"freertos/task.h"
#include"freertos/event_groups.h"
#include"esp_system.h"
#include"esp_wifi.h"
#include"esp_event.h"
#include"esp_log.h"
#include"esp_netif.h"
#include"esp_timer.h"
#include"nvs_flash.h"
#include"mqtt_client.h"
#include"esp_adc/adc_oneshot.h"
#include"esp_adc/adc_cali.h"
#include"esp_adc/adc_cali_scheme.h"
#include"cJSON.h"
/* ---------- Configuration ---------- */
staticconstchar*TAG ="soil_mqtt";
/* Wi-Fi credentials (set via menuconfig) */
#defineWIFI_SSID CONFIG_WIFI_SSID
#defineWIFI_PASSWORD CONFIG_WIFI_PASSWORD
/* MQTT broker (set via menuconfig) */
#defineMQTT_BROKER_URI CONFIG_MQTT_BROKER_URI
#defineMQTT_USERNAME CONFIG_MQTT_USERNAME
#defineMQTT_PASSWORD CONFIG_MQTT_PASSWORD
/* MQTT topics */
#defineTOPIC_MOISTURE"home/garden/moisture"
#defineTOPIC_ALERT"home/garden/alert"
#defineTOPIC_CONFIG"home/garden/config"
#defineTOPIC_STATUS"home/garden/status"
/* ADC calibration values (adjust for your sensor) */
/* Initialize the ADC for soil moisture reading */
adc_init();
/* Connect to Wi-Fi (blocks until IP is obtained) */
wifi_init();
/* Start the MQTT client */
mqtt_init();
/* Start the periodic publish timer */
start_publish_timer();
ESP_LOGI(TAG, "Initialization complete");
ESP_LOGI(TAG, "Publishing every %d sec, threshold=%d%%",
s_publish_interval_sec, s_moisture_threshold);
}
How the Firmware Works
The firmware is organized into five cooperating modules:
ADC module: Initializes ADC1 channel 0 (GPIO 36) with 11 dB attenuation and curve-fitting calibration. The read_soil_moisture_mv() function returns a calibrated voltage, and voltage_to_moisture_pct() maps it to a 0-100% range using the calibration constants.
Wi-Fi module: Connects in station mode with auto-reconnect (up to 10 retries). The wifi_init() function blocks until an IP address is obtained, ensuring MQTT only starts after network connectivity is established.
MQTT module: Configures the client with TLS, broker credentials, and a last will message. On connection, it publishes “sensor-online” (retained) and subscribes to the config topic. The event handler dispatches incoming config commands to the parser.
Publish timer: An esp_timer fires every s_publish_interval_sec seconds. Each tick reads the sensor, publishes the moisture data at QoS 1, and checks whether an alert should be sent (QoS 2). Alert hysteresis prevents repeated notifications.
Config processor: Parses incoming JSON on the config topic, validates the interval and threshold fields, and applies the changes live by restarting the timer.
CMakeLists.txt and Kconfig Files
Top-Level CMakeLists.txt
cmake_minimum_required(VERSION 3.16)
include($ENV{IDF_PATH}/tools/cmake/project.cmake)
project(soil-moisture-mqtt)
main/CMakeLists.txt
idf_component_register(SRCS "main.c"
INCLUDE_DIRS "."
EMBED_TXTFILES "hivemq_server_cert.pem")
The EMBED_TXTFILES directive embeds the broker’s root CA certificate into the firmware binary.
Full URI of the MQTT broker, including scheme and port.
Use mqtts:// for TLS connections on port 8883.
config MQTT_USERNAME
string "MQTT Username"
default "esp32user"
help
Username for MQTT broker authentication.
config MQTT_PASSWORD
string "MQTT Password"
default "esp32pass"
help
Password for MQTT broker authentication.
endmenu
Project File Structure
Directorysoil-moisture-mqtt/
CMakeLists.txt
Directorymain/
CMakeLists.txt
Kconfig.projbuild
main.c
hivemq_server_cert.pem
Building and Flashing
Create the project directory and add all files:
Terminal window
mkdir-psoil-moisture-mqtt/main
Place the top-level CMakeLists.txt in soil-moisture-mqtt/, and place CMakeLists.txt, Kconfig.projbuild, main.c, and hivemq_server_cert.pem in soil-moisture-mqtt/main/.
Navigate to Soil Moisture MQTT Configuration and enter your Wi-Fi SSID, Wi-Fi password, MQTT broker URI, MQTT username, and MQTT password.
Build the project:
Terminal window
idf.pybuild
Connect the ESP32 DevKitC via USB and flash:
Terminal window
idf.py-p/dev/ttyUSB0flashmonitor
On macOS use /dev/cu.usbserial-XXXX. On Windows use COM3 or the appropriate port.
Watch the serial output for connection status:
I (456) soil_mqtt: Plant Soil Moisture Monitor starting
I (462) soil_mqtt: ADC1 channel 0 (GPIO 36) initialized
I (468) soil_mqtt: Wi-Fi initialized, connecting to MyNetwork
I (3842) soil_mqtt: Got IP: 192.168.1.105
I (3843) soil_mqtt: MQTT client started, connecting to mqtts://xxxx.s1.eu.hivemq.cloud:8883
I (5124) soil_mqtt: MQTT connected to broker
I (5125) soil_mqtt: Subscribed to topic, msg_id=12345
I (5126) soil_mqtt: Publish timer started, interval=60 sec
I (5127) soil_mqtt: Initialization complete
I (5128) soil_mqtt: Publishing every 60 sec, threshold=30%
I (65130) soil_mqtt: Published: moisture=62%, voltage=1632 mV, msg_id=2
Press Ctrl+] to exit the serial monitor.
Testing with MQTT Explorer
MQTT Explorer is a free desktop application that lets you connect to any MQTT broker and inspect all published messages in real time. It is the easiest way to verify that your ESP32 is sending data correctly.
Download MQTT Explorer from mqtt-explorer.com (available for Windows, macOS, and Linux).
Open the application and create a new connection:
Name: HiveMQ Cloud
Host: your cluster URL (e.g., xxxxxxxxxxxxxxxx.s1.eu.hivemq.cloud)
Port: 8883
Protocol: mqtt:// (the app handles TLS automatically for port 8883)
Username: the same credentials you created earlier
Password: the same password
Enable SSL/TLS in the advanced settings
Click Connect. The left panel shows a tree of all topics on the broker.
Expand home then garden. You should see:
moisture: JSON payloads arriving at your configured interval
status: shows “sensor-online” (retained message)
config: empty until you publish a command
To test remote configuration, click on the Publish section at the bottom. Set the topic to home/garden/config and enter this payload:
{"interval": 10, "threshold": 50}
Click Publish. The ESP32 serial monitor should log the config change, and you will see messages arriving every 10 seconds instead of 60.
To test the last will, unplug the ESP32 USB cable. After the broker’s keep-alive timeout expires (typically 60-120 seconds), the home/garden/status topic changes from “sensor-online” to “sensor-offline”.
Alternative: Phone MQTT Apps
If you prefer testing from your phone, install one of these free apps:
IoT MQTT Panel (Android): Lets you create dashboard widgets (gauges, charts, buttons) bound to MQTT topics. Create a gauge for home/garden/moisture that parses the moisture field from the JSON payload.
MQTT Dashboard (Android): Similar functionality with a simpler interface.
MQTTool (iOS): A straightforward MQTT client for subscribing and publishing.
EasyMQTT (iOS): Provides simple publish/subscribe with topic history.
Connect to the same broker with the same credentials, subscribe to home/garden/# to see all messages from the sensor, and publish to home/garden/config to change settings remotely.
Exercises
Add multiple sensor zones. Modify the firmware to support two soil moisture sensors on two different ADC channels (e.g., GPIO 36 and GPIO 39). Publish each sensor’s data to a zone-specific topic: home/garden/zone1/moisture and home/garden/zone2/moisture. Add zone-specific alert and config topics. Maintain separate thresholds and alert states for each zone.
Implement a persistent session with offline message queuing. Change the MQTT configuration to use clean_session = false (set .session.disable_clean_session = true in the config). Give the client a fixed client ID. On the phone app, subscribe to home/garden/moisture with QoS 1. Disconnect the phone app, wait for several publish cycles, then reconnect. Verify that the phone receives all the messages that were published while it was offline. Note how the broker queues messages only for QoS 1 and QoS 2 subscriptions, not QoS 0.
Build a moving average filter for ADC readings. The raw ADC values can be noisy, especially in changing soil conditions. Implement a 10-sample moving average filter that stores the last 10 readings in a ring buffer and publishes the averaged value. Add a "raw_mv" field to the JSON payload alongside the filtered value so you can compare them in MQTT Explorer and see how much smoothing the filter provides.
Add a local OLED display. Connect a 128x64 I2C OLED display (SSD1306) to the ESP32 and show the current moisture percentage, the MQTT connection status (“Online” or “Offline”), the publish interval, and the threshold setting. Update the display every time a new reading is taken and whenever a config command changes the settings. This makes the device useful even without a phone nearby.
Summary
You explored the MQTT protocol from first principles: the publish/subscribe model, topic hierarchy, three QoS levels with their delivery guarantees, retained messages for instant state on subscription, persistent sessions for offline message queuing, and last will messages for automatic offline detection. You set up a free cloud MQTT broker with TLS encryption and embedded the root CA certificate in your firmware for secure communication. You connected a capacitive soil moisture sensor to the ESP32’s ADC, calibrated its wet and dry reference values, and converted the analog reading to a moisture percentage. The complete firmware publishes sensor data periodically with QoS 1, sends low-moisture alerts with QoS 2, accepts remote configuration changes (interval and threshold) via a subscribed command topic, and uses a last will message so subscribers know immediately when the device goes offline. You verified the system using MQTT Explorer and learned how phone apps can subscribe to the same topics for mobile monitoring.
Comments