Skip to content

Yocto Project and Production Images

Yocto Project and Production Images hero image
Modified:
Published:

Buildroot works well for small projects, but when you need license auditing, reproducible builds across a team, a shared SDK, and a layered architecture that separates board support from application logic, the Yocto Project is the industry standard. In this final lesson, you will set up a Yocto build environment, create a custom BSP layer for the Raspberry Pi Zero 2 W, write BitBake recipes for the sensor daemon and client tool, generate a portable SDK that any developer on your team can install, and structure the image for over-the-air (OTA) updates using dual root filesystem partitions. The result is a reproducible, production-ready image built from version-controlled metadata. #YoctoProject #BitBake #ProductionLinux

What We Are Building

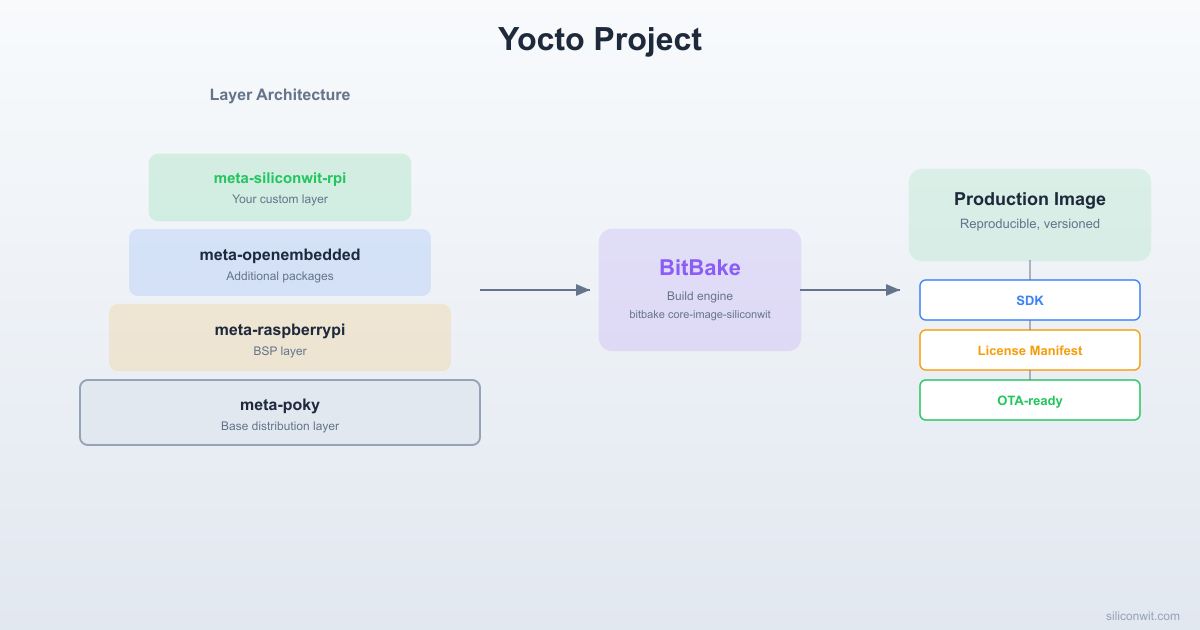
Production Yocto Image with Custom BSP and SDK

A complete Yocto-based Linux distribution for the Raspberry Pi Zero 2 W containing a custom BSP layer (meta-siliconwit-rpi), application recipes for sensor-monitord and sensor-query, a generated cross-compilation SDK (.sh installer), and a dual-rootfs partition layout ready for A/B OTA updates. The build is fully reproducible: checking out the same manifest and running BitBake produces an identical image byte-for-byte.

Build specifications:

ParameterValue
Yocto releaseScarthgap (5.0 LTS)
Build toolBitBake
Machineraspberrypi-zero2w
Distropoky (customized)
Custom layermeta-siliconwit-rpi (BSP + application recipes)
Image recipesiliconwit-image-sensor
SDKCross-compilation toolchain + sysroot installer
Partition layoutboot (FAT32) + rootfsA (ext4) + rootfsB (ext4) + data (ext4)
OTA strategyA/B root filesystem with U-Boot switching
ReproducibilityLocked layer revisions via repo manifest or kas
License auditAutomatic license manifest generation

Yocto Layer Structure

LayerPurpose
poky (meta, meta-poky)Core OE recipes and reference distro
meta-raspberrypiBSP support for Raspberry Pi boards
meta-openembeddedAdditional libraries and utilities
meta-siliconwit-rpiCustom recipes, image definition, distro config

Key Recipes

RecipeDescription
sensor-monitord_1.0.bbDaemon application with systemd unit files
sensor-query_1.0.bbClient CLI tool
siliconwit-image-sensor.bbImage recipe pulling in all components
siliconwit-rpi.confMachine configuration overrides
A/B OTA Partition Layout
──────────────────────────────────────────
microSD Card:
┌──────────────────────────────────────┐
│ boot (FAT32, 64 MB) │
│ kernel, DTBs, config.txt, U-Boot │
├──────────────────────────────────────┤
│ rootfsA (ext4, 256 MB) ◄── active │
│ current running system │
├──────────────────────────────────────┤
│ rootfsB (ext4, 256 MB) ◄── standby │
│ OTA writes new image here │
├──────────────────────────────────────┤
│ data (ext4, remaining space) │
│ persistent: logs, config, database │
└──────────────────────────────────────┘
After OTA: U-Boot switches active slot
from A to B. Rollback on boot failure.

What is the Yocto Project?


Yocto Layer Architecture
──────────────────────────────────────────
┌─────────────────────────────────────┐
│ meta-siliconwit-rpi (your layer) │
│ recipes: sensor-monitord, image │
├─────────────────────────────────────┤
│ meta-raspberrypi (BSP layer) │
│ machine config, bootloader, kernel │
├─────────────────────────────────────┤
│ meta-openembedded (extra packages) │
│ libraries, tools, networking │
├─────────────────────────────────────┤
│ poky (core: meta + meta-poky) │
│ gcc, glibc, busybox, systemd │
└─────────────────────────────────────┘
▼ BitBake processes all layers
┌─────────────────────────────────────┐
│ Output: rootfs image + SDK + .wic │
└─────────────────────────────────────┘

The Yocto Project is a collaboration that provides tools and metadata for building custom Linux distributions for embedded systems. Rather than shipping a pre-built distribution, you define exactly what goes into your image through recipes (build instructions), layers (organized collections of recipes), and configuration files.

Core Components

  • BitBake: the task execution engine that parses recipes and runs build tasks (fetch, configure, compile, install, package)
  • OpenEmbedded-Core (OE-Core): the foundational set of recipes for building a minimal Linux system (kernel, glibc, busybox, systemd, etc.)
  • Poky: the Yocto reference distribution that combines OE-Core with tools and a default configuration
  • Metadata: recipes (.bb), append files (.bbappend), configuration (.conf), and classes (.bbclass)

Yocto vs Buildroot

  • Buildroot (Lesson 6): Makefile-based, fast builds, single-config output, ideal for small dedicated systems
  • Yocto: recipe-based, layered architecture, shared state cache, SDK generation, license auditing, better for teams and products shipping at scale
  • Buildroot builds everything from scratch each time; Yocto caches intermediate results (sstate) so incremental builds are fast
  • Yocto has a steeper learning curve but pays off when you need reproducibility, compliance, and maintainability

When to choose Yocto: when your project has multiple developers, needs license compliance tracking, requires a cross-compilation SDK for application developers who do not need the full build system, targets multiple hardware platforms from a shared codebase, or must support field updates with rollback capability.

Setting Up the Build Environment


Yocto builds are resource-intensive. The first build downloads all source tarballs, compiles the toolchain from scratch, and builds every package. Plan for significant disk space and build time.

Host Requirements

ResourceMinimumRecommended
Disk space50 GB100 GB+
RAM8 GB16 GB+
CPU cores48+
OSUbuntu 22.04 LTSUbuntu 22.04 LTS
First build time2 to 4 hours (4 cores)1 to 2 hours (8+ cores)

Install Dependencies

Terminal window
sudo apt update
sudo apt install gawk wget git diffstat unzip texinfo gcc build-essential \
chrpath socat cpio python3 python3-pip python3-pexpect xz-utils \
debianutils iputils-ping python3-git python3-jinja2 python3-subunit \
zstd liblz4-tool file locales libacl1
sudo locale-gen en_US.UTF-8

Clone Poky

Clone the Poky repository using the Scarthgap (5.0 LTS) branch:

Terminal window
mkdir -p ~/yocto && cd ~/yocto
git clone -b scarthgap git://git.yoctoproject.org/poky.git
cd poky

Initialize the Build Environment

Terminal window
source oe-init-build-env build-rpi

This creates a build-rpi directory with default configuration files and sets up environment variables so that bitbake is in your PATH. Every time you open a new terminal, you must source this script again to restore the environment.

After sourcing, your working directory changes to ~/yocto/poky/build-rpi. The directory structure is:

  • Directorypoky/
    • Directorymeta/
    • Directorymeta-poky/
    • Directorymeta-yocto-bsp/
    • Directorybuild-rpi/
      • Directoryconf/
        • local.conf
        • bblayers.conf

Understanding Layers


A layer is a directory containing recipes, configuration, and classes organized under a common purpose. Layer names conventionally start with meta-. Each layer has a conf/layer.conf that declares its name, priority, and compatibility.

Yocto resolves recipes by searching layers in priority order. A recipe in a higher-priority layer overrides one with the same name in a lower-priority layer. This is how BSP layers customize core recipes without forking them.

Adding Required Layers

You need two additional layers: meta-raspberrypi for Raspberry Pi BSP support, and meta-openembedded for additional libraries.

Terminal window
cd ~/yocto
git clone -b scarthgap git://git.yoctoproject.org/meta-raspberrypi.git
git clone -b scarthgap git://git.openembedded.org/meta-openembedded

Add them to the build configuration:

Terminal window
cd ~/yocto/poky
source oe-init-build-env build-rpi
bitbake-layers add-layer ../../meta-raspberrypi
bitbake-layers add-layer ../../meta-openembedded/meta-oe
bitbake-layers add-layer ../../meta-openembedded/meta-python
bitbake-layers add-layer ../../meta-openembedded/meta-networking

Verify the layer configuration:

Terminal window
bitbake-layers show-layers

Expected output:

layer path priority
==========================================================================
meta /home/user/yocto/poky/meta 5
meta-poky /home/user/yocto/poky/meta-poky 5
meta-yocto-bsp /home/user/yocto/poky/meta-yocto-bsp 5
meta-raspberrypi /home/user/yocto/meta-raspberrypi 9
meta-oe /home/user/yocto/meta-openembedded/meta-oe 6
meta-python /home/user/yocto/meta-openembedded/meta-python 7
meta-networking /home/user/yocto/meta-openembedded/meta-networking 5

The bblayers.conf file records the layer list:

conf/bblayers.conf
BBLAYERS ?= " \
/home/user/yocto/poky/meta \
/home/user/yocto/poky/meta-poky \
/home/user/yocto/poky/meta-yocto-bsp \
/home/user/yocto/meta-raspberrypi \
/home/user/yocto/meta-openembedded/meta-oe \
/home/user/yocto/meta-openembedded/meta-python \
/home/user/yocto/meta-openembedded/meta-networking \
"

Creating Your Custom Layer


Create a custom layer to hold your application recipes, image definition, and distro configuration.

Terminal window
cd ~/yocto/poky
source oe-init-build-env build-rpi
bitbake-layers create-layer ../../meta-siliconwit-rpi
bitbake-layers add-layer ../../meta-siliconwit-rpi

Populate the layer with the directories you need:

Terminal window
cd ~/yocto/meta-siliconwit-rpi
mkdir -p recipes-apps/sensor-monitord/files
mkdir -p recipes-apps/sensor-query/files
mkdir -p recipes-core/images
mkdir -p conf/distro
mkdir -p wic

The full layer structure:

  • Directorymeta-siliconwit-rpi/
    • Directoryconf/
      • layer.conf
      • Directorydistro/
        • siliconwit-rpi.conf
    • Directoryrecipes-apps/
      • Directorysensor-monitord/
        • sensor-monitord_1.0.bb
        • Directoryfiles/
          • sensor-monitord.c
          • sensor-protocol.h
          • sensor-monitord.service
      • Directorysensor-query/
        • sensor-query_1.0.bb
        • Directoryfiles/
          • sensor-query.c
          • sensor-protocol.h
    • Directoryrecipes-core/
      • Directoryimages/
        • siliconwit-image-sensor.bb
    • Directorywic/
      • siliconwit-rpi-ab.wks
    • COPYING.MIT
    • README

Edit the layer configuration:

conf/layer.conf
# Layer configuration for meta-siliconwit-rpi
BBPATH .= ":${LAYERDIR}"
BBFILES += " \
${LAYERDIR}/recipes-*/*/*.bb \
${LAYERDIR}/recipes-*/*/*.bbappend \
"
BBFILE_COLLECTIONS += "siliconwit-rpi"
BBFILE_PATTERN_siliconwit-rpi = "^${LAYERDIR}/"
BBFILE_PRIORITY_siliconwit-rpi = "10"
LAYERDEPENDS_siliconwit-rpi = "core meta-raspberrypi"
LAYERSERIES_COMPAT_siliconwit-rpi = "scarthgap"

The priority of 10 is higher than all other layers, ensuring your recipes take precedence when there is a conflict.

Writing Application Recipes


A BitBake recipe (.bb) is a file that describes how to fetch, configure, compile, install, and package a piece of software. Recipe filenames follow the convention <name>_<version>.bb.

sensor-monitord Recipe

recipes-apps/sensor-monitord/sensor-monitord_1.0.bb
SUMMARY = "BME280 sensor monitoring daemon with systemd integration"
DESCRIPTION = "Reads BME280 temperature, pressure, and humidity data \
via I2C, stores readings in shared memory, serves clients over a Unix \
domain socket, and integrates with systemd watchdog and journald."
LICENSE = "MIT"
LIC_FILES_CHKSUM = "file://${COMMON_LICENSE_DIR}/MIT;md5=0835ade698e0bcf8506ecda2f7b4f302"
SRC_URI = " \
file://sensor-monitord.c \
file://sensor-protocol.h \
file://sensor-monitord.service \
"
S = "${WORKDIR}"
DEPENDS = "systemd"
RDEPENDS:${PN} = "i2c-tools"
inherit systemd
SYSTEMD_SERVICE:${PN} = "sensor-monitord.service"
SYSTEMD_AUTO_ENABLE = "enable"
do_compile() {
${CC} ${CFLAGS} ${LDFLAGS} -o sensor-monitord sensor-monitord.c \
-lrt -lpthread -lsystemd -lm
}
do_install() {
install -d ${D}${bindir}
install -m 0755 sensor-monitord ${D}${bindir}/sensor-monitord
install -d ${D}${systemd_system_unitdir}
install -m 0644 sensor-monitord.service ${D}${systemd_system_unitdir}/sensor-monitord.service
}
FILES:${PN} = " \
${bindir}/sensor-monitord \
${systemd_system_unitdir}/sensor-monitord.service \
"

Here is what each variable and function does:

ElementPurpose
LICENSE and LIC_FILES_CHKSUMDeclares the license and provides a checksum so BitBake can verify it. Required for every recipe
SRC_URILists source files to fetch. file:// means local files in the files/ subdirectory next to the recipe
S = "${WORKDIR}"Source directory. Since we use local files (not a tarball), sources are directly in WORKDIR
DEPENDSBuild-time dependencies. We need systemd headers and libraries for compilation
RDEPENDS:${PN}Runtime dependencies. i2c-tools ensures the I2C kernel modules are loaded
inherit systemdPulls in the systemd bbclass, which handles service file installation and enable/disable logic
SYSTEMD_SERVICE:${PN}Tells the systemd class which service file to manage
do_compile()The build step. Uses BitBake-provided ${CC}, ${CFLAGS}, and ${LDFLAGS} for cross-compilation
do_install()Installs files into the staging directory ${D} using standard paths
FILES:${PN}Declares which installed files belong to the main package

Copy the source files from Lesson 7 into the recipe’s files/ directory:

Terminal window
cp ~/rpi-sensor-daemon/src/sensor-monitord.c \
~/yocto/meta-siliconwit-rpi/recipes-apps/sensor-monitord/files/
cp ~/rpi-sensor-daemon/src/sensor-protocol.h \
~/yocto/meta-siliconwit-rpi/recipes-apps/sensor-monitord/files/
cp ~/rpi-sensor-daemon/systemd/sensor-monitord.service \
~/yocto/meta-siliconwit-rpi/recipes-apps/sensor-monitord/files/

sensor-query Recipe

recipes-apps/sensor-query/sensor-query_1.0.bb
SUMMARY = "Client tool for sensor-monitord"
DESCRIPTION = "Command-line client that queries the sensor monitoring \
daemon over a Unix domain socket."
LICENSE = "MIT"
LIC_FILES_CHKSUM = "file://${COMMON_LICENSE_DIR}/MIT;md5=0835ade698e0bcf8506ecda2f7b4f302"
SRC_URI = " \
file://sensor-query.c \
file://sensor-protocol.h \
"
S = "${WORKDIR}"
do_compile() {
${CC} ${CFLAGS} ${LDFLAGS} -o sensor-query sensor-query.c -lrt
}
do_install() {
install -d ${D}${bindir}
install -m 0755 sensor-query ${D}${bindir}/sensor-query
}
FILES:${PN} = "${bindir}/sensor-query"

Copy the source files:

Terminal window
cp ~/rpi-sensor-daemon/src/sensor-query.c \
~/yocto/meta-siliconwit-rpi/recipes-apps/sensor-query/files/
cp ~/rpi-sensor-daemon/src/sensor-protocol.h \
~/yocto/meta-siliconwit-rpi/recipes-apps/sensor-query/files/

Verifying Recipes Parse Correctly

Before building, check that BitBake can parse the recipes without errors:

Terminal window
cd ~/yocto/poky
source oe-init-build-env build-rpi
bitbake -e sensor-monitord | grep ^SRC_URI=
bitbake -e sensor-query | grep ^SRC_URI=

If there are parse errors, BitBake prints the file and line number. Common mistakes include missing backslashes in multi-line variables and incorrect indentation (BitBake uses Python-style syntax in recipe metadata).

The Image Recipe


An image recipe defines the final root filesystem contents. It inherits from core-image (which provides the base functionality) and adds your application packages.

recipes-core/images/siliconwit-image-sensor.bb
SUMMARY = "SiliconWit Sensor Image for Raspberry Pi Zero 2 W"
DESCRIPTION = "Production image with BME280 sensor daemon, client tool, \
systemd integration, and essential networking utilities."
LICENSE = "MIT"
inherit core-image
# Base system features
IMAGE_FEATURES += " \
ssh-server-dropbear \
package-management \
"
# Application packages
IMAGE_INSTALL += " \
sensor-monitord \
sensor-query \
"
# System utilities
IMAGE_INSTALL += " \
i2c-tools \
systemd-analyze \
htop \
nano \
socat \
"
# Networking
IMAGE_INSTALL += " \
openssh-sftp-server \
wpa-supplicant \
dhcpcd \
ntp \
"
# Kernel modules for I2C
IMAGE_INSTALL += " \
kernel-module-i2c-bcm2835 \
kernel-module-i2c-dev \
"
# Set root password (change for production)
EXTRA_IMAGE_FEATURES += "debug-tweaks"
# Image size settings
IMAGE_ROOTFS_EXTRA_SPACE = "131072"

Key points:

  • inherit core-image provides the IMAGE_INSTALL mechanism and the root filesystem assembly logic.
  • ssh-server-dropbear installs a lightweight SSH server so you can access the board remotely.
  • debug-tweaks sets an empty root password and enables root login. Remove this for production images.
  • IMAGE_ROOTFS_EXTRA_SPACE adds 128 MB (in KB) of free space beyond what the installed packages require.
  • Each IMAGE_INSTALL entry must correspond to a recipe (or package name) that BitBake can find in the configured layers.

Machine and Distro Configuration


Machine Configuration (local.conf)

Edit conf/local.conf in your build directory to target the Raspberry Pi Zero 2 W:

conf/local.conf (key settings)
# Target machine
MACHINE = "raspberrypi0-2w-64"
# Use systemd as the init manager
DISTRO_FEATURES:append = " systemd"
DISTRO_FEATURES_BACKFILL_CONSIDERED:append = " sysvinit"
VIRTUAL-RUNTIME_init_manager = "systemd"
VIRTUAL-RUNTIME_initscripts = "systemd-compat-units"
# Enable I2C
ENABLE_I2C = "1"
KERNEL_MODULE_AUTOLOAD:rpi += "i2c-dev i2c-bcm2835"
# Enable UART for serial console debugging
ENABLE_UART = "1"
# WiFi firmware
MACHINE_EXTRA_RRECOMMENDS += "linux-firmware-rpidistro-bcm43436s"
# Use RPi kernel
PREFERRED_PROVIDER_virtual/kernel = "linux-raspberrypi"
# Parallel build settings (adjust to your host)
BB_NUMBER_THREADS = "8"
PARALLEL_MAKE = "-j 8"
# Download and shared-state cache directories
DL_DIR = "${TOPDIR}/../downloads"
SSTATE_DIR = "${TOPDIR}/../sstate-cache"

The MACHINE variable is the most important setting. It determines which BSP recipes are used, which kernel configuration is applied, and which device tree files are included. The raspberrypi0-2w-64 machine definition comes from the meta-raspberrypi layer and targets the 64-bit (AArch64) configuration.

Custom Distro Configuration (Optional)

For production, you may want a custom distro configuration that overrides Poky defaults. Create a distro conf file:

conf/distro/siliconwit-rpi.conf
require conf/distro/poky.conf
DISTRO = "siliconwit-rpi"
DISTRO_NAME = "SiliconWit RPi Distribution"
DISTRO_VERSION = "1.0"
# Strip down DISTRO_FEATURES for an embedded target
DISTRO_FEATURES = "acl ipv4 ipv6 systemd usbhost wifi largefile pam"
# Use systemd everywhere
VIRTUAL-RUNTIME_init_manager = "systemd"
VIRTUAL-RUNTIME_initscripts = "systemd-compat-units"
VIRTUAL-RUNTIME_login_manager = "shadow-base"
VIRTUAL-RUNTIME_dev_manager = "systemd"
# Default timezone
DEFAULT_TIMEZONE = "UTC"
# Optimize for size
FULL_OPTIMIZATION = "-O2 -pipe"

To use this distro, set DISTRO = "siliconwit-rpi" in local.conf. If you skip this step, the default Poky distro works fine for development.

Building the Image


With all layers, recipes, and configuration in place, build the image:

Terminal window
cd ~/yocto/poky
source oe-init-build-env build-rpi
bitbake siliconwit-image-sensor

Build Stages

BitBake processes each recipe through a series of tasks. For the entire image, this involves hundreds of recipes, but the stages for each one follow the same pattern:

TaskDescription
do_fetchDownload source code from SRC_URI (tarballs, git repos, local files)
do_unpackExtract archives into the work directory
do_patchApply any patches listed in SRC_URI
do_configureRun configure scripts (autotools, cmake, etc.)
do_compileCompile the source code using the cross-toolchain
do_installInstall built files into a staging directory
do_packageSplit installed files into packages (rpm, deb, or ipk)
do_rootfs(Image only) Assemble all packages into the root filesystem
do_image(Image only) Generate the final image files (ext4, wic, etc.)

Monitor the build progress:

Terminal window
# In another terminal, watch the build log
tail -f ~/yocto/poky/build-rpi/tmp/log/cooker/raspberrypi0-2w-64/*.log

The first build takes 1 to 3 hours depending on your hardware. Subsequent builds are much faster because BitBake caches intermediate results in the shared state (sstate) directory.

Build Output

After a successful build, the output images are in:

Terminal window
ls tmp/deploy/images/raspberrypi0-2w-64/

Key output files:

FileDescription
siliconwit-image-sensor-raspberrypi0-2w-64.rootfs.wic.bz2Complete SD card image (boot + rootfs)
siliconwit-image-sensor-raspberrypi0-2w-64.rootfs.ext4Root filesystem only
ImageKernel image
bcm2710-rpi-zero-2-w.dtbDevice tree blob
siliconwit-image-sensor-raspberrypi0-2w-64.rootfs.manifestList of all installed packages

Writing to an SD Card

Terminal window
cd tmp/deploy/images/raspberrypi0-2w-64/
# Decompress the image
bzip2 -dk siliconwit-image-sensor-raspberrypi0-2w-64.rootfs.wic.bz2
# Write to SD card (replace /dev/sdX with your actual device)
sudo dd if=siliconwit-image-sensor-raspberrypi0-2w-64.rootfs.wic \
of=/dev/sdX bs=4M status=progress conv=fsync

Double-check the target device

The dd command writes raw data to a block device. Writing to the wrong device will destroy data. Use lsblk to identify your SD card before running dd. The SD card is typically /dev/sdb or /dev/mmcblk0.

SDK Generation


The SDK (Software Development Kit) is a self-contained, portable toolchain installer that any developer on your team can use to cross-compile applications for the target without setting up the full Yocto build environment. The SDK includes the cross-compiler, sysroot with all target libraries and headers, and environment setup scripts.

Building the SDK

Terminal window
bitbake -c populate_sdk siliconwit-image-sensor

This produces an SDK installer script in tmp/deploy/sdk/:

Terminal window
ls tmp/deploy/sdk/

The output is a self-extracting shell script, for example:

poky-glibc-x86_64-siliconwit-image-sensor-cortexa53-raspberrypi0-2w-64-toolchain-5.0.sh

Installing and Using the SDK

Terminal window
# Install to the default location (/opt/poky/5.0)
./poky-glibc-x86_64-siliconwit-image-sensor-cortexa53-raspberrypi0-2w-64-toolchain-5.0.sh

Accept the default installation directory or specify a custom path. The installer copies the toolchain and sysroot and creates an environment setup script.

Terminal window
# Source the environment (required before each build session)
source /opt/poky/5.0/environment-setup-cortexa53-poky-linux
# Verify the cross-compiler
$CC --version
echo $CFLAGS

The environment script sets CC, CXX, CFLAGS, LDFLAGS, PKG_CONFIG_PATH, and other variables to point at the cross-toolchain and sysroot.

Cross-compile an application outside the Yocto build system:

Terminal window
source /opt/poky/5.0/environment-setup-cortexa53-poky-linux
cd ~/rpi-sensor-daemon/src
$CC $CFLAGS $LDFLAGS -o sensor-query sensor-query.c -lrt
file sensor-query
# sensor-query: ELF 64-bit LSB executable, ARM aarch64, ...

The SDK is useful for application developers who need to compile code for the target but should not have to wait for a full Yocto build. Distribute the .sh installer to your team, and they can set up their toolchain in minutes.

A/B Root Filesystem for OTA


Over-the-air (OTA) updates in the field require a strategy that avoids bricking the device if an update fails partway through. The dual root filesystem (A/B) approach is the most common pattern: the device has two root filesystem partitions, and the bootloader switches between them.

Partition Layout

PartitionMount PointSizePurpose
boot/boot64 MBFAT32, kernel + DTB + config.txt
rootfsA/512 MBext4, primary root filesystem
rootfsB(inactive)512 MBext4, update target
data/dataRemainingext4, persistent application data

WKS File for SD Card Layout

Yocto uses WIC (a disk image creation tool) with .wks files that describe the partition layout. Create a custom WKS file:

wic/siliconwit-rpi-ab.wks
# Boot partition (FAT32)
part /boot --source bootimg-partition --ondisk mmcblk0 \
--fstype=vfat --label boot --active --align 4096 --size 64
# Root filesystem A
part / --source rootfs --ondisk mmcblk0 \
--fstype=ext4 --label rootfsA --align 4096 --size 512
# Root filesystem B (initially empty, same size as A)
part --ondisk mmcblk0 \
--fstype=ext4 --label rootfsB --align 4096 --size 512
# Persistent data partition (fills remaining space)
part /data --ondisk mmcblk0 \
--fstype=ext4 --label data --align 4096 --size 256

To use this layout, add the following to local.conf:

Terminal window
WKS_FILE = "siliconwit-rpi-ab.wks"
IMAGE_FSTYPES = "wic.bz2 ext4"

U-Boot Environment for A/B Switching

The A/B switching logic lives in the U-Boot environment. U-Boot checks a flag to decide which partition to boot from:

u-boot-env.txt
# A/B boot selection
# boot_slot: 0 = rootfsA (mmcblk0p2), 1 = rootfsB (mmcblk0p3)
boot_slot=0
boot_attempts=0
max_boot_attempts=3
bootcmd=run select_root; run boot_kernel
select_root=if test ${boot_slot} -eq 0; then setenv root_part 2; setenv root_label rootfsA; else setenv root_part 3; setenv root_label rootfsB; fi
boot_kernel=setenv bootargs "console=ttyS0,115200 root=/dev/mmcblk0p${root_part} rootfstype=ext4 rootwait"; fatload mmc 0:1 ${kernel_addr_r} Image; fatload mmc 0:1 ${fdt_addr} bcm2710-rpi-zero-2-w.dtb; booti ${kernel_addr_r} - ${fdt_addr}

The OTA Update Flow

  1. Write the new image to the inactive partition

    If the device is currently booted from rootfsA (partition 2), the update writes to rootfsB (partition 3):

    Terminal window
    # Determine the inactive partition
    CURRENT=$(fw_printenv -n boot_slot)
    if [ "$CURRENT" = "0" ]; then
    TARGET_DEV="/dev/mmcblk0p3"
    NEW_SLOT=1
    else
    TARGET_DEV="/dev/mmcblk0p2"
    NEW_SLOT=0
    fi
    # Write the new rootfs image
    dd if=/tmp/new-rootfs.ext4 of=$TARGET_DEV bs=4M conv=fsync
  2. Switch the boot flag

    Terminal window
    fw_setenv boot_slot $NEW_SLOT
    fw_setenv boot_attempts 0
  3. Reboot into the new partition

    Terminal window
    reboot
  4. Verify and finalize (in the new root)

    After rebooting, the application should run a self-test. If everything passes, mark the update as successful. If the boot fails or the self-test fails, U-Boot increments boot_attempts. After max_boot_attempts failures, U-Boot falls back to the previous partition:

    Terminal window
    # Add this to the U-Boot bootcmd (before boot_kernel):
    # if boot_attempts > max_boot_attempts, swap boot_slot back

The data partition (/data) is shared between both root filesystems and is never overwritten during an update. Store application configuration, sensor logs, and calibration data on this partition.

Reproducible Builds


A reproducible build means that checking out the same source revision and running the same build command produces an identical output image. This is essential for debugging field issues (“which exact code is running on that device?”) and for regulatory compliance.

Locking Layer Revisions with kas

kas is a setup tool that defines all layers, their git revisions, and build configuration in a single YAML file:

kas-siliconwit.yml
header:
version: 14
machine: raspberrypi0-2w-64
distro: poky
repos:
poky:
url: "git://git.yoctoproject.org/poky.git"
branch: scarthgap
commit: "a1b2c3d4e5f6..."
layers:
meta:
meta-poky:
meta-raspberrypi:
url: "git://git.yoctoproject.org/meta-raspberrypi.git"
branch: scarthgap
commit: "f6e5d4c3b2a1..."
meta-openembedded:
url: "git://git.openembedded.org/meta-openembedded"
branch: scarthgap
commit: "1a2b3c4d5e6f..."
layers:
meta-oe:
meta-python:
meta-networking:
meta-siliconwit-rpi:
path: "../meta-siliconwit-rpi"
layers:
meta-siliconwit-rpi:
local_conf_header:
siliconwit: |
ENABLE_I2C = "1"
ENABLE_UART = "1"
KERNEL_MODULE_AUTOLOAD:rpi += "i2c-dev i2c-bcm2835"
target: siliconwit-image-sensor

Build with kas:

Terminal window
pip3 install kas
kas build kas-siliconwit.yml

kas checks out the exact commit specified for each layer, generates local.conf and bblayers.conf, and runs BitBake. Anyone with this YAML file can reproduce the same image.

Sharing the Shared State Cache (SSTATE)

The sstate cache stores compiled artifacts keyed by recipe version, configuration, and input hashes. Sharing this cache across developers and CI systems eliminates redundant compilation.

Set up a shared cache on a network drive or HTTP server:

Terminal window
# In local.conf, point to a shared directory
SSTATE_DIR = "/shared/yocto/sstate-cache"
DL_DIR = "/shared/yocto/downloads"
# Or use an HTTP mirror for read-only access
SSTATE_MIRRORS = "file://.* http://sstate-server.local/sstate/PATH"

With a warm sstate cache, a rebuild that only changes one recipe takes minutes instead of hours.

Building in a Container

For maximum reproducibility, run the build inside a Docker container with a fixed OS version and toolchain:

Dockerfile
FROM ubuntu:22.04
RUN apt-get update && apt-get install -y \
gawk wget git diffstat unzip texinfo gcc build-essential \
chrpath socat cpio python3 python3-pip python3-pexpect \
xz-utils debianutils iputils-ping python3-git python3-jinja2 \
python3-subunit zstd liblz4-tool file locales libacl1 \
&& locale-gen en_US.UTF-8
ENV LANG=en_US.UTF-8
RUN useradd -m builder
USER builder
WORKDIR /home/builder
CMD ["/bin/bash"]

Build and run:

Terminal window
docker build -t yocto-builder .
docker run -it -v ~/yocto:/home/builder/yocto yocto-builder

Inside the container, follow the same steps: source the environment, run BitBake. The container ensures every developer and CI system uses identical host tools.

License Compliance


Shipping a product that contains open-source software requires compliance with each component’s license terms. Yocto automates much of this process.

Generating the License Manifest

After building the image, generate a complete license manifest:

Terminal window
bitbake -c populate_lic siliconwit-image-sensor

The output is in tmp/deploy/licenses/siliconwit-image-sensor-raspberrypi0-2w-64/:

Terminal window
ls tmp/deploy/licenses/siliconwit-image-sensor-raspberrypi0-2w-64/

This directory contains:

  • license.manifest: a text file listing every package, its version, and its license
  • Individual directories for each package containing the actual license text files

Understanding SPDX

Yocto uses SPDX (Software Package Data Exchange) identifiers for license names. Common ones you will encounter:

SPDX IdentifierCommon Name
MITMIT License
GPL-2.0-onlyGNU GPL v2
GPL-2.0-or-laterGNU GPL v2+
LGPL-2.1-onlyGNU LGPL v2.1
Apache-2.0Apache License 2.0
BSD-2-ClauseSimplified BSD
BSD-3-ClauseNew BSD

Handling Commercial Licenses

Some packages have licenses that require explicit opt-in. BitBake refuses to build these unless you whitelist them:

Terminal window
# In local.conf, allow specific commercial licenses
LICENSE_FLAGS_ACCEPTED = "commercial"

For production, be more specific about which commercial packages you accept:

Terminal window
LICENSE_FLAGS_ACCEPTED = "commercial_ffmpeg commercial_x264"

License Auditing Workflow

  1. Build the image and generate the manifest

    Terminal window
    bitbake siliconwit-image-sensor
  2. Review the license manifest

    Terminal window
    cat tmp/deploy/licenses/siliconwit-image-sensor-raspberrypi0-2w-64/license.manifest

    Check for any unexpected licenses (especially GPL in a proprietary product).

  3. Generate source archives for GPL compliance

    GPL licenses require that you provide the corresponding source code. Yocto can archive all sources:

    Terminal window
    # Add to local.conf
    INHERIT += "archiver"
    ARCHIVER_MODE[src] = "original"

    Rebuild, and source tarballs appear in tmp/deploy/sources/.

  4. Include the license manifest in your product documentation

    Many products ship a “Third-Party Software Notices” document generated from this manifest.

Exercises


Exercise 1: Add a Web Dashboard Recipe

Write a BitBake recipe for a lightweight web dashboard (using Python Flask or a static HTML page served by lighttpd) that displays real-time sensor readings. The recipe should depend on sensor-query, install a systemd service that starts the web server at boot, and be included in the image via IMAGE_INSTALL. Test the dashboard by accessing it from a browser on your development machine.

Exercise 2: Implement OTA Update Script

Write a complete OTA update script that: (a) downloads a new rootfs image from an HTTP server, (b) verifies its SHA256 checksum, (c) writes it to the inactive partition, (d) switches the boot slot, and (e) reboots. Include a post-boot verification step that reverts to the previous partition if the sensor daemon fails to start within 60 seconds. Package the script as a Yocto recipe.

Exercise 3: Multi-Machine Build

Add a second MACHINE target (raspberrypi4-64) to your build and produce images for both the Pi Zero 2 W and the Pi 4. Use a single set of application recipes and a shared sstate cache. Compare the image sizes and boot times. Document any recipe changes needed to support both machines.

Exercise 4: Automated CI Build

Set up a CI pipeline (using GitHub Actions or GitLab CI) that builds the Yocto image inside a Docker container whenever a commit is pushed to the meta-siliconwit-rpi repository. The pipeline should: fetch layers from the kas YAML file, build the image, run a basic validation (check that the manifest includes sensor-monitord), and archive the output image as a build artifact. Use the shared sstate cache to keep build times under 30 minutes.

Comments

Loading comments...


© 2021-2026 SiliconWit®. All rights reserved.