An IoT device that publishes sensor data without encryption or authentication is an open invitation to anyone on the same network. In Lesson 2 we configured Mosquitto with server-side TLS and password authentication, which is a solid start, but production systems demand more: mutual TLS where the device proves its identity with a certificate, a provisioning workflow that gives each device a unique credential, and firmware signing so that only code you have authorized can run on your hardware. This lesson covers all three. #Security #TLS #IoTSecurity
The IoT Threat Landscape
IoT devices face a unique set of risks that traditional servers and workstations do not.
Always On, Always Reachable
IoT devices run 24/7, often on networks with direct internet exposure. Unlike a laptop that a user powers off at night, a temperature sensor on a factory floor is always listening. Attackers have unlimited time to probe it.
Rarely Updated
Many deployed IoT devices never receive a firmware update after installation. Known vulnerabilities remain exploitable for the entire lifetime of the device, which can be 5 to 10 years for industrial equipment.
Physical Access
Devices deployed in the field (parking sensors, environmental monitors, agricultural nodes) can be physically accessed by anyone. An attacker can extract firmware, read flash memory, or attach a debugger if the hardware is not locked down.
Resource Constraints
Limited CPU, RAM, and storage mean that heavyweight security mechanisms (full IDS, antivirus, complex firewalls) are not feasible. Security must be lightweight and built into the protocol and provisioning layers.
X.509 Certificate Chain
──────────────────────────────────────────
Root CA (self-signed, kept offline)
│
│ signs
▼
Server Certificate (on Mosquitto broker)
│ CN = mqtt.example.com
│ Used for TLS server identity
│
│ signs (for mutual TLS)
▼
Device Certificate (in ESP32 flash)
│ CN = device-001
│ Proves device identity to broker
│
▼
Broker verifies device cert against CA
Device verifies server cert against CA
= Mutual TLS (both sides authenticated)
Why Attackers Target IoT
The goal is not always the device itself. Compromised IoT devices serve as:
Botnet nodes: The Mirai botnet in 2016 used hundreds of thousands of IoT devices (cameras, routers, DVRs) to launch DDoS attacks exceeding 1 Tbps.
Network pivot points: A compromised sensor on a corporate network gives an attacker a foothold to move laterally toward more valuable targets.
Data exfiltration sources: Sensor data can reveal manufacturing schedules, occupancy patterns, or environmental conditions that have business intelligence value.
Ransomware targets: Locking a building management system or industrial controller until a ransom is paid is increasingly common.
Device Provisioning Workflow
──────────────────────────────────────────
Factory Field
─────── ─────
1. Generate unique 5. Power on
device keypair │
│ 6. Connect to
2. Sign device cert provisioning
with CA key server (TLS)
│ │
3. Flash to ESP32 7. Server verifies
- CA cert device cert
- Device cert │
- Device key 8. Server sends
│ config + MQTT
4. Ship device credentials
│
9. Device connects
to production
MQTT broker
OWASP IoT Top 10
The Open Web Application Security Project (OWASP) maintains a list of the ten most critical IoT security risks. Every IoT engineer should know these.
Rank
Vulnerability
Description
Mitigation
I1
Weak, guessable, or hardcoded passwords
Default credentials that are never changed, or passwords embedded in firmware
Unique credentials per device, force password change on first boot
I2
Insecure network services
Unnecessary open ports, unencrypted protocols, vulnerable services
Disable unused services, use TLS, firewall all ports except required
I3
Insecure ecosystem interfaces
Weak APIs, lack of authentication on web/mobile/cloud interfaces
Secure defaults in production builds, disable debug interfaces
I10
Lack of physical hardening
Exposed UART/JTAG, no tamper detection, readable flash
Disable debug interfaces, enable secure boot, use tamper-evident enclosures
We will address I1, I2, I4, I7, I8, and I9 directly in this lesson. The remaining items are covered through practices introduced across the full course series.
TLS Fundamentals for IoT
Transport Layer Security (TLS) provides three guarantees for network communication:
Property
What It Does
How It Works
Confidentiality
Prevents eavesdropping
Symmetric encryption (AES) after key exchange
Authentication
Proves the server (and optionally client) identity
X.509 certificates verified against a trusted CA
Integrity
Detects tampering with messages in transit
HMAC or AEAD tag on every record
TLS 1.2 vs. TLS 1.3
Feature
TLS 1.2
TLS 1.3
Handshake round-trips
2 RTT
1 RTT (0-RTT resumption possible)
Cipher suites
Many, some insecure (RC4, 3DES)
Only AEAD ciphers (AES-GCM, ChaCha20-Poly1305)
Key exchange
RSA or ECDHE
ECDHE only (forward secrecy mandatory)
Certificate compression
No
Yes (reduces handshake size)
ESP32 support (ESP-IDF 5.x)
Full
Full (mbedTLS 3.x)
Mosquitto support
Full
Full (OpenSSL 1.1.1+)
For constrained devices, TLS 1.3 is preferred because the 1-RTT handshake saves time and bandwidth, and the removal of legacy cipher suites means there are fewer ways to misconfigure security. However, TLS 1.2 with the right cipher suite is still acceptable.
Cipher Suites for Constrained Devices
Not all cipher suites are equal in computational cost. For ESP32 class devices (240 MHz, hardware AES acceleration):
Recommended cipher suites for IoT
# TLS 1.3 (preferred)
TLS_AES_128_GCM_SHA256 # Fast, hardware-accelerated AES on ESP32
TLS_CHACHA20_POLY1305_SHA256 # Good alternative, fast in software
# TLS 1.2 (if 1.3 is not available)
TLS_ECDHE_RSA_WITH_AES_128_GCM_SHA256
TLS_ECDHE_ECDSA_WITH_AES_128_GCM_SHA256
Avoid RSA key exchange (no forward secrecy), CBC mode ciphers (vulnerable to padding oracle attacks), and anything with SHA-1.
X.509 Certificate Hierarchy
TLS authentication is built on X.509 certificates organized in a chain of trust:
Certificate chain of trust
Root CA Certificate (self-signed, kept offline)
|
+-- Intermediate CA Certificate (signed by Root CA)
|
+-- Server Certificate (signed by Intermediate CA)
| Used by: Mosquitto broker
|
+-- Device Certificate (signed by Intermediate CA)
Used by: ESP32, RPi Pico, STM32
One unique certificate per device
Why this hierarchy matters:
The Root CA private key is the master secret. If compromised, every certificate in the chain is untrustworthy. Keep it offline (USB drive in a safe, or better, an HSM).
The Intermediate CA signs day-to-day certificates. If compromised, you revoke the intermediate and issue a new one without replacing the root on every device.
Server certificates prove the broker is who it claims to be. This is what Lesson 2 configured.
Device certificates prove each device is who it claims to be. This is what we add in this lesson.
Certificate Fields That Matter
Every X.509 certificate contains these key fields:
Field
Purpose
Example
Subject (CN)
Identifies the entity
CN=sensor-node-042
Issuer
Who signed this certificate
CN=SiliconWit IoT Intermediate CA
Serial Number
Unique ID within the CA
0x01A3F2
Not Before / Not After
Validity period
2026-03-10 to 2027-03-10
Public Key
The entity’s public key
RSA-2048 or ECDSA P-256
Key Usage
What the key can do
Digital Signature, Key Encipherment
Extended Key Usage
TLS role
Server Auth, Client Auth
Subject Alternative Names (SANs)
Additional identities
DNS: broker.local, IP: 192.168.1.100
Building Your Own Certificate Authority
For development and small-scale production, creating your own CA with OpenSSL is practical and free. For large-scale production, consider a managed PKI service (AWS IoT Core, Azure IoT Hub, or a dedicated CA like Let’s Encrypt for servers).
Generate the Root CA key and self-signed certificate
The Root CA is the anchor of trust. Every device and server in your system will have a copy of ca.crt (the public certificate), but the private key (ca.key) must never leave your secure machine.
Generate Root CA
# Generate a 4096-bit RSA private key for the Root CA
opensslgenrsa-aes256-outroot/ca.key4096
# Create a self-signed Root CA certificate valid for 10 years
The -aes256 flag encrypts the private key with a passphrase. You will be prompted to enter it. For production, use a strong passphrase and store it separately from the key file.
Generate the Intermediate CA key and certificate
The Intermediate CA does the daily signing work. If this key is compromised, you revoke it and issue a new one without touching the Root CA.
Generate Intermediate CA
# Generate Intermediate CA key (no passphrase for automation, or add -aes256)
The pathlen:0 constraint means this intermediate CA cannot sign other CA certificates, only end-entity certificates (server and device certs). This limits the damage if the intermediate key is compromised.
Generate the server (broker) certificate
This certificate goes on your Mosquitto broker. The Common Name (CN) or Subject Alternative Name (SAN) must match the hostname or IP address that devices use to connect.
Using ECDSA P-256 instead of RSA-2048 for device certificates reduces key size from 256 bytes to 32 bytes and speeds up TLS handshakes on constrained devices.
Create a script to automate device certificate generation
When provisioning multiple devices, a script saves time and reduces errors:
generate-device-cert.sh
#!/bin/bash
# Usage: ./generate-device-cert.sh <device-id>
set-euopipefail
DEVICE_ID="$1"
CA_DIR="$HOME/iot-ca"
DAYS_VALID=365
if [ -z"$DEVICE_ID" ]; then
echo"Usage: $0 <device-id>"
exit1
fi
echo"Generating certificate for device: $DEVICE_ID"
The broker proves its identity to connecting clients by presenting broker-fullchain.crt.
Clients verify the broker’s certificate against ca.crt.
Clients authenticate with a username and password.
All traffic is encrypted.
This is good, but has a limitation: any client that knows the username and password can connect. If a password leaks (hardcoded in firmware that someone extracts), anyone can impersonate that device. Mutual TLS eliminates this risk.
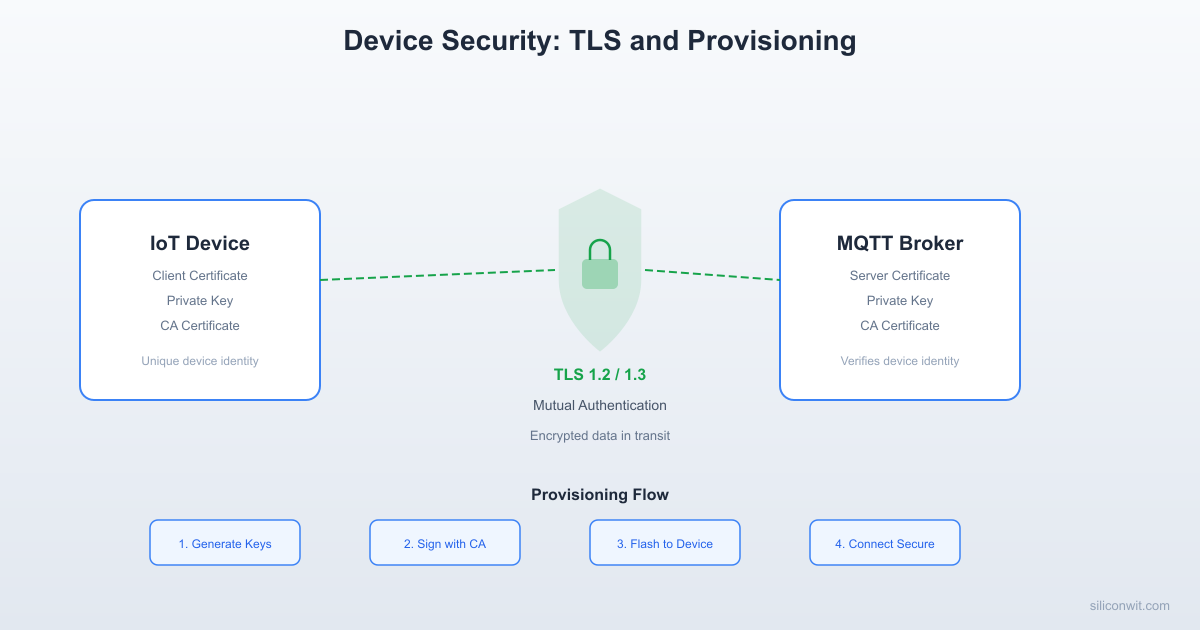
Mutual TLS (mTLS)
In mutual TLS, both sides present certificates:
mTLS handshake flow
Client (ESP32) Server (Mosquitto)
| |
| --- ClientHello ---> |
| |
| <--- ServerHello --- |
| <--- Server Certificate --- |
| <--- CertificateRequest --- | (Server asks client for a cert)
| |
| --- Client Certificate ---> | (Client sends its cert)
| --- ClientKeyExchange ---> |
| --- CertificateVerify ---> | (Client proves it owns the key)
| |
| <--- Finished --- |
| --- Finished ---> |
| |
| ====== Encrypted channel ====== |
The key difference from server-side TLS: the broker sends a CertificateRequest message, and the client must respond with its own certificate and prove possession of the corresponding private key. If the client cannot do this, the handshake fails and the connection is refused.
Configure Mosquitto for Mutual TLS
Update your Mosquitto configuration to require client certificates:
mosquitto.conf (mutual TLS)
# Listener on port 8883 with mutual TLS
listener 8883
# CA certificate (used to verify both server and client certs)
# This means the device identity comes from the certificate, not a password
use_identity_as_username true
# TLS version
tls_version tlsv1.2
The two critical settings:
require_certificate true tells Mosquitto to send a CertificateRequest during the TLS handshake and reject any client that does not present a valid certificate signed by the CA in cafile.
use_identity_as_username true extracts the Common Name (CN) from the client certificate and uses it as the MQTT username. This eliminates the need for a separate password file. The device identity is cryptographically bound to its certificate.
Restart Mosquitto and test with the mosquitto_pub command-line tool:
Test mTLS connection
# Copy certificates to the test machine
# This test uses the sensor-001 device certificate
If the certificate is invalid, expired, or not signed by the trusted CA, you will see a TLS handshake error and the connection will be refused.
ACLs with Certificate Identity
Since use_identity_as_username true sets the MQTT username to the certificate CN, you can write ACL rules based on device identity:
acl.conf
# Each device can only publish to its own topic subtree
pattern write devices/%u/telemetry/#
pattern write devices/%u/status
# Each device can subscribe to its own command topic
pattern read devices/%u/commands/#
# Admin users can read everything
user admin
topic read #
# Admin users can write to any device's command topic
user admin
topic write devices/+/commands/#
Add the ACL file to mosquitto.conf:
Add to mosquitto.conf
acl_file /etc/mosquitto/acl.conf
With this setup, a device with CN=sensor-001 can only publish to devices/sensor-001/telemetry/# and subscribe to devices/sensor-001/commands/#. Even if an attacker extracts the certificate from one device, they cannot impersonate a different device.
ESP32 Mutual TLS Client
Now let us write the ESP32 firmware that connects to Mosquitto using mutual TLS. The ESP32 needs three PEM files embedded in its firmware:
CA certificate (ca.crt): to verify the broker’s certificate
Client certificate (sensor-001.crt): the device’s identity
Client private key (sensor-001.key): to prove ownership of the certificate
Embedding Certificates in ESP-IDF
In ESP-IDF, the standard approach is to embed certificate files as binary data using EMBED_TXTFILES in CMakeLists.txt.
First, create a certs/ directory inside your project and copy the three PEM files:
The three calls setCACert(), setCertificate(), and setPrivateKey() are all required for mutual TLS. If you omit the client certificate and key, you get server-side TLS only (the broker verifies itself but does not verify the device).
Device Provisioning Workflows
Generating certificates on your development machine and copying them into firmware works for prototypes, but at scale you need a provisioning workflow. There are three common approaches.
1. Factory Provisioning
In factory provisioning, each device receives its unique certificate and private key during manufacturing, before it ships.
Generate a unique certificate for each device using the batch script from earlier. The CN is set to the device serial number or MAC address.
Flash the certificate into a dedicated NVS (Non-Volatile Storage) partition on the ESP32. This keeps the certificate separate from the firmware binary, so firmware updates do not erase the device identity.
Write certificate to NVS partition
# Create an NVS CSV file with the certificate data
if (err != ESP_OK) { nvs_close(handle); return err; }
nvs_close(handle);
return ESP_OK;
}
Record the device serial number and certificate fingerprint in your asset management database. This lets you track which certificate belongs to which device and revoke individual devices if needed.
Advantages: Strongest security. Each device has a unique key that never traverses a network. Private keys are generated and stored locally.
Disadvantages: Requires a provisioning station on the manufacturing line. Does not scale well for devices manufactured by third-party contract manufacturers who you do not fully trust with your CA key.
2. First-Boot Provisioning
In first-boot provisioning, the device ships with a temporary bootstrap credential (a one-time token) and requests its permanent certificate from a provisioning server when it first connects.
First-boot provisioning flow
Device (first boot) Provisioning Server
| |
| --- HTTPS POST /provision --- |
| Body: { token: "abc123", |
| csr: "-----BEGIN CSR..." } |
| |
| Server validates token, |
| signs CSR with Intermediate CA, |
| marks token as used |
| |
| <-- 200 OK --- |
| Body: { cert: "-----BEGIN CERT..." }|
| |
| Stores cert in NVS |
| Deletes bootstrap token from NVS |
| Reboots, connects to MQTT with mTLS |
During manufacturing, each device receives a unique one-time provisioning token burned into NVS. The token is also recorded in the provisioning server database.
On first boot, the device generates a key pair locally (the private key never leaves the device), creates a CSR, and sends it to the provisioning server over HTTPS along with the token.
The provisioning server validates the token (single-use, not expired), signs the CSR with the Intermediate CA, returns the certificate, and marks the token as consumed.
The device stores the certificate in NVS, erases the token, and reboots. Subsequent boots use the stored certificate for mTLS.
Here is a minimal Python provisioning server:
provisioning_server.py
from flask import Flask, request, jsonify
import subprocess
import os
import secrets
import json
app =Flask(__name__)
CA_DIR= os.path.expanduser("~/iot-ca")
TOKENS_FILE="provisioning_tokens.json"
defload_tokens():
if os.path.exists(TOKENS_FILE):
withopen(TOKENS_FILE) as f:
return json.load(f)
return {}
defsave_tokens(tokens):
withopen(TOKENS_FILE,"w") as f:
json.dump(tokens, f,indent=2)
@app.route("/provision",methods=["POST"])
defprovision_device():
data = request.get_json()
token = data.get("token")
csr_pem = data.get("csr")
ifnot token ornot csr_pem:
returnjsonify({"error": "Missing token or CSR"}), 400
# Validate token
tokens =load_tokens()
if token notin tokens or tokens[token]["used"]:
returnjsonify({"error": "Invalid or used token"}), 403
Advantages: Private key never leaves the device. Scales well because devices self-provision. Works with contract manufacturers who only need to burn a token, not handle CA keys.
Disadvantages: Requires a provisioning server that must be available when devices first boot. The bootstrap channel (HTTPS with an ad-hoc certificate) is less secure than factory provisioning.
3. Certificate Rotation
Certificates expire. A device deployed for years needs to renew its certificate before the old one expires.
Certificate rotation logic (pseudocode)
voidcheck_certificate_expiry(void)
{
// Parse the Not After date from the stored certificate
// Send CSR to provisioning server (authenticated with current cert)
// Store new cert and key in NVS
// Reboot to use new credentials
}
}
The renewal request uses the device’s current (still valid) certificate for authentication. The provisioning server verifies the existing certificate, signs the new CSR, and returns the new certificate. This creates a seamless rotation with no downtime.
SiliconWit.io Security Model
The SiliconWit.io platform uses TLS on port 8883 for all MQTT connections. Each device authenticates with a device_id and access_token pair, which is simpler to set up than per-device certificates.
SiliconWit.io connection parameters
Host: mqtt.siliconwit.io
Port: 8883 (TLS)
Username: <your_device_id>
Password: <your_access_token>
CA: Uses a publicly trusted CA (no custom CA needed)
This model works well for small to medium deployments (dozens to hundreds of devices). The platform handles TLS termination, and you manage devices through the web dashboard.
For production at scale (thousands of devices), mutual TLS with per-device certificates is more secure than shared tokens for several reasons:
Aspect
Token-Based (SiliconWit.io)
Per-Device mTLS
Credential extraction
Token can be read from firmware dump
Private key can be protected with secure boot + flash encryption
Credential sharing
A leaked token can be used from any device
Certificate is bound to a specific key pair
Revocation
Revoke token on the server
Revoke certificate via CRL or OCSP
Identity assurance
Token proves knowledge of a secret
Certificate proves possession of a private key, verified by CA chain
Scalability
Simple, no PKI infrastructure needed
Requires CA management, provisioning workflow
For many IoT projects, starting with token-based authentication on SiliconWit.io and migrating to mTLS as the deployment grows is a practical approach.
Secure Firmware Updates
An attacker who can push malicious firmware to your device owns it completely. Firmware signing ensures that only binaries you have authorized can run.
The Firmware Signing Workflow
Firmware signing and verification flow
Developer Machine ESP32 Device
| |
| 1. Build firmware binary |
| 2. Hash the binary (SHA-256) |
| 3. Sign the hash with signing key |
| 4. Append signature to binary |
| 5. Host on update server |
| |
| (OTA update) |
| |
| 6. Download binary <|
| 7. Extract signature |
| 8. Verify signature |
| with public key |
| 9. If valid: flash |
| 10. If invalid: reject|
ESP32 Secure Boot V2
ESP32 supports Secure Boot V2, which uses RSA-PSS signatures to verify the bootloader and application at every boot. This was covered in detail in the ESP32 course (Lesson 7: OTA Updates and Secure Boot). Here is a summary of the key steps:
Build and flash: The build system automatically signs the bootloader and application image. On first boot, the ESP32 burns the public key hash into eFuse (one-time programmable). After this, only firmware signed with the matching private key will boot.
OTA updates must also be signed. When you push a new firmware binary via OTA, the bootloader verifies the signature before accepting it. An unsigned or incorrectly signed binary is rejected.
Signing OTA Binaries Without Secure Boot
Even without full secure boot (which locks down the bootloader), you can implement application-level signature verification for OTA updates:
Verify OTA firmware signature
#include"mbedtls/pk.h"
#include"mbedtls/sha256.h"
#include"mbedtls/error.h"
// Public key embedded in firmware (the signing key's public half)
Integrate this check into your OTA update handler: download the signed image, call verify_firmware_signature(), and only proceed with esp_ota_write() if verification passes.
Network Segmentation
Even with TLS and mTLS, placing IoT devices on the same network as workstations, file servers, and databases is risky. A compromised IoT device should not be able to reach your accounting database.
VLAN Isolation
Create a separate VLAN for IoT devices. Most managed switches and enterprise routers support VLANs:
These are the mistakes we see most often in IoT deployments. Avoid all of them.
Hardcoded Credentials
Wi-Fi passwords, MQTT tokens, API keys baked into source code or firmware binaries. Anyone with a firmware dump can extract them. Fix: Store credentials in NVS, provision per-device, use mTLS certificates instead of passwords.
No TLS
Plaintext MQTT on port 1883. All sensor data, commands, and credentials visible to anyone on the network with a packet sniffer. Fix: Always use port 8883 with TLS. There is no valid reason to use unencrypted MQTT in production.
Unpatched Firmware
Devices deployed and never updated. Known vulnerabilities in mbedTLS, lwIP, or the RTOS accumulate over time. Fix: Implement OTA updates from Lesson 2, sign all firmware, check for updates periodically.
Open Debug Ports
JTAG, UART, and USB debug interfaces left enabled in production firmware. An attacker with physical access can dump memory, extract keys, or inject code. Fix: Disable JTAG via eFuse on ESP32. Remove UART debug output in release builds. Enable secure boot.
Default Passwords
Shipping devices with “admin/admin” or “root/root” and hoping users will change them. They will not. Fix: Force unique credentials during provisioning. Use certificate-based authentication where no user password exists.
No Certificate Rotation
Certificates with 10-year validity or no rotation plan. Long-lived credentials are more likely to be compromised over time. Fix: Issue certificates with 1-year validity. Implement automatic rotation 30 days before expiry.
Security Audit Checklist
Use this checklist before deploying any IoT system to production. Each item maps to a specific OWASP IoT Top 10 risk.
Communication Security
All MQTT connections use TLS (port 8883, never 1883)
TLS 1.2 or 1.3 with AEAD cipher suites only
Server certificate verified against known CA (not setInsecure())
Mutual TLS enabled for device authentication (if scale permits)
Certificate validity period is 1 year or less
Certificate rotation process is tested and documented
Device Identity
Each device has a unique identity (certificate CN, serial number, or token)
No shared credentials across devices
Credentials stored in NVS or secure element, not in firmware binary
Device identity recorded in asset management database
Firmware Security
Secure boot enabled (ESP32: Secure Boot V2)
Flash encryption enabled (ESP32: AES-256)
OTA firmware is signed; device verifies signature before flashing
OTA rollback mechanism tested (device recovers from bad firmware)
Debug interfaces (JTAG, UART) disabled in production builds
Network Security
IoT devices on a separate VLAN or subnet
Firewall rules restrict IoT device traffic to MQTT broker only
No direct internet access for IoT devices (unless required)
Broker firewall limits connections to known IP ranges
Access Control
MQTT ACLs restrict topics per device (no wildcard publish/subscribe)
Admin/management credentials use strong authentication
API endpoints require authentication (tokens, mTLS, or OAuth)
Provisioning tokens are single-use and time-limited
Monitoring and Incident Response
Failed TLS handshakes and authentication attempts are logged
Alerts configured for unusual patterns (new device IDs, high message rates)
Device decommissioning process documented (revoke cert, remove from ACL)
Incident response plan exists for compromised devices
Exercises
Exercise 1: Build a Complete mTLS Setup
Set up the full mutual TLS pipeline from scratch:
Generate a Root CA, Intermediate CA, server certificate, and two device certificates using the OpenSSL commands from this lesson.
Configure Mosquitto with require_certificate true and use_identity_as_username true.
Test with mosquitto_pub and mosquitto_sub using the device certificates.
Verify that a connection without a client certificate is rejected.
Verify that a connection with a certificate signed by a different CA is rejected.
Write ACL rules so each device can only publish to its own topic subtree, then test that sensor-001 cannot publish to devices/sensor-002/telemetry.
Deliverable: A working mTLS setup with two device certificates, ACL rules, and a test log showing accepted and rejected connections.
Exercise 2: ESP32 mTLS Sensor Node
Flash the ESP32 mTLS firmware from this lesson and connect to your Mosquitto broker:
Embed the CA certificate, device certificate, and device key in the firmware.
Publish temperature and humidity readings every 60 seconds to devices/<device-id>/telemetry/environment.
Subscribe to devices/<device-id>/commands/# and implement a command that changes the publish interval.
Verify in the Mosquitto log that the device authenticated with its certificate CN.
Try connecting with an expired certificate (generate one with -days 1 and wait, or set your system clock forward). Confirm the connection is rejected.
Deliverable: Serial monitor output showing successful mTLS connection and data publishing, plus Mosquitto log entries confirming certificate-based authentication.
Exercise 3: First-Boot Provisioning System
Build a minimal provisioning system:
Run the Python provisioning server from this lesson.
Generate three provisioning tokens using the /generate-token endpoint.
Write ESP32 firmware that, on first boot, generates a key pair, creates a CSR, sends it to the provisioning server with the token, and stores the returned certificate in NVS.
On subsequent boots, the firmware should skip provisioning and connect directly with the stored certificate.
Verify that using the same token twice is rejected.
Verify that provisioned devices can connect to Mosquitto with mTLS.
Deliverable: Provisioning server running, three devices provisioned, Mosquitto accepting mTLS connections from all three. A brief write-up of the provisioning flow.
Exercise 4: Security Audit
Audit your IoT setup from the previous lessons in this course (broker, dashboard, Node-RED, ESP32 clients) against the security checklist in this lesson:
Go through every item in the checklist and mark it as pass, fail, or not applicable.
For each failing item, write a one-paragraph remediation plan with specific steps.
Implement at least three of the remediation steps.
Re-audit after remediation and document the improvement.
Deliverable: A completed audit checklist (before and after), remediation plans, and evidence of implemented fixes (configuration changes, test results).
Summary
Topic
Key Takeaway
Threat landscape
IoT devices are always on, rarely updated, and often physically accessible. Security must be built in from the start.
OWASP IoT Top 10
Know the common vulnerabilities. Most IoT breaches exploit weak passwords, no TLS, or lack of updates.
TLS
Provides confidentiality, authentication, and integrity. Use TLS 1.3 when possible, TLS 1.2 with AEAD ciphers otherwise.
Certificate hierarchy
Root CA (offline) signs Intermediate CA, which signs server and device certificates. This limits blast radius if a key is compromised.
Server-side TLS
Broker proves its identity to devices. Good baseline, but devices are authenticated only by password.
Mutual TLS
Both broker and device prove identity via certificates. Eliminates password-based attacks. Use require_certificate true in Mosquitto.
Sign all OTA binaries. Device verifies signature before flashing. ESP32 Secure Boot V2 makes this hardware-enforced.
Network segmentation
Isolate IoT devices on a dedicated VLAN. Firewall rules restrict traffic to the MQTT broker only.
In the next and final lesson, we bring everything together: broker, clients, dashboards, alerts, automation, and security into a complete production IoT monitoring system.
Comments