Every project so far has required a USB cable for control and monitoring. That limits where you can deploy the device: it has to be within reach of a laptop. Adding Wi-Fi turns the Pico into a standalone networked node you can control from any phone or browser on the same network. This final lesson brings together everything from the course: PIO drives the WS2812B LED protocol from Lesson 3, the CYW43 wireless chip handles networking, and a lightweight MicroPython web server serves a color picker UI. You will configure Wi-Fi station mode, set up TCP sockets, handle HTTP requests, and push real-time color updates to the NeoPixel strip. #PicoW #WiFi #WirelessEmbedded
What We Are Building
Wi-Fi Controlled NeoPixel Display
A Pico W running MicroPython connects to your Wi-Fi network and serves a web page with a color picker and pattern selector. When you choose a color or animation pattern on your phone or laptop, the Pico receives the command over HTTP and updates the WS2812B LED strip in real time using PIO. The web UI is self-contained HTML/CSS/JS served directly from the Pico’s filesystem.
Project specifications:
Parameter
Value
Board
Raspberry Pi Pico W (CYW43439)
Wireless
Wi-Fi 802.11n (2.4 GHz), BLE 5.2
Web Server
Raw socket HTTP server with asyncio
LED Control
WS2812B via PIO (reuse Lesson 3 driver)
Web UI
Color picker, pattern selector, brightness slider
Network Mode
Station mode (connects to existing Wi-Fi)
Runtime
MicroPython with network and socket modules
Bill of Materials
Ref
Component
Quantity
Notes
1
Raspberry Pi Pico W
1
Replaces standard Pico for this lesson
2
WS2812B LED strip (8 pixels)
1
Reuse from Lesson 3
3
330 ohm resistor
1
Data line series resistor
4
Micro USB cable
1
For power and initial flashing
5
Breadboard + jumper wires
1 set
Pico W Hardware
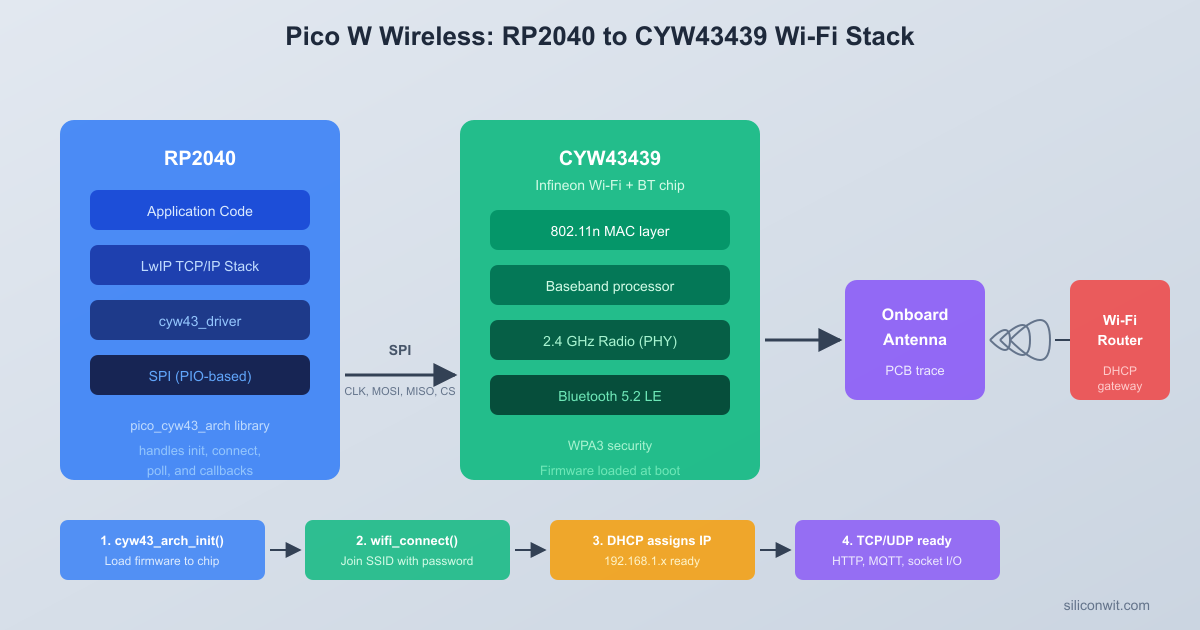
The Pico W adds an Infineon CYW43439 wireless chip to the standard Pico board. This chip supports 802.11n Wi-Fi on the 2.4 GHz band and Bluetooth 5.2 (including BLE). The CYW43439 connects to the RP2040 over SPI, not through the general-purpose GPIO pins. This means the wireless chip does not consume any of the GPIO pins you use for your own peripherals.
Pico W Internal Architecture
┌──────────────────────────────────────┐
│ Raspberry Pi Pico W │
│ │
│ ┌────────────┐ SPI ┌─────────┐│
│ │ RP2040 │<────────>│ CYW43439││
│ │ │ (internal│ ││
│ │ Cortex-M0+ │ pins) │ Wi-Fi ││
│ │ Cortex-M0+ │ │ BLE 5.2 ││
│ │ │ │ ││
│ │ GPIO 0..28 │ │ Onboard ││
│ │ (user pins)│ │ LED ││
│ └────────────┘ │ Antenna ││
│ └─────────┘│
│ USB 30 user GPIOs remain │
└──┤├─────────────────────────────────┘
One important difference from the standard Pico: the onboard LED is no longer connected to GP25. On the Pico W, the LED is routed through the CYW43 wireless chip. You must use the CYW43 driver to control it. In MicroPython, the pin name "LED" maps to the correct CYW43 GPIO internally.
Blinking the Onboard LED
On a standard Pico, you would use machine.Pin(25, machine.Pin.OUT) to control the LED. On the Pico W, use this instead:
blink_pico_w.py
import machine
import time
led = machine.Pin("LED", machine.Pin.OUT)
whileTrue:
led.toggle()
time.sleep(0.5)
The string "LED" tells MicroPython to route the pin control through the CYW43 driver. If you try Pin(25) on a Pico W, nothing happens because GP25 is not connected to the LED on this board.
Wi-Fi Connection
The network module in MicroPython provides the WLAN class for managing Wi-Fi connections. The Pico W operates in station mode (STA_IF) to connect to an existing Wi-Fi access point, or in access point mode (AP_IF) to create its own network. For this project we use station mode so the Pico joins your home or lab Wi-Fi.
Station Mode Setup
The connection sequence follows four steps: activate the interface, issue the connect command, wait for the connection to complete, and retrieve the assigned IP address.
The wlan.status() method returns an integer code. Status 3 means CYW43_LINK_JOIN, indicating a successful connection with an IP address assigned. Negative values indicate errors such as connection failure or wrong password.
Reusable Connection Function
Wrapping the connection logic in a function makes it easy to reuse across projects:
wifi_utils.py
import network
import time
defconnect_wifi(ssid, password, timeout=10):
"""Connect to Wi-Fi and return the WLAN interface."""
wlan = network.WLAN(network.STA_IF)
wlan.active(True)
# Set power management to aggressive for better responsiveness
wlan.config(pm=0xa11140)
wlan.connect(ssid, password)
for i inrange(timeout):
if wlan.status() ==3:
ip = wlan.ifconfig()[0]
print("Connected to", ssid,"at", ip)
return wlan
print("Connecting... attempt", i +1)
time.sleep(1)
wlan.active(False)
raiseRuntimeError("Could not connect to "+ ssid)
The wlan.config(pm=0xa11140) call configures power management. The default power saving mode can add latency to incoming connections. Setting this value puts the wireless chip in a more responsive mode, which matters when you are running a web server that needs to reply quickly to HTTP requests.
Socket Programming Basics
With Wi-Fi connected and an IP address assigned, the Pico W can send and receive data over TCP. MicroPython includes usocket (aliased as socket) for BSD-style socket programming. A web server listens for incoming TCP connections on port 80, reads the HTTP request, and sends back an HTTP response.
Pico W Web Server Flow
┌──────────┐ 1. Connect ┌──────────┐
│ Phone │ to Wi-Fi │ Pico W │
│ Browser ├──────────────>│ TCP :80 │
│ │ │ │
│ │ 2. HTTP GET │ │
│ ├──────────────>│ Parse │
│ │ /color?r=255 │ request │
│ │ │ │
│ │ 3. Response │ Update │
│ │<──────────────┤ NeoPixels│
│ │ 200 OK + │ via PIO │
│ Shows │ HTML page │ │
│ color │ │ │
│ picker │ │ │
└──────────┘ └──────────┘
Minimal Web Server
This example serves a static “Hello from Pico W” page to any browser that connects:
hello_server.py
import socket
import network
import time
# Connect to Wi-Fi first
wlan = network.WLAN(network.STA_IF)
wlan.active(True)
wlan.connect("YourSSID","YourPassword")
while wlan.status() !=3:
time.sleep(1)
ip = wlan.ifconfig()[0]
print("Listening on", ip)
# Create TCP server socket
server = socket.socket(socket.AF_INET, socket.SOCK_STREAM)
<body><h1>Hello from Pico W!</h1><p>IP: {}</p></body>
</html>""".format(ip)
whileTrue:
client, addr = server.accept()
print("Connection from", addr)
request = client.recv(1024).decode("utf-8")
# Parse the request line
request_line = request.split("\r\n")[0]
method, path, _ = request_line.split("",2)
print(method, path)
# Send HTTP response
response ="HTTP/1.1 200 OK\r\n"
response +="Content-Type: text/html\r\n"
response +="Connection: close\r\n"
response +="\r\n"
response += html
client.send(response.encode("utf-8"))
client.close()
The server creates a TCP socket, binds it to all interfaces on port 80, and listens for connections. When a browser connects, the server reads the HTTP request, ignores most of it, and sends back a simple HTML page. The Connection: close header tells the browser to close the connection after receiving the response, keeping the server logic simple.
Parsing HTTP Requests
For the NeoPixel controller we need to handle different endpoints and parse JSON data from POST requests. Here is the pattern for extracting the method, path, and body:
defparse_request(data):
"""Parse an HTTP request into method, path, headers, and body."""
text = data.decode("utf-8")
header_section, _, body = text.partition("\r\n\r\n")
lines = header_section.split("\r\n")
request_line = lines[0]
parts = request_line.split("",2)
method = parts[0]
path = parts[1] iflen(parts) >1else"/"
return method, path, body
The NeoPixel Web Controller
The complete project consists of five files that work together: Wi-Fi configuration, the NeoPixel PIO driver, the HTTP server, the web UI, and the main entry point. Each file has a single responsibility, making the project easy to modify and debug.
Project Structure
Directory/
wifi_config.py
neopixel_pio.py
web_server.py
index.html
main.py
These files live on the Pico W’s internal filesystem. MicroPython executes main.py automatically on boot.
wifi_config.py
Store your network credentials in a separate file so you can keep the rest of the code in version control without exposing your password. Never commit this file to a public repository.
wifi_config.py
SSID="YourNetworkName"
PASSWORD="YourNetworkPassword"
neopixel_pio.py
This module wraps the WS2812B PIO driver in a Python class. The PIO program is the same protocol from Lesson 3, expressed using MicroPython’s @rp2.asm_pio decorator instead of a .pio file.
time.sleep_us(60) # Reset signal: hold low for > 50 us
defset_brightness(self, value):
"""Set brightness as a float from 0.0 to 1.0."""
self.brightness =max(0.0,min(1.0, value))
@staticmethod
defwheel(pos):
"""Color wheel: input 0-255, returns (r, g, b) tuple.
Colors transition through red, green, blue and back to red.
"""
pos = pos &0xFF
if pos <85:
return (255- pos *3, pos *3, 0)
elif pos <170:
pos -=85
return (0, 255- pos *3, pos *3)
else:
pos -=170
return (pos *3, 0, 255- pos *3)
The PIO program runs at 8 MHz, which gives 10 cycles per bit (T1 + T2 + T3 = 2 + 5 + 3). At 8 MHz each cycle is 125 ns, so the total bit period is 1.25 us, matching the 800 kHz WS2812B specification. This is the same timing analysis from Lesson 3, now running through MicroPython’s rp2.StateMachine interface.
The show() method calls sm.put(pixel, 8) for each pixel. The second argument (8) tells the state machine to shift the data left by 8 bits before writing it to the FIFO, matching the 24-bit autopull threshold. After all pixels are written, a 60 us delay generates the reset signal.
web_server.py
The HTTP server handles four endpoints: GET / serves the web page, POST /color sets a solid color, POST /pattern selects an animation, and POST /brightness adjusts the brightness level.
web_server.py
import usocket as socket
import ujson as json
classWebServer:
def__init__(self, state):
self.state = state
self.server =None
self._html_cache =None
def_load_html(self):
"""Load and cache the HTML file from the filesystem."""
ifself._html_cache isNone:
withopen("index.html","r") as f:
self._html_cache = f.read()
returnself._html_cache
def_parse_request(self, data):
"""Extract method, path, and body from raw HTTP data."""
text = data.decode("utf-8")
header_section, _, body = text.partition("\r\n\r\n")
The server uses a shared state dictionary that both the web server and the animation loop can read and write. When a POST request changes the color or pattern, the server updates the state dictionary. The animation coroutine reads from the same dictionary on every frame. This avoids the need for locks or queues; the cooperative scheduling of uasyncio ensures only one coroutine runs at a time.
The socket is set to non-blocking mode with setblocking(False). The accept() call raises OSError when no client is waiting, which the except block catches silently. The coroutine then yields control with await asyncio.sleep_ms(10), giving the animation loop a chance to run.
index.html
The web UI is a single self-contained HTML file with inline CSS and JavaScript. It provides a color picker, pattern selection buttons, and a brightness slider. The layout is responsive and works well on phone screens.
The JavaScript uses fetch() to send POST requests with JSON bodies to the Pico’s endpoints. The color picker fires sendColor() on the change event (when the user releases the picker), not on every input event, to avoid flooding the Pico with requests. The pattern buttons use click handlers that also update the active button styling.
main.py
The entry point connects to Wi-Fi, creates the shared state, and launches two uasyncio coroutines: one for the LED animation loop and one for the web server.
main.py
import uasyncio as asyncio
import network
import time
from machine import Pin
from wifi_config importSSID, PASSWORD
from neopixel_pio import NeoPixel
from web_server import WebServer
NUM_PIXELS=8
LED_PIN=2
# Shared state between web server and animation loop
state = {
"pattern": "rainbow",
"color": (255, 0, 64),
"brightness": 0.3
}
defconnect_wifi():
"""Connect to Wi-Fi and return the IP address."""
wlan = network.WLAN(network.STA_IF)
wlan.active(True)
wlan.config(pm=0xa11140)
wlan.connect(SSID, PASSWORD)
for i inrange(15):
if wlan.status() ==3:
ip = wlan.ifconfig()[0]
print("Connected to", SSID)
print("IP address:", ip)
return ip
print("Connecting... attempt", i +1)
time.sleep(1)
raiseRuntimeError("Wi-Fi connection failed")
asyncdefanimation_loop(np):
"""Continuously update the LED strip based on the current state."""
# Start the web server and animation loop concurrently
server =WebServer(state)
print("Starting NeoPixel controller at http://{}".format(ip))
await asyncio.gather(
animation_loop(np),
server.start()
)
# Run the async main function
try:
asyncio.run(main())
exceptKeyboardInterrupt:
print("Stopped by user")
On boot, the Pico W connects to Wi-Fi and blinks the onboard LED three times to confirm the connection. Then it starts both coroutines with asyncio.gather(). The animation loop runs continuously, reading the pattern and color from the shared state dictionary. The web server accepts incoming HTTP connections and updates the same dictionary when commands arrive. Because uasyncio is cooperative, only one coroutine executes at a time, and context switches happen at every await statement.
Uploading Files to the Pico W
Before running the project you need to transfer all five files to the Pico W’s internal filesystem. Two tools work well for this: Thonny (graphical) and mpremote (command line).
Open Thonny and select the Pico W as the interpreter (bottom-right corner, select “MicroPython (Raspberry Pi Pico)”).
Open each .py and .html file from your computer using File, then Open.
For each file, use File, then Save As, then select “Raspberry Pi Pico” as the target. Save with the same filename.
After all files are saved, click the Stop/Restart button to reset the Pico. It will run main.py automatically on boot.
After the Pico reboots, watch the serial output (Thonny’s shell or mpremote repl) for the Wi-Fi connection status and the IP address. Open that IP address in a browser on your phone or laptop, and the NeoPixel controller interface appears.
How the Animation Loop Works
The Pico W runs MicroPython’s uasyncio library, which provides cooperative multitasking on a single-threaded event loop. Two coroutines share the CPU:
animation_loop() updates the LED strip on every frame. Depending on the pattern, it sleeps for 20 to 100 ms between frames using await asyncio.sleep_ms().
server.start() polls for incoming HTTP connections. When no client is waiting, it catches the OSError from the non-blocking accept() call and yields with await asyncio.sleep_ms(10).
The key insight is that await is the only point where a context switch can happen. Neither coroutine can be interrupted in the middle of updating pixels or handling an HTTP request. This eliminates race conditions on the shared state dictionary without requiring locks or mutexes.
The timing works out well in practice. The animation loop sleeps for at least 20 ms per frame, giving the server coroutine many opportunities to check for and handle incoming connections. HTTP requests typically complete in under 5 ms (the request and response are small), so the animation does not stutter visibly when a browser sends a command.
If you add more complex server logic or longer running computations, you can insert additional await asyncio.sleep_ms(0) calls at strategic points to yield control more frequently without adding real delays.
Circuit Wiring
Connect the WS2812B strip to the Pico W the same way as in Lesson 3:
WS2812B Pin
Pico W Connection
DIN (data in)
GP2 through 330 ohm resistor
VCC (5V)
VBUS (5V USB) or external 5V supply
GND
GND (shared ground with Pico W)
The Pico W has the same pinout as the standard Pico for all GPIO pins. The only difference is the onboard LED routing and the addition of the CYW43439 module on the back of the board. All your existing wiring from earlier lessons works without changes.
Adding MQTT
HTTP works well for direct browser control, but many IoT applications need a publish/subscribe messaging system. MQTT is the standard protocol for this. The Pico W can publish its LED state to a broker and subscribe to commands from other devices or dashboards.
MicroPython includes the umqtt.simple library for basic MQTT communication. If it is not included in your firmware build, install it using mpremote:
Terminal window
mpremotemipinstallumqtt.simple
Publish/Subscribe Example
This example connects to an MQTT broker, publishes the current LED color whenever it changes, and subscribes to a topic for receiving color commands from other clients.
mqtt_example.py
from umqtt.simple import MQTTClient
import ujson as json
import time
BROKER="mqtt.siliconwit.io"
PORT=1883
CLIENT_ID="pico-w-neopixel"
TOPIC_PUB=b"pico/neopixel/state"
TOPIC_SUB=b"pico/neopixel/command"
defon_message(topic, msg):
"""Handle incoming MQTT messages."""
try:
data = json.loads(msg)
print("MQTT command:", data)
# Update the shared state dictionary here
# For example: state["color"] = (data["r"], data["g"], data["b"])
exceptExceptionas e:
print("MQTT parse error:", e)
defmqtt_connect():
"""Connect to the MQTT broker and subscribe to the command topic."""
You can test this with SiliconWit’s public MQTT broker at https://mqtt.siliconwit.io/. Open a second MQTT client (such as MQTTX or mosquitto_sub on your computer), subscribe to pico/neopixel/state, and watch the messages appear when the Pico W publishes its LED state.
To integrate MQTT into the main project, add a third coroutine that periodically calls client.check_msg() to process incoming messages and publishes state updates after each change:
asyncdefmqtt_loop(client):
"""Check for MQTT messages and publish state periodically."""
whileTrue:
client.check_msg()
await asyncio.sleep_ms(100)
Add this coroutine to the asyncio.gather() call in main() alongside the animation and server tasks.
Experiments
Experiment 1: Add More Animation Patterns
Add two new patterns to the NeoPixel controller: a “sparkle” effect that randomly lights individual pixels with brief white flashes, and a “fire” effect that simulates flickering flames using warm color gradients. Add corresponding buttons to the HTML interface and POST handlers in the server. Test each pattern to find the right frame delay for a natural appearance.
Experiment 2: mDNS Discovery
Instead of remembering the Pico’s IP address, configure mDNS so you can reach the device at http://neopixel.local. MicroPython does not include mDNS by default, but you can implement a minimal mDNS responder that replies to queries for your chosen hostname. Research the mDNS packet format (multicast to 224.0.0.251 on port 5353) and write a UDP listener that responds with the Pico’s IP address.
Experiment 3: BLE Control
The CYW43439 supports Bluetooth Low Energy. Use MicroPython’s bluetooth module to create a BLE GATT service with characteristics for color (3 bytes: R, G, B), pattern (1 byte: pattern index), and brightness (1 byte: 0 to 100). Write a BLE central script on your computer or use a phone app like nRF Connect to send commands. Compare the latency and range with the Wi-Fi HTTP approach.
Experiment 4: Scheduled On/Off Times
Add a scheduling feature that turns the LED strip on and off at configured times. Use the Pico W’s ability to sync time via NTP (ntptime.settime() in MicroPython) to get the current time. Store the schedule in a JSON file on the filesystem. Add schedule configuration endpoints to the web server and display the current schedule on the HTML page.
Summary
The Pico W extends the RP2040 with Infineon’s CYW43439 wireless chip, connected over SPI and managed through MicroPython’s network module. Wi-Fi station mode connects the board to an existing network in a few lines of code: activate the WLAN interface, issue the connect call, wait for status 3, and read the IP address. Once connected, standard socket programming serves HTTP requests on port 80.
The NeoPixel web controller demonstrates a practical pattern for wireless embedded projects: a shared state dictionary, an animation coroutine that reads the state on every frame, and a server coroutine that updates the state when HTTP commands arrive. MicroPython’s uasyncio handles cooperative scheduling between the two tasks on the single-core MicroPython runtime. The PIO state machine from Lesson 3 handles all timing-critical LED signaling, freeing the CPU for network and application code.
MQTT extends the same architecture to publish/subscribe messaging, enabling integration with IoT dashboards and other devices on the network. With Wi-Fi, HTTP, MQTT, PIO, and asyncio all working together, the Pico W becomes a capable platform for connected embedded systems.
Comments