The Official Framework
ESP-IDF is what Espressif uses internally. It gives you full access to Wi-Fi, BLE, OTA, secure boot, partition tables, and the dual-core FreeRTOS scheduler. Arduino-ESP32 is a wrapper around ESP-IDF with limitations.
The ESP32 brings Wi-Fi and Bluetooth to embedded systems for under $5. This course teaches you to build connected devices using ESP-IDF (the official framework), not Arduino wrappers. Each lesson produces a working networked project, progressing from local peripherals to cloud-connected IoT nodes with OTA updates and battery optimization. #ESP32 #IoT #EmbeddedSystems
The Official Framework
ESP-IDF is what Espressif uses internally. It gives you full access to Wi-Fi, BLE, OTA, secure boot, partition tables, and the dual-core FreeRTOS scheduler. Arduino-ESP32 is a wrapper around ESP-IDF with limitations.
Production-Grade IoT
OTA firmware updates, flash encryption, secure boot v2, and partition management. These are not optional extras; they are what separates a prototype from a product. Lessons 7 and 8 cover them in depth.
Wi-Fi + BLE + FreeRTOS
Dual-core with FreeRTOS SMP, full Wi-Fi stack (STA/AP/mesh), BLE 4.2/5.0, and MQTT/HTTP client libraries. All running concurrently. The ESP32 is a complete IoT platform on a single chip.
Connects to Everything
MQTT brokers, REST APIs, phone apps via BLE, web dashboards. Each lesson connects the ESP32 to something new. By the capstone, you have a complete sensor network.
Each lesson follows a consistent cycle:
The Connected Problem A real IoT scenario. Not “connect to Wi-Fi” but “build a browser-controlled thermostat.”
ESP-IDF Internals How the relevant subsystem works: event loops, task model, protocol stack, partition layout.
Implementation Write firmware in C using ESP-IDF APIs. Configure with menuconfig. Handle errors, edge cases, and reconnections.
Build, Flash, and Connect Flash via USB, connect to the network, and verify with real clients (browser, phone, MQTT explorer).
Hardening Error recovery, watchdog supervision, and connection resilience patterns you need for real deployments.
Lesson 1: ESP-IDF Toolchain and Dual-Core Architecture
ESP-IDF Toolchain and Dual-Core Architecture. Install ESP-IDF, understand menuconfig, partition tables, and the dual-core FreeRTOS model. Build an RGB mood lamp where one core runs color animations and the other handles serial commands. Build: RGB mood lamp. Parts: ESP32 DevKitC, RGB LED (common cathode), resistors.
Lesson 2: GPIO, Peripherals, and Driver Framework
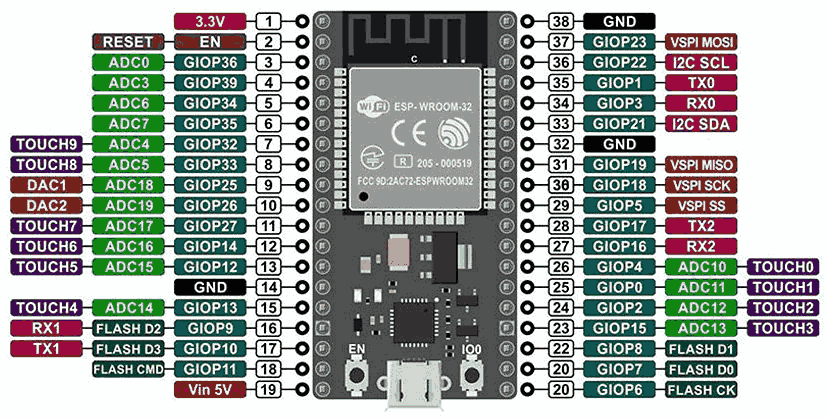
GPIO, Peripherals, and Driver Framework. Explore the GPIO matrix, LEDC PWM controller, pulse counter (PCNT), and RMT peripheral. Build a capacitive touch lamp dimmer using the ESP32’s built-in touch pins. Build: Capacitive touch lamp dimmer. Parts: Bright LED or small LED strip.
Lesson 3: Wi-Fi and Network Configuration
Wi-Fi and Network Configuration. Master the Wi-Fi driver: STA/AP/STA+AP modes, event model, SmartConfig provisioning, and scan capabilities. Build a Wi-Fi signal mapper that scans nearby access points and serves results as a webpage. Build: Wi-Fi signal mapper. Parts: No new parts.
Lesson 4: HTTP Server and REST API
HTTP Server and REST API. Build an HTTP server with RESTful endpoints, JSON parsing, mDNS discovery, and a responsive web UI served from SPIFFS. Build a browser-controlled thermostat with real sensor input. Build: Browser-controlled thermostat. Parts: DHT22 temperature/humidity sensor, relay module.
Lesson 5: MQTT and Cloud Communication
MQTT and Cloud Communication. Implement MQTT with QoS levels, TLS encryption, persistent sessions, and last will messages. Build a plant soil moisture monitor that sends alerts to your phone via a free MQTT broker. Build: Soil moisture monitor with alerts. Parts: Capacitive soil moisture sensor.
Lesson 6: Bluetooth Low Energy (BLE)
Bluetooth Low Energy. Implement GAP and GATT: advertising, scanning, services, characteristics, notifications. Handle BLE and Wi-Fi coexistence. Build a BLE environmental beacon that any phone can read. Build: BLE environmental beacon. Parts: Reuse DHT22.
Lesson 7: OTA Updates and Secure Boot
OTA Updates and Secure Boot. Configure OTA partition schemes, implement firmware rollback, enable flash encryption and secure boot v2, and sign firmware images. Build a remotely updateable sensor node. Build: OTA-updateable sensor node. Parts: Reuse existing.
Lesson 8: Power Management and Deep Sleep
Power Management and Deep Sleep. Master deep sleep modes, ULP coprocessor programming, RTC memory persistence, and multiple wake sources. Build a solar-ready weather node optimized for months of battery life. Build: Solar-ready weather node. Parts: 2xAA battery holder.
Lesson 9: Capstone: Connected Sensor Network
Connected Sensor Network Project. Combine everything: build a two-node system with an outdoor sensor (battery, deep sleep, MQTT publish) and an indoor display (OLED, always-on, MQTT subscribe). A complete IoT deployment. Build: Two-node sensor network. Parts: SSD1306 OLED (or reuse from prior courses).
| Part | Quantity | First Used | Approximate Cost |
|---|---|---|---|
| ESP32 DevKitC | 1-2 | Lesson 1 | $4-6 each |
| RGB LED (common cathode) + resistors | 1 | Lesson 1 | $0.50 |
| Bright LED or small LED strip | 1 | Lesson 2 | $1-2 |
| DHT22 temperature/humidity sensor | 1 | Lesson 4 | $2-3 |
| Relay module (5V, 1-channel) | 1 | Lesson 4 | $1 |
| Capacitive soil moisture sensor | 1 | Lesson 5 | $1-2 |
| 2xAA battery holder | 1 | Lesson 8 | $0.50 |
| SSD1306 OLED display | 1 | Lesson 9 | $3-4 |
Total estimated cost: $18-28 (with two ESP32 DevKitC boards for the capstone)
| Skill | Lessons 1-3 | Lessons 4-6 | Lessons 7-9 |
|---|---|---|---|
| Connectivity | GPIO, touch, Wi-Fi scan/connect | HTTP server, MQTT, BLE | OTA, deep sleep + wake, mesh |
| Protocols | FreeRTOS SMP, event loops | REST, MQTT QoS, GATT | TLS, secure boot, flash encryption |
| Power | Always-on | Wi-Fi power save | Deep sleep, ULP, battery budgeting |
| Production | menuconfig, partitions | Error recovery, reconnection | OTA rollback, firmware signing |
You should be comfortable with:
Helpful but not required:
Get an ESP32 DevKitC (or similar ESP32 development board with USB). For the capstone, a second board is ideal.
Install ESP-IDF following the official Getting Started Guide. Lesson 1 walks through the process.
Download the ESP32 Technical Reference Manual from Espressif (PDF) (datasheet). These cover every peripheral register and electrical specification.
Set up a Wi-Fi network you can connect to. A phone hotspot works if needed.
Start with Lesson 1. The course builds connectivity progressively, lesson by lesson.
Test with real clients. Use a web browser, phone BLE scanner app, and MQTT Explorer to interact with your builds.