The RP2040 is unlike any other microcontroller. Programmable I/O state machines let you implement custom hardware protocols in software. Two Cortex-M0+ cores give you real parallel processing. And it costs about 4 USD. This course focuses on what makes the Pico unique, not just another GPIO tutorial. Each lesson builds something that showcases these capabilities. #RaspberryPiPico #RP2040 #EmbeddedSystems
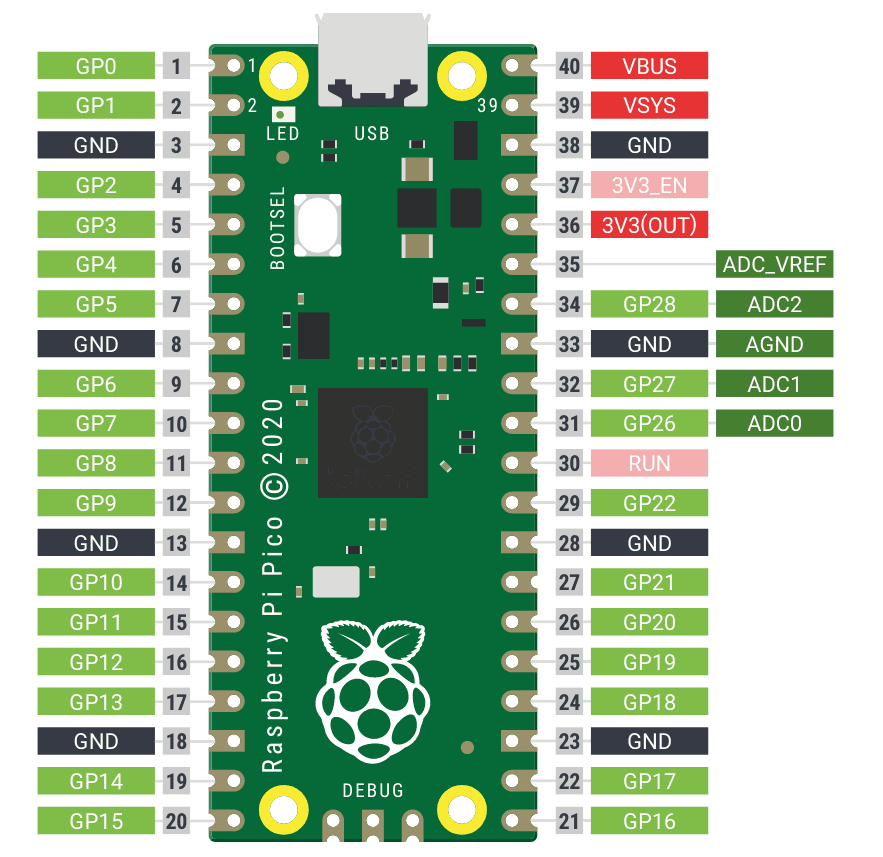
Keep the RP2040 Datasheet open as you work through this course. For the Pico board itself, the Raspberry Pi Pico Datasheet covers pinout, power supply, and mechanical drawings. The Pico W Datasheet adds CYW43439 wireless details for Lesson 8.
Why the RP2040?
PIO: Custom Hardware in Software
Programmable I/O state machines can implement WS2812B, VGA, UART, SPI, I2S, or any custom protocol without using CPU cycles. No other microcontroller in this price range offers anything like it. Lesson 3 teaches PIO assembly from scratch.
True Dual-Core
Two independent Cortex-M0+ cores with hardware FIFOs and spinlocks for synchronization. Run audio generation on one core and UI on the other. Lesson 4 covers multicore patterns in depth.
DMA That Chains
DMA channels with chaining, pacing timers, and ring buffer modes. Build pipelines where ADC feeds DMA feeds PIO with zero CPU involvement. Lesson 5 shows how.
C SDK and MicroPython
The Pico C SDK is clean, well-documented, and CMake-based. MicroPython runs natively with hardware access. Lesson 7 compares both approaches on the same hardware, so you know when to use each.
Course Structure
Each lesson follows a consistent cycle:
The Unique Problem
A project that specifically leverages RP2040 capabilities. Not generic embedded tasks, but things this chip does better than others.
RP2040 Architecture
How the relevant subsystem works: PIO instruction set, core interconnect, DMA channel architecture, USB PHY.
Implementation
Write firmware using the Pico C SDK (or MicroPython in Lesson 7). CMake build system, UF2 flashing.
Build and Demonstrate
Wire it up, flash via USB drag-and-drop or picotool, and verify the project works.
Performance Analysis
Measure timing, CPU usage, or throughput. Understand where the RP2040 excels and where it has limitations.
Lessons
Lesson 1: Pico SDK and RP2040 Architecture
Pico SDK and RP2040 Architecture. Install the Pico SDK, understand CMake build flow, dual Cortex-M0+ cores, bus fabric, and UF2 boot process. Build a USB text injector that types a predefined message when plugged in.
Build: USB text injector. Parts: Raspberry Pi Pico, micro USB cable.
Lesson 2: GPIO, PWM, and Analog I/O
GPIO, PWM, and Analog I/O. Explore GPIO functions, PWM slice architecture, the 12-bit ADC, on-chip temperature sensor, and hardware interpolators. Build an LED brightness controller with analog knob and serial feedback.
Build: LED brightness controller. Parts: LEDs, potentiometer, resistors.
Lesson 3: PIO: Programmable I/O State Machines
PIO: Programmable I/O State Machines. Learn PIO assembly from scratch: instruction set, state machine architecture, FIFOs, clock dividers, and sideset. Write a WS2812B LED driver entirely in PIO.
Build: WS2812B LED strip driver. Parts: WS2812B LED strip (8 pixels).
Lesson 4: Multicore Programming
Multicore Programming: Dual Core. Launch code on Core 1, communicate through hardware FIFOs, use spinlocks and shared memory safely. Build a dual-core synthesizer where one core generates waveforms and the other handles button input.
Build: Dual-core tone synthesizer. Parts: Piezo or small speaker, buttons.
Lesson 5: DMA and High-Speed Data Pipelines
DMA and High-Speed Data Pipelines. Configure DMA channels with chaining, pacing timers, and ring buffer modes. Build an audio sampler that captures microphone input via ADC+DMA and stores it to SPI flash.
Build: Audio sampler. Parts: Electret microphone module, W25Q SPI flash module.
Lesson 6: USB Device Classes
USB Device Classes. Use TinyUSB to implement HID, CDC, and MSC USB device classes. Build a custom USB gamepad with a joystick and buttons that appears as a standard HID controller on any PC.
Build: Custom USB gamepad. Parts: Thumb joystick module, 4 push buttons.
Lesson 7: MicroPython on RP2040
MicroPython on RP2040. Flash MicroPython, use the REPL, access hardware through the machine module, write PIO programs in Python. Rebuild a previous project in MicroPython and compare development speed vs performance.
Build: Rapid sensor dashboard (same hardware, fraction of the code). Parts: Reuse existing.
Lesson 8: Wireless with Pico W
Wireless Networking with Pico W. Use the CYW43 wireless driver for Wi-Fi and BLE connectivity. Set up network sockets, run a microdot web server, and serve a control interface. Build a Wi-Fi controlled NeoPixel display.
Build: Wi-Fi controlled NeoPixel display. Parts: Pico W (swap from Pico), reuse WS2812B.
Parts Kit
Part
Quantity
First Used
Approximate Cost
Raspberry Pi Pico
1
Lesson 1
~4 USD
Raspberry Pi Pico W
1
Lesson 8
~6 USD
Micro USB cable
1
Lesson 1
~1 USD
Breadboard + jumper wires
1 set
Lesson 1
3-5 USD
LEDs + 220R resistors
4
Lesson 2
~0.50 USD
Potentiometer (10K)
1
Lesson 2
~0.25 USD
WS2812B LED strip (8 pixels)
1
Lesson 3
2-3 USD
Piezo buzzer or small speaker
1
Lesson 4
~0.50 USD
Push buttons
4
Lesson 4
~0.50 USD
Electret microphone module
1
Lesson 5
~1 USD
W25Q SPI flash module
1
Lesson 5
1-2 USD
Thumb joystick module
1
Lesson 6
1-2 USD
Total estimated cost: 22-30 USD (including both Pico and Pico W)
Skill Progression
Skill
Lessons 1-2
Lessons 3-4
Lessons 5-6
Lessons 7-8
Architecture
Boot, GPIO, PWM, ADC
PIO assembly, multicore
DMA channels, USB PHY
MicroPython VM, CYW43
Unique Features
UF2 flashing, interpolators
PIO state machines, FIFOs
DMA chaining, ring buffers
PIO in Python, Wi-Fi
Projects
Text injector, LED control
LED strip driver, synth
Audio sampler, USB gamepad
Sensor dashboard, Wi-Fi display
Language
C (Pico SDK)
C (Pico SDK)
C (TinyUSB)
MicroPython, then C
Prerequisites
Embedded C experience required
You should be comfortable with:
C programming (pointers, structs, bit manipulation, basic CMake)