Industry Standard Architecture
ARM Cortex-M is the most widely used 32-bit microcontroller architecture. STM32 alone has over 1,000 part numbers across automotive, industrial, medical, and consumer markets. Learning STM32 opens doors everywhere.
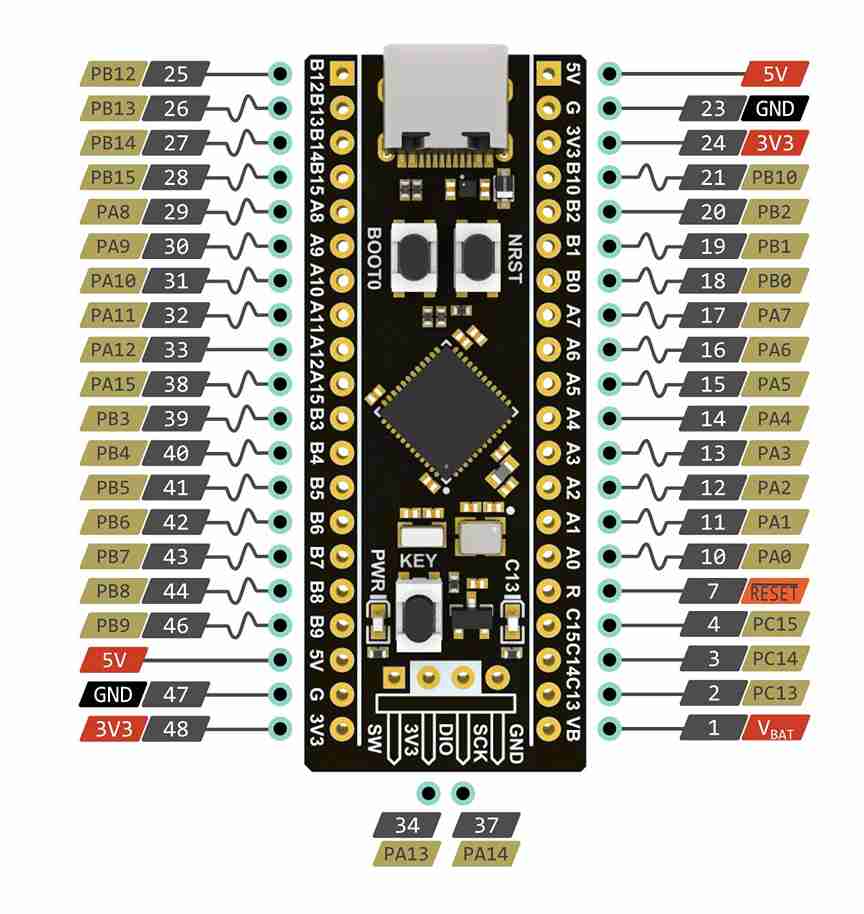
Step up from 8-bit AVR to 32-bit ARM Cortex-M. The STM32 family powers everything from consumer electronics to industrial controllers and medical devices. This course teaches you to program the STM32F103 (Blue Pill) using both HAL and direct register access, so you always understand what the abstraction hides. Each lesson builds a real project. #STM32 #ARM #EmbeddedSystems
Industry Standard Architecture
ARM Cortex-M is the most widely used 32-bit microcontroller architecture. STM32 alone has over 1,000 part numbers across automotive, industrial, medical, and consumer markets. Learning STM32 opens doors everywhere.
HAL and Registers, Side by Side
Every peripheral is taught two ways: first with STM32 HAL for productivity, then at the register level for understanding. You learn when to use each approach and why.
Real Debugging, Not printf
SWD/JTAG debugging with GDB, breakpoints, watchpoints, fault handler decoding, and ITM trace. Lesson 7 is an entire debug challenge. This is how professionals find bugs.
FreeRTOS Built In
Lesson 8 introduces real-time multitasking with FreeRTOS on STM32. Tasks, queues, semaphores, and mutexes in a practical context, not abstract theory.
Each lesson follows a consistent cycle:
The Project A real, useful thing to build. The project drives which peripheral concepts you need.
Architecture and Registers How this peripheral works in the STM32 reference manual. Clock enables, register maps, configuration bits.
HAL Implementation Build it first with STM32 HAL for a working baseline. Understand the CubeMX configuration.
Register-Level Insight See exactly what the HAL functions do under the hood. Rewrite critical sections at the register level.
Build and Debug Flash via SWD, test on real hardware, measure with logic analyzer or oscilloscope when relevant.
Lesson 1: STM32 Toolchain and ARM Architecture
STM32 Toolchain and ARM Architecture. Set up arm-gcc, OpenOCD, and STM32CubeMX. Understand Cortex-M3 architecture: vector table, startup code, linker scripts, CMSIS. Build a breathing LED that demonstrates precise clock configuration. Build: Breathing LED with HSE clock. Parts: Blue Pill, ST-Link V2, breadboard, LED.
Lesson 2: GPIO and Clock Tree Configuration
GPIO and Clock Tree Configuration. Master the RCC clock tree, AHB/APB buses, GPIO modes, and alternate functions. Build a rotary encoder menu system controlled through a serial terminal. Build: Rotary encoder menu system. Parts: KY-040 rotary encoder.
Lesson 3: Timers, PWM, and Input Capture
Timers, PWM, and Input Capture. Explore general-purpose and advanced timers: PWM generation, output compare, input capture, encoder interface. Build a servo-driven pan mechanism controlled by the rotary encoder. Build: Servo pan mechanism. Parts: SG90 micro servo.
Lesson 4: UART with DMA and Interrupts
UART with DMA and Interrupts. Configure USART with NVIC interrupt priorities and DMA channels. Implement circular buffers, idle line detection, and a command parser. Build an interactive command shell. Build: Interactive serial command shell. Parts: Reuse existing.
Lesson 5: SPI and I2C: HAL vs Register Level
SPI and I2C: HAL vs Register Access. Implement both protocols using HAL, then rewrite the drivers at register level. Compare code size, speed, and clarity. Build a sensor dashboard on OLED. Build: Sensor dashboard on OLED. Parts: SSD1306 OLED, BME280.
Lesson 6: ADC with DMA and Analog Watchdog
ADC with DMA and Analog Watchdog. Configure multi-channel ADC scanning with DMA transfers and analog watchdog thresholds. Build a voltage and current monitor with visual alerts. Build: Voltage/current monitor. Parts: INA219 current sensor module, potentiometer.
Lesson 7: Debugging with SWD and Fault Handlers
Debugging with SWD, GDB, and Fault Handlers. Master SWD debugging: breakpoints, watchpoints, register inspection, HardFault decoding, and ITM trace output. Receive intentionally buggy firmware and diagnose every fault. Build: Bug hunt challenge (5 bugs to find and fix). Parts: No new parts.
Lesson 8: FreeRTOS on STM32
FreeRTOS Fundamentals on STM32. Introduce real-time multitasking: tasks, queues, semaphores, mutexes, and priority management. Build a multitasking dashboard with sensor reading, display, and serial logging as separate tasks. Build: Multitasking sensor dashboard. Parts: Reuse existing.
Lesson 9: Low-Power and Production Firmware
Low-Power Modes and Production Firmware. Explore Stop/Standby modes, RTC wakeup, flash and option bytes, and bootloader basics. Build a battery-powered data logger that wakes periodically, logs to SPI flash, and sleeps. Build: Battery-powered data logger. Parts: CR2032 holder, W25Q SPI flash module.
| Part | Quantity | First Used | Approximate Cost |
|---|---|---|---|
| Blue Pill (STM32F103C8T6) | 1 | Lesson 1 | $2-4 |
| ST-Link V2 clone | 1 | Lesson 1 | $2-4 |
| Breadboard + jumper wires | 1 set | Lesson 1 | $3-5 |
| LEDs + 220R resistors | 2 | Lesson 1 | $0.50 |
| KY-040 rotary encoder | 1 | Lesson 2 | $1 |
| SG90 micro servo | 1 | Lesson 3 | $2 |
| SSD1306 OLED display | 1 | Lesson 5 | $3-4 |
| BME280 sensor module | 1 | Lesson 5 | $2-3 |
| INA219 current sensor module | 1 | Lesson 6 | $2 |
| Potentiometer (10K) | 1 | Lesson 6 | $0.25 |
| CR2032 battery holder | 1 | Lesson 9 | $0.50 |
| W25Q SPI flash module | 1 | Lesson 9 | $1-2 |
Total estimated cost: $20-30 (including Blue Pill and ST-Link)
| Skill | Lessons 1-3 | Lessons 4-6 | Lessons 7-9 |
|---|---|---|---|
| Architecture | Clock tree, GPIO modes, timers | DMA, NVIC priorities, analog | Fault handling, RTOS kernel, sleep modes |
| Approach | HAL + register exploration | HAL vs register comparison | FreeRTOS, production patterns |
| Debugging | Basic SWD flash | Serial + logic analyzer | GDB, breakpoints, fault decode, Tracealyzer |
| Hardware | LED, encoder, servo | OLED, sensors, current monitor | SPI flash, battery power |
You should be comfortable with:
Helpful but not required:
Get a Blue Pill board (STM32F103C8T6) and an ST-Link V2 clone. Together they cost under $8.
Install the toolchain: arm-none-eabi-gcc, OpenOCD, and STM32CubeMX. Lesson 1 covers setup on Linux, macOS, and Windows.
Download the STM32F103 reference manual (RM0008) from ST Microelectronics (PDF) (product page). This is your primary reference, covering every register in the chip.
Start with Lesson 1. Wire the ST-Link to the Blue Pill and flash your first program.
Work through lessons in order. Each builds on peripherals and patterns from previous lessons.