Protocol Fluency
MQTT, CoAP, and HTTP each have trade-offs in bandwidth, latency, battery, and reliability. You need to know when to use each and why. Lesson 1 benchmarks all three with the same sensor data so you can make informed decisions.
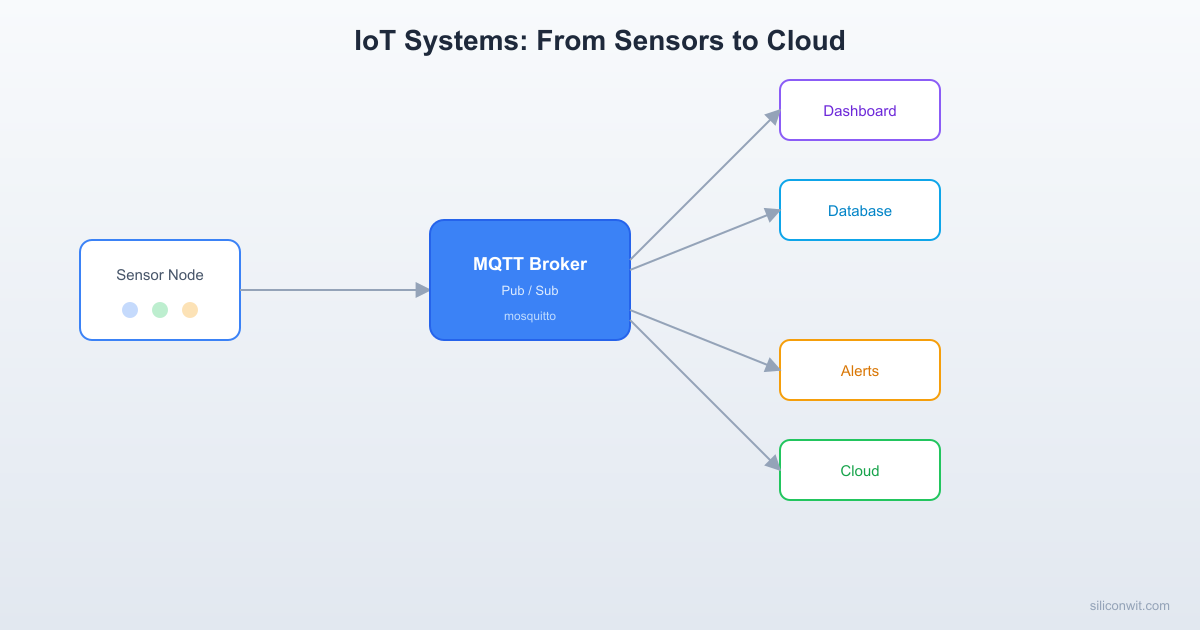
A sensor that only logs to serial is not an IoT device. IoT means the data reaches a broker, gets stored, triggers alerts, appears on dashboards, and drives decisions, whether the operator is in the next room or on another continent. This course teaches you to build that entire pipeline, from wiring up a microcontroller with sensors to deploying a production monitoring system with dashboards, alerts, and automation. #IoT #MQTT #ConnectedDevices
The embedded courses touched networking (ESP32 Wi-Fi, RPi Pico W, Embedded Linux MQTT bridge), but always as a side topic. Building a reliable, secure, production-grade IoT system requires its own set of skills:
Protocol Fluency
MQTT, CoAP, and HTTP each have trade-offs in bandwidth, latency, battery, and reliability. You need to know when to use each and why. Lesson 1 benchmarks all three with the same sensor data so you can make informed decisions.
Broker Infrastructure
A broker is the backbone of any MQTT system. You will set up Mosquitto from scratch with TLS, authentication, ACLs, and persistence. You will also connect to cloud platforms like SiliconWit.io, a connected operations platform that accepts MQTT connections and provides dashboards, alerts, automation, and REST API access. You will understand both self-hosted and managed options.
End-to-End Visibility
Raw sensor data is useless without visualization and alerting. You will build dashboards with Grafana and InfluxDB, configure threshold alerts that notify via email, SMS, or Slack, and design automation rules that act without human intervention.
Security From Day One
Most IoT tutorials skip security. This course dedicates an entire lesson to TLS, mutual authentication, certificate management, device provisioning, and firmware signing. Because an insecure IoT device is worse than no device at all.
Each lesson follows a consistent cycle:
The IoT Problem A real connectivity, data, or operations challenge. Not “blink an LED over Wi-Fi” but “build a dashboard that alerts you when a greenhouse sensor goes offline.”
Protocol and Architecture How the relevant protocol or pattern works: MQTT publish/subscribe, REST request/response, webhook push, TLS handshake.
Build and Configure Set up the infrastructure (broker, database, dashboard) and write the firmware and backend code.
Deploy and Test Flash MCUs, verify data flow end-to-end, simulate failures, and confirm recovery.
Production Considerations What changes at scale: connection pooling, message queuing, retry logic, monitoring, and cost.
Lesson 1: IoT Architecture and Protocol Comparison
IoT Architecture and Protocol Comparison. Survey IoT system architectures and compare MQTT, CoAP, and HTTP side by side. Send the same BME280 sensor data over all three protocols and measure bandwidth, latency, and power consumption. Build: Protocol comparison bench on ESP32. Parts: ESP32, BME280 (reuse).
Lesson 2: MQTT Broker Setup and Secure Connections
MQTT Broker Setup and Secure Connections. Install and configure Mosquitto with TLS, password authentication, and topic ACLs. Connect to both your self-hosted broker and the SiliconWit.io connected operations platform. Understand retained messages, last will, QoS levels, and persistence. Build: Production-ready Mosquitto broker with TLS. Parts: Raspberry Pi or any Linux machine.
Lesson 3: MQTT Clients on ESP32, Pico, and STM32
MQTT Clients on ESP32, Pico, and STM32. Write standard MQTT client firmware for three different MCU platforms. Design a consistent topic hierarchy, handle reconnection gracefully, and publish structured JSON payloads with QoS 1. Build: Three-MCU sensor network publishing to one broker. Parts: ESP32, RPi Pico W, STM32 + ESP01 (reuse).
Lesson 4: Real-Time Dashboards and Data Visualization
Real-Time Dashboards and Data Visualization. Store MQTT data in InfluxDB via Telegraf, build Grafana dashboards with live charts and gauges, and explore the SiliconWit.io dashboard as a managed alternative. Query historical data and export reports. Build: Grafana dashboard with live sensor data. Parts: No new hardware.
Lesson 5: REST APIs, Webhooks, and Device Integration
REST APIs, Webhooks, and Device Integration. Design RESTful APIs for device management and data retrieval. Implement webhook endpoints that receive real-time push notifications, validate payloads with HMAC signatures, and integrate with external services. Build: REST API server with webhook receiver. Parts: No new hardware.
Lesson 6: Alerts, Automation, and Rule Engines
Alerts, Automation, and Rule Engines. Configure threshold alerts that notify via email, SMS, Discord, Slack, and Telegram. Build automation flows with Node-RED that trigger actions based on sensor data. Compare self-hosted rule engines with the SiliconWit.io alert system. Build: Multi-channel alert system with automation flows. Parts: No new hardware.
Lesson 7: Device Security, TLS, and Provisioning
Device Security, TLS, and Provisioning. Generate and deploy X.509 certificates for mutual TLS authentication. Implement device identity and provisioning workflows. Secure firmware updates with signed images. Audit your IoT deployment against common attack vectors. Build: Mutual TLS connection with certificate provisioning. Parts: ESP32 (reuse).
Lesson 8: Production IoT Monitoring System
Production IoT Monitoring System. Combine everything from this course into a complete production system. Deploy multiple sensor nodes, a broker with TLS, a time-series database, live dashboards, automated alerts, and cloud forwarding. Handle node failures, broker restarts, and network outages gracefully. Build: Complete production IoT monitoring system. Parts: All reused from prior lessons.
No new hardware required. Everything is reused from the embedded courses.
| Part | Quantity | First Used | Notes |
|---|---|---|---|
| ESP32 dev board | 1 | Lesson 1 | Reuse from ESP32 course |
| RPi Pico W | 1 | Lesson 3 | Reuse from RPi Pico course |
| STM32 + ESP-01 (or STM32 with Wi-Fi) | 1 | Lesson 3 | Reuse from STM32 course |
| BME280 sensor module | 1 | Lesson 1 | Reuse |
| Raspberry Pi (any model) or Linux PC | 1 | Lesson 2 | For broker and dashboard hosting |
| USB webcam (optional) | 1 | Lesson 8 | Reuse from Embedded Linux course |
Total estimated cost: 0 USD (if you have components from prior courses)
| Skill | Lessons 1-2 | Lessons 3-4 | Lessons 5-6 | Lessons 7-8 |
|---|---|---|---|---|
| Protocol | MQTT vs CoAP vs HTTP, broker setup | Multi-MCU MQTT clients, topic design | REST API, webhooks, HMAC | Mutual TLS, X.509, provisioning |
| Infrastructure | Mosquitto, TLS, ACLs | InfluxDB, Telegraf, Grafana | Node-RED, webhook servers | Production deployment, monitoring |
| Data | JSON payloads, QoS levels | Time-series storage, queries | Automation rules, triggers | End-to-end pipeline, failover |
| Cloud | Self-hosted vs SiliconWit.io | Dashboard comparison | Alert channels, integrations | Full production system |
You should be comfortable with:
Helpful but not required:
Ensure you have an ESP32 and a BME280 sensor. Lesson 1 uses these to compare protocols. If you completed the ESP32 course, you already have both.
Set up a Linux machine for the broker. This can be your development PC, a Raspberry Pi, a VM, or a cloud VPS. Mosquitto, InfluxDB, and Grafana all run on any Linux distribution.
Create a free SiliconWit.io account. Go to siliconwit.io and register. SiliconWit.io is a connected operations platform that accepts MQTT connections and provides dashboards, alerts, automation, remote control, and REST API access. The free tier gives you 3 devices with 7-day data retention, enough for all lessons.
Start with Lesson 1. The protocol comparison gives you the mental model for every decision in the rest of the course.
Work through lessons in order. Each lesson builds on the infrastructure from previous lessons.